I remember the first time I decided to give my old deck a fresh coat of paint. I was excited—ready to revive my outdoor space and impress my neighbors. But midway through, I realized I had bitten off more than I could chew. The paint was streaky, drips were everywhere, and worst of all, I had skipped a crucial prep step that set everything back. Sound familiar?
If you’ve ever found yourself staring at a half-finished deck railings project, feeling frustrated and wondering where it all went wrong, you’re not alone. Painting deck railings might seem straightforward, but as I learned the hard way, there are tricks that can make the process smoother, faster, and result in a finish that lasts.
Today, I promise to share the *best approach* I’ve discovered over years of trial, error, and research. Whether you’re tackling your deck for the first time or trying to breathe new life into worn-out railings, you’ll learn how to avoid common pitfalls and achieve a stunning, professional-looking job.
Why Your Summer Deck Makeover Matters More Than You Think
Deck railings do more than frame your outdoor space—they define its style and safety. The right paint can protect those rails from the harsh summer sun, rain, and fluctuating temperatures. Did you know that properly painted and sealed railings can extend their lifespan significantly? According to home improvement experts, neglecting this maintenance can lead to rot, cracking, and safety hazards over time. Moreover, a freshly painted railing adds a pop of color and charm that makes gatherings more inviting.
But here’s the catch: *not all paints are created equal*, and the way you prepare your surface makes all the difference. When I initially skipped some key prep steps, I ended up double-coating and still faced peeling and uneven coverage in just a few months. It was a costly lesson—both financially and aesthetically.
So, are you wondering if you should just grab a brush and go? Or is there a smarter way to handle this project? Trust me, a little planning and the right products can transform what seems like a tedious chore into a satisfying weekend project. Want to avoid my mistakes? Keep reading.
Before we dive into the steps, I want to address a common skepticism: “Is painting my deck rails actually worth the time and effort?” Absolutely. Properly maintained and painted rails not only look better but also protect your investment. Plus, choosing the right products—like outdoor-rated paints designed for wood—can make all the difference. If you’re skeptical about the durability, check out the latest advancements in deck paint technology, which now offer better protection and longevity.
Now that we’ve established why this project shouldn’t be skipped, let’s go through the essential preparations and techniques that will make your summer deck makeover a success.
Clear the Surface and Remove Old Paint
Start by removing any peeling or flaking paint using a paint scraper or wire brush. For stubborn areas, a heat gun can help soften the old paint, making it easier to scrape away. During my first attempt, I neglected thorough removal, which led to uneven coverage and early peeling. Make sure the surface is clean, smooth, and free of debris to ensure proper adhesion of your new coat.
Sand the Rails to Achieve a Smooth Finish
Sanding is essential to create a uniform surface. Use medium-grit sandpaper (around 120 grit) to lightly sand the entire railing, focusing on rough spots or splinters. Afterward, switch to fine-grit sandpaper (around 220 grit) for a smooth finish. I once skipped this step, and the paint adhered poorly, resulting in an uneven look. Proper sanding acts like buffing a car—it prepares the surface for a flawless coat.
Key Tip
Wear a mask and goggles during sanding to protect against dust particles. After sanding, wipe the surface with a damp cloth to remove dust—this is crucial for paint to stick effectively, much like preparing a canvas before painting.
Apply a Masonry or Primer Sealant
Using a high-quality primer designed for outdoor wood greatly enhances durability. Choose a primer compatible with your paint (oil-based or latex), and apply evenly with a brush or roller. For my deck, I applied a primer that bonded well with both the old paint and the new topcoat, resulting in a longer-lasting finish. Primer acts as a barrier, sealing the porous wood, and providing a uniform base for the topcoat, akin to laying a foundation before building a house.
Choose the Right Paint for Weather Resistance
Select an exterior-rated acrylic or latex paint formulated for wood and UV resistance. Look for products with mildew inhibitors for added longevity. When I chose a high-quality outdoor paint, the deck rails withstood harsh summer rains and intense sun without peeling or cracking, saving me time and money. Remember, the right paint can be your best defense against the elements.
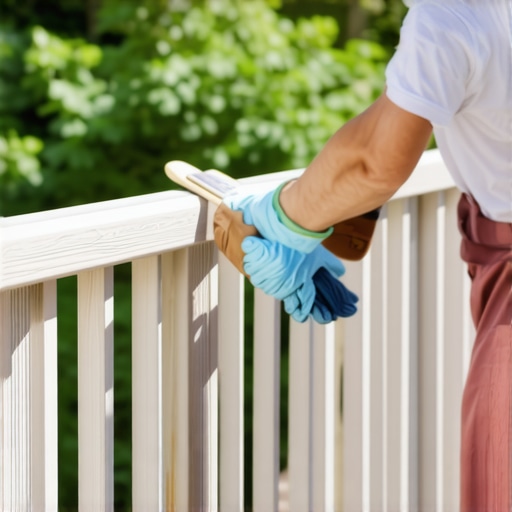
Use Proper Tools and Techniques
Apply paint with a high-quality brush or roller suitable for smooth surfaces. Use long, even strokes to minimize lap marks. For detailed areas, a brush will give you more control. I once tried spray painting, but overspray and uneven coats made a mess—manual application gives you better control, especially on intricate railings. Two thin coats are better than one thick coat; dry thoroughly between applications.
Maintain and Periodically Refinish
Once finished, inspect your rails periodically for signs of wear or damage. Touch up any chips or peeling spots promptly to prevent further deterioration. I learned this the hard way—leaving chips unaddressed can lead to rot and costly repairs down the line. Proper maintenance keeps your deck looking fresh and extends its lifespan, much like a routine skincare regimen.When it comes to decks in Needham, homeowners often focus on the aesthetic choices—colors, style, or materials—believing that these are the key factors to consider. However, a frequently overlooked aspect is the importance of local building codes and nuanced architectural adaptations. Contrary to popular belief, ensuring your deck complies with all local regulations isn’t just bureaucratic red tape—it’s essential for safety, longevity, and resale value.
Many homeowners assume that a reputable deck builder will automatically know all the local requirements. While experienced contractors are generally familiar with Needham’s building standards, the real mastery lies in the attention to the project’s specific nuances—such as the town’s recent updates to [building codes](https://deckbuildersneedham.com/hiring-a-needham-deck-contractor-avoiding-common-2026-scams). Neglecting these details might seem minor initially but can lead to costly revisions or even safety hazards down the line.
One common myth I encounter is that conforming to the minimum height or load requirements is sufficient. In practice, overlooking less obvious factors such as proper joist spacing, drainage considerations, or integrated lighting designs can compromise your deck’s integrity. For instance, incorporating [solar railing lights](https://deckbuildersneedham.com/solar-railing-lights-the-best-models-for-needham-decks-2026) without consulting local electrical codes or ensuring waterproofing can cause issues sooner than you might expect. Think of it like building a sturdy foundation—precision matters far beyond what the eye catches.