Ever since I stepped onto my deck and heard that awful crunch under my feet, I knew I was in for a problem. That sharp crack echoed not just through the boards but right into my worries about safety and value. It was a lightbulb moment—I realized my deck’s floorboards were splitting, and if I didn’t fix it, it could be the beginning of much bigger trouble.
Dealing with the Dreaded Deck Floorboard Splits
Splitting floorboards aren’t just an eyesore; they can be a safety hazard waiting to happen. Years ago, I neglected to address these cracks early on, thinking they were just superficial. That mistake cost me more time and money later because the splits worsened, allowing moisture to seep in and accelerate decay. Now, I make it a point to catch such issues early—and I want you to do the same.
Research shows that regular maintenance can extend the life of your deck by up to 30%. Properly identifying and fixing splits early prevents the need for costly replacements, and it keeps your outdoor space safe and inviting.
In this guide, I’ll share practical, proven methods to fix those split floorboards, so your deck remains sturdy and attractive. Whether you’re planning to host fall gatherings or just enjoy quiet evenings outside, caring for your deck now ensures you won’t face major surprises later.
Thinking about how to get started? Let’s dive into the common causes of splitting and the first steps to repair, so you can restore your deck’s beauty and safety.
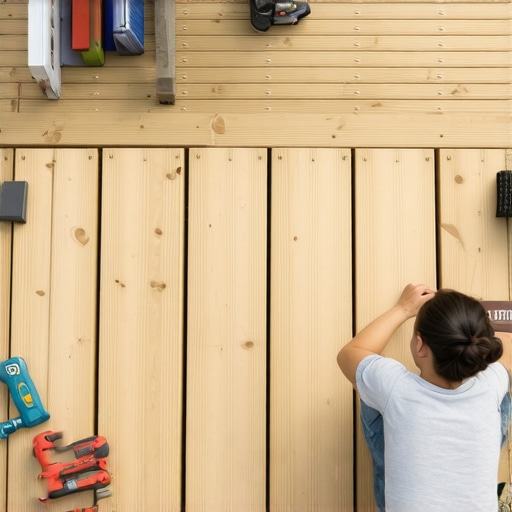
Assess the Damage
Begin by carefully inspecting your deck to identify all split boards. Use a pry bar to check for looseness or signs of further splitting. I once overlooked a small crack, assuming it was minor; months later, it expanded and caused a safety concern. Catching splits early prevents costly repairs down the line.
Gather Necessary Tools and Materials
Prepare a hammer, chisel, drill, deck screws, replacement boards, wood filler, and water-resistant sealant. Having everything on hand speeds up the repair process and minimizes delays. In my experience, using quality screws and sealant ensures longer-lasting results, especially in Needham’s varied weather conditions.
Remove the Damaged Board
Unscrew the split board carefully. Use a chisel to loosen it if screws are rusted or embedded tightly. Be cautious not to damage adjacent boards. I once used too much force, cracking a neighboring plank, which added extra work. Proceed slowly and methodically to preserve the surrounding material.
Prepare and Install the New Board
Cut the replacement board to match the original length. Treat the new wood with a waterproof sealant before installation. Position it in place, ensuring it aligns with existing boards. Secure it with deck screws, driving them at a slight angle to prevent wood splitting.
Fill Gaps and Seal Joints
If there’s any small gap or visible joint, apply a suitable wood filler or caulk. Follow up with a water-resistant sealant to protect against moisture and UV damage. Proper sealing is critical to avoiding future splits, especially in Needham’s humid seasons.
Finish and Protect
Sand any rough edges around the repair. Apply a deck stain or sealer that matches your existing finish. Regular maintenance will extend the life of your deck and prevent future issues. I recommend checking out maintenance tips for long-term preservation.
Review Safety and Building Codes
Ensure your repair complies with local safety regulations. For instance, confirm that railing heights and board spacing meet the 2026 standards in Needham, which can be verified on safety rules page. Staying compliant prevents fines and ensures your deck remains a safe gathering place.
Many homeowners believe that hiring a local deck builder means choosing the cheapest option or relying solely on online reviews. However, in my experience, the real nuance lies in understanding a builder’s specific expertise with local material conditions and code compliance. For example, Needham’s high humidity and temperature fluctuations demand specialized knowledge about moisture-resistant framing and fastening techniques. Overlooking this can lead to premature deck failure, even if the contractor appears reputable. An often-missed detail is a builder’s familiarity with the latest 2026 safety regulations, such as updated railing height requirements, which can affect permit approval and long-term safety. To avoid these pitfalls, I recommend vetting professionals not just on price but on their experience with recent local code changes and weather-resistant craftsmanship. It’s tempting to go for the lowest bid, but that usually means sacrificing quality and safety. Have you ever fallen into this trap? Let me know in the comments. Moreover, many assume that all materials are equally durable, but choosing the right composite or wood for Needham’s climate can double your deck’s lifespan. An expert who knows the nuances of material performance in different weather patterns will guide you toward options like fiberon or Trex, which are proven to withstand Needham’s seasonal shifts better than generic alternatives. Don’t miss the opportunity to collaborate with a builder who genuinely understands these intricate details; it can save you thousands and prevent headaches. For deeper insights, consider reviewing specialized resources, such as safety checklists to ensure your deck complies with new standards. Being aware of these hidden nuances means you can confidently select a contractor who elevates your project from average to outstanding, ensuring safety, durability, and aesthetic appeal in every season.
Keep Your Deck in Prime Condition with the Right Tools
Maintaining a durable, safe deck in Needham requires more than just the right materials; it demands the use of specialized, high-quality tools tailored for precision and efficiency. I personally swear by a cordless Milwaukee M18 orbital sander for periodic sanding jobs, especially before applying sealants or stains. Its variable speed control allows me to handle different wood types without damaging the surface, ensuring long-term protection. For cleaning, I prefer a gas-powered pressure washer with adjustable nozzles, such as the Simpson MegaShot, because it provides enough power to remove built-up grime without risking damage to delicate composite surfaces. When replacing boards or installing new fasteners, a Impact Driver like the DeWalt DCF887 offers the torque needed to drive screws efficiently, saving time and reducing hand fatigue.
Investing in quality tools pays dividends over time. For example, choosing a high-quality water sealant applicator, such as a Wagner FLEXiO 3000 HVLP paint sprayer, allows for a smooth, even coat that penetrates the wood, extending the deck’s lifespan. Proper application is critical; I recommend always using a sprayer in combination with a paintbrush for edges and tricky spots. Regular maintenance of these tools, including cleaning nozzles and changing worn-out parts, will ensure optimal performance season after season, especially through Needham’s humid summers and cold winters.
How do I maintain my deck tools over time?
To keep your deck maintenance tools performing at their best over time, clean them thoroughly after each use—especially pressure washers and sprayers—and store them in a dry, sheltered space to prevent rust and corrosion. Regularly inspect electrical cords and replace any worn or damaged parts immediately. Lubricate moving parts periodically with manufacturer-approved oils, like WD-40, to keep everything operating smoothly. When it comes to power tools, replace batteries before they lose their capacity to ensure consistent power during projects. By maintaining your equipment well, you’ll have reliable tools ready for every big repair or upgrade, making the process more efficient and less stressful.
Looking ahead, innovations like smart spray systems with adjustable nozzle patterns and battery innovations are transforming DIY deck maintenance, making it faster and more precise. For those serious about preserving their decks, I suggest exploring advanced tools like the Bosch Power Max Cordless Powerwasher, which combines strength with portability, perfectly suited for Needham’s varied outdoor spaces.
Lastly, always stay updated on the latest trends and tools by checking out resources like maintaining your wood deck for maximum longevity. Including professional-grade equipment in your toolkit ensures your deck remains a safe, stunning centerpiece of your home year after year. Don’t hesitate to try out a high-end sprayer or impact driver next time you plan a maintenance project — the improved efficiency and finish are worth the investment.

Corral Your Hidden Pitfalls Before They Catch You Off Guard
One of the most eye-opening lessons I learned was how overlooked details, like the type of fasteners used or the grain direction of wood, could make or break a deck repair. I once replaced a board only to realize the new fasteners caused uneven sinking and future splits. It’s a reminder that paying attention to the intricacies—like moisture levels and seasonal expansion—helps you prevent problems instead of just fixing them later.
The Breakthrough Tools That Saved My Weekend
Investing in the right equipment changed my approach entirely. I found that a good quality impact driver, paired with weather-resistant sealants and a moisture meter, made all the difference. These tools don’t just make the job easier—they ensure longevity and safety, especially when facing Needham’s unique climate swings. Every DIYer should prioritize a reliable moisture meter to catch issues before they become costly headaches.
Let Your Deck Be Your Inspiration for Action
Now that I’ve embraced routine inspection and the right techniques, I see my deck not just as an outdoor feature but as a reflection of care and craftsmanship. Don’t let small cracks turn into big hazards. Take that first step today—whether it’s fixing a split or applying a fresh sealant. Your deck is worth it, and so are you. Ready to make your outdoor space safer and more inviting? Share your experiences or questions below, and let’s build something better together.