It was a crisp spring morning when I stepped onto my deck, only to hear that dreaded cracking sound beneath my feet. A split board! That lightbulb moment hit hard—I realized my beautiful outdoor retreat was slowly falling apart. Like many homeowners in Needham, I’d overlooked the small issues that can escalate into costly repairs. But I learned the hard way that addressing split deck boards early is crucial—not just for aesthetics, but for safety too.
Today, I’m here to share a straightforward, proven approach to repairing those pesky splits. No more scrambling to find the right pro or wasting money on unnecessary replacements. With my tips, you’ll be empowered to fix your deck confidently, saving time and cash in 2026.
Don’t Let Your Deck Fall Apart—Fix It Now
Split deck boards can seem minor, but they’re often a sign of underlying problems like excessive moisture, age, or improper installation. Left unchecked, they can become safety hazards, with boards weakening and even breaking under weight. Plus, the appearance of a cracked board can drag down your entire outdoor vibe. My personal experience taught me that catching cracks early allows you to repair efficiently, often with simple tools and materials. This way, you preserve your deck’s integrity and extend its lifespan. If you’re worried about leaving repairs to an expert, trust me—many small fixes are well within a DIYer’s reach, especially with guidance from seasoned enthusiasts available at places like [Needham’s top deck contractors](https://deckbuildersneedham.com/needhams-best-deck-contractors-for-historic-homes) to avoid common pitfalls. I’ll walk you through the essential steps to tackle split boards today, so you can enjoy a safe, beautiful deck once again.
Is Repairing Deck Boards Actually Worth the Hype?
Honestly, I used to think replacing entire sections was the only solution. But early on, I made the costly mistake of believing every crack meant total replacement. What I didn’t know was that many splits are superficial and fixable with a bit of TLC. According to industry experts, proper maintenance—like sealing and timely repairs—can double a deck’s lifespan. For instance, [proper sealing techniques](https://deckbuildersneedham.com/how-to-stop-your-needham-deck-from-rotting-this-winter) prevent moisture intrusion that causes splits. So, yes—repairing split boards is absolutely worth the effort, especially if you’re aiming for budget-friendly longevity. Now, let’s get into the practical steps that will make your repair seamless rather than stressful.
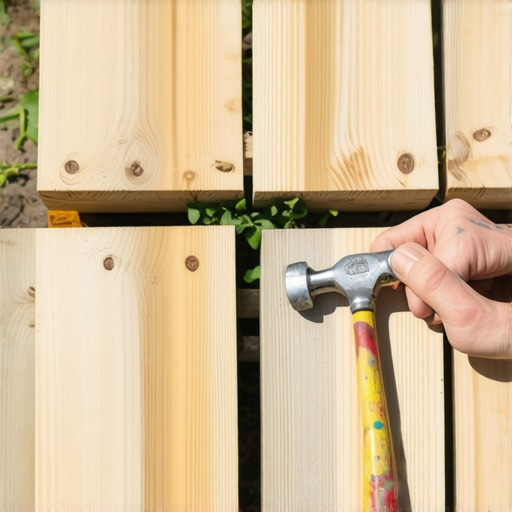
Assess the Damage and Gather Supplies
Begin by inspecting your deck closely, looking for splits that are superficial or deep. I once discovered a small crack on an area seldom walked, which turned out to be a superficial split easily fixable. For tools, you’ll need a circular saw or handsaw, a hammer, deck screws, wood filler or epoxy resin, sandpaper, and protective gear like gloves and eye goggles. Grab the necessary materials, ensuring they match your deck’s wood type and color for a seamless repair. Having everything ready before starting saves time and prevents multiple trips to the store. Remember, durability is key—use high-quality screws and sealants to extend your repair’s lifespan.
Prepare the Area for Repair
Clear the deck section around the split, removing furniture, plants, and debris. Use a cleaner and a wire brush to scrub the damaged area gently, removing mold or old stain. If the split is deep, consider cutting away the damaged section with a circular saw—like trimming a bad branch from a tree to promote healthy growth. This step ensures that the repair material adheres properly and looks neat. Don’t forget to sand the edges of the cut to smooth out roughness, preventing splinters and providing a better bonding surface.
Secure and Fix the Split
Apply an epoxy resin or wood filler into the crack, pushing it deep with a putty knife until it’s level with the surface. I once fixed a split in my back porch using epoxy—it was messy at first, but the result was a nearly invisible repair. Clamp the split boards together if possible, tightly securing them for at least 24 hours to allow the filler to cure fully. For superficial splits, screwing through the board on either side strengthens the structure—drill pilot holes first to prevent further splitting. Loosely fitting the screws will provide flexibility for natural expansion and contraction due to weather. Always pre-drill to avoid splitting the wood further.
Finish the Repair and Protect
Sand the repaired area smoothly, blending it with the surrounding deck surface. Apply a weatherproof sealant or stain compatible with your deck’s finish—this step is vital in preventing future moisture intrusion, a common cause of splits. I recommend checking out How to stop your Needham deck from rotting this winter for more sealing tips. Allow the sealant to dry thoroughly before replacing furniture or foot traffic. Maintaining your deck with regular inspections and prompt repairs extends its life significantly, saving you money in the long run. Remember, a well-maintained deck isn’t just about appearance—it’s about safety and peace of mind.While many believe they fully understand what it takes to build or repair a deck, there are subtle nuances that often go unnoticed, leading to costly mistakes or underwhelming results. One common myth is that choosing premium materials alone guarantees longevity; however, your project’s success hinges not just on material quality but also on mastery of installation and maintenance techniques. For example, expert deck builders in Needham understand the importance of proper flashing and sealing strategies—details that significantly impact durability and safety, as highlighted in recent studies on moisture intrusion and wood decay.
Many homeowners underestimate the significance of understanding local climate influences on decking choices. A deck built without considering Needham’s humid winters and seasonal temperature swings can suffer accelerated deterioration, even with high-end materials. This oversight often results in premature rot or splitting, emphasizing the need for tailored solutions rather than one-size-fits-all approaches.
Beware of the trap of over-relying on DIY fixes for structural issues. While DIY can be satisfying and cost-effective for minor repairs, advanced problems—like compromised joists or subtle foundational shifts—require professional assessment. Attempting to fix these without expertise can lead to safety hazards or costly rebuilds. As I’ve learned from collaborating with top local contractors, early professional intervention preserves both safety and value in your Needham deck.
Ever wondered why some decks edge closer to collapse despite appearing sound? The answer often lies in hidden structural flaws—such as improperly installed ledger boards or overlooked drainage problems—that aren’t immediately visible. Consulting experienced Needham deck contractors for periodic inspections can reveal these issues early. For insights into common red flags during deck assessments, check my guide on [red flags to watch for](https://deckbuildersneedham.com/needhams-best-deck-contractors-for-historic-homes).
Make no mistake, understanding these nuanced aspects of deck building and repair is critical. By engaging with seasoned professionals and paying attention to local conditions, you ensure your deck remains a safe, attractive space for years. It’s about more than just appearance; it’s about building confidence and longevity. Have you ever fallen into this trap? Let me know in the comments and share your experience. For a happier, safer backyard, consider these advanced insights next time you plan your deck project.Maintaining a deck that stands the test of time requires more than just good intentions; it demands the right tools, consistent care, and a clear understanding of long-term strategies. As a Needham homeowner aiming to keep your outdoor retreat safe and beautiful, investing in quality equipment and adopting effective methods is essential.
Smart Tools for Deck Maintenance and Repairs
One of my go-to tools is a cordless oscillating multi-tool. I use it extensively for detailed sanding and removing old sealants around tight corners—its versatility saves me time and reduces frustration. For larger surface prep, a cordless rotary sander with variable speed control provides smooth finishes without damaging the wood. I prefer models with dust collection systems, like the Makita XOP02Z, because they keep my workspace cleaner and the air healthier. When dealing with deep cracks or rotten boards, a reciprocating saw with a fine-tooth blade helps me make precise cuts without risking further damage. Remember, high-quality tools may be an initial investment, but they pay off through durability and efficiency, especially when performing routine maintenance or emergency fixes.
For inspection, a good moisture meter such as the Wagner Meters MMC220 can detect hidden rot before it becomes structural. It’s particularly valuable in climates like Needham’s, where seasonal moisture fluctuation accelerates decay. Adding a checklist app on your phone, like Todoist, helps me stay organized with routine inspections and scheduled upkeep tasks. Automation and reminders streamline proactive maintenance, preventing small issues from snowballing into costly repairs.
Software and Resources That Keep You Ahead
Beyond physical tools, software platforms like iFixture or SketchUp let me plan repairs visually. They help in calculating wood quantities accurately and choosing colors or materials that match my existing deck. Staying informed through sites like [Needham’s best deck contractors](https://deckbuildersneedham.com/needhams-best-deck-contractors-for-historic-homes) and industry blogs keeps me updated on emerging trends, such as the shift toward synthetic materials that require less upkeep and last longer—see the recent [comparison of Trex and TimberTech](https://deckbuildersneedham.com/trex-vs-timbertech-2026-needham-performance-test). Using these insights, I can better schedule upgrades and decide when to switch to low-maintenance composites.
Developing a Maintenance Routine That Works
Consistency is key in preserving your deck’s integrity. I recommend inspecting your deck at least twice a year—preferably in spring and fall—to catch early signs of wear like loose screws or surface splinters. Cleaning with eco-friendly deck wash solutions prevents mold and mildew without damaging the wood. Applying sealants or stains every two to three years, based on weather exposure, keeps moisture out—boosting longevity. To optimize your efforts, consider integrating smart lighting or privacy screens, which not only elevate aesthetics but also reduce physical wear in high-traffic areas. Regular upkeep might seem tedious, but the payoff is a deck that remains inviting and safe for years to come.
What’s the Future of Deck Maintenance?
Looking ahead, automation and smart technology will likely revolutionize how we care for outdoor spaces. Imagine sensors that monitor moisture levels real-time, alerting you when repairs are needed before damage occurs. Innovations like UV-resistant coatings and self-healing materials are also on the horizon, promising less time and money spent on maintenance. Staying ahead of these trends requires adopting a proactive mindset now—so start experimenting with tools like moisture meters or automatic cleaners to see immediate benefits.
For anyone serious about keeping their deck in top shape, I advise trying out a digital maintenance tracker combined with quality inspection tools. Not only will this simplify routine inspections, but it also ensures lasting safety and beauty. Don’t wait for visible damage—be like a seasoned pro and embrace these advanced strategies today. And remember, if you notice signs of decay, consulting expert [red flags to watch for in Needham](https://deckbuildersneedham.com/needhams-best-deck-contractors-for-historic-homes) early can save you significant time and expense—making now the perfect time to get started.
What I Didn’t Expect to Learn About Deck Repairs
One of the most valuable insights I gained was realizing that many superficial cracks are not worth panicking over. I used to think every split meant a major overhaul, but quick, targeted repairs can often extend your deck’s life significantly. Another lesson was understanding the importance of local climate—in Needham, seasonal moisture swings demand materials and maintenance routines tailored to our environment. Lastly, I discovered that engaging with seasoned professionals early on can prevent small issues from snowballing into costly disasters, saving both time and money in the long run.
Tools and Resources That Changed My Repair Game
My go-to toolkit now includes a reliable moisture meter from Wagner, which helps me catch hidden rot early. For planning and visualization, SketchUp has been invaluable in ensuring my repairs match the existing deck design. I also swear by the comprehensive guide on needham’s best deck contractors—their expertise helps me identify red flags before kickstarting any project. Lastly, staying updated with industry trends via blogs like DeckBuildersNeedham keeps me informed about durable, low-maintenance materials like synthetic decking that are perfect for our climate.
Embrace the Challenge and Build Confidence
Taking on deck repairs might seem daunting, but with the right knowledge and tools, you can become your own project hero. Focus on small, manageable fixes—like sealing cracks or replacing split boards—and soon enough, you’ll develop a sense of mastery that makes future maintenance feel less like a chore and more like a fulfilling task. Remember, your outdoor space is an extension of your home, and investing effort now will pay off with safety, beauty, and peace of mind for years to come. Ready to turn your deck into a showcase of pride? Share your thoughts or ask questions below—I’d love to hear about your repair journey.