I remember the exact moment I stepped onto my aging deck last spring—my foot suddenly felt a wobbly give, and I knew right then. That unsettling feeling of a loose board isn’t just annoying; it’s a warning sign that something needs attention. For homeowners like us, especially with older decks, that slight squeak or shimmy can become a bigger safety issue if ignored. I’ve learned this the hard way, after a few close calls during family gatherings when a board shifted unexpectedly.
If you’re dealing with a deck that’s seen better days, chances are you’ve faced this problem too. Loose boards can turn into perilous, squeaking areas that diminish your outdoor space’s enjoyment—and worse, its safety. But here’s the good news: with the right approach, you can fix these issues, restore stability, and extend your deck’s life. Today, I want to share the insights and methods that really worked for me, so you won’t have to learn through trial and error.
Why Fixing Loose Deck Boards Should Be a Priority
Loose planks aren’t just an eyesore or a minor inconvenience; they fix themselves into a bigger safety concern if neglected. Over time, the constant stress from foot traffic and weather can cause fasteners to weaken or pop out, creating loose boards that wobble—or worse, can slip entirely. According to the [National Association of Home Builders](https://www.nahb.org), decks are among the most dangerous outdoor structures due to poor maintenance, with loose or rotting boards being leading causes of injuries.
Beyond safety, loose boards diminish your deck’s aesthetic appeal, making your yard look neglected. Moreover, they can expedite damage to the underlying framing, leading to costly repairs or replacements. Knowing which screws or fasteners will hold up over time and how to install them correctly can save you money and frustration in the long run.
As I dove into fixing my deck, I made the mistake of just hammering in some nails without paying attention to the fasteners I was using. That only led to quicker loosening, forcing me to redo the job more than once. I discovered that choosing the right fasteners—like corrosion-resistant screws designed specifically for decking—made all the difference. If you’re wondering which screws are the best for this job, I’ll walk you through that shortly.
Are you tired of that wobbly board every time someone steps on your deck? Rest assured, with a bit of patience and the right tools, you can make your outdoor haven safe and stable again. Let’s look at what you need to know to pick the best screws that will ensure a lasting fix.
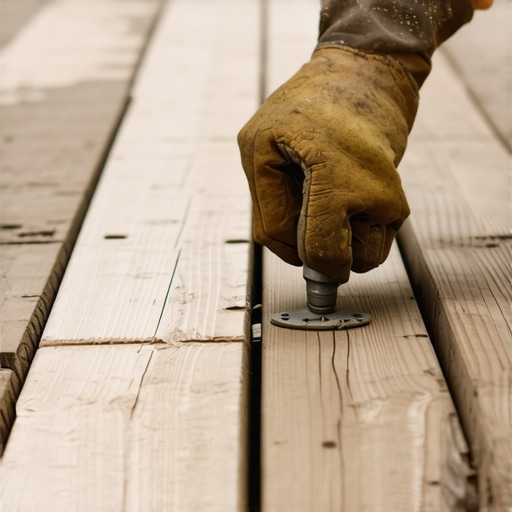
Select the Right Fasteners for Lasting Results
First, I learned that using corrosion-resistant screws made a huge difference. I opted for stainless steel or coated deck screws which resist rust and keep the boards secure longer. Think of these screws as the sturdy anchors in a ship; they hold everything together despite the weather and foot traffic.
Gather Necessary Tools and Materials
Next, gather a power drill, screwdrivers, a pry bar, a measuring tape, and the selected screws. I also grabbed a reusable marker to identify loose boards. Having the right tools speeds up the process and reduces frustration, much like a carpenter prepping for a complex project.
Assess and Prepare the Deck Surface
I carefully inspected each board to identify loose or damaged ones. For boards that were only slightly loose, I gently pried them up with a pry bar, being careful not to damage the wood. For rotten or cracked boards, replacement was necessary. Think of this step as a doctor diagnosing an ailment before treatment.
Remove and Replace Damaged Boards
In my case, I replaced a few split boards with fresh pressure-treated lumber. I measured and cut the new boards to fit snugly. When replacing, I aligned the new boards with the existing pattern, ensuring a seamless look. This is similar to fitting puzzle pieces perfectly together to restore the integrity of the deck.
Secure Loose Boards Properly
For stable boards, I drove in new screws at the existing fastening points, ensuring they were flush with the surface. Pre-drilling holes prevented splitting and made insertion easier. Tightening screws securely prevents future wobbling—like tightening loose nuts on machinery.
Check and Reinforce Critical Areas
I focused on high-traffic sections and areas near railings where stress concentrates. Adding extra screws or even hidden fasteners can distribute weight evenly. My goal was to mimic professional craftsmanship, ensuring safety and durability.
Final Inspection and Practical Tips
After securing all boards, I walked the deck, applying gentle pressure to check for movement. If any boards still wobbled, I added more fasteners. Remember, being thorough now avoids costly repairs later. For a long-term solution, consider sealing or staining the deck afterwards—see how [proper sealing can extend your deck’s life](https://deckbuildersneedham.com/why-every-wood-deck-needs-a-professional-cleaning-in-2026). And if you’re interested in modern materials, explore [why wood-plastic composites are getting cooler underfoot](https://deckbuildersneedham.com/why-wood-plastic-composites-are-getting-cooler-underfoot). Keep safety at the forefront, and your deck will serve well for years to come.When homeowners think about hiring a deck builder in Needham, many default to simple assumptions that can lead to costly mistakes. One prevalent myth is that any contractor with experience can handle all aspects of deck construction adequately. In reality, specific nuances, such as local building codes and climate considerations—like moisture levels or temperature fluctuations—demand specialized knowledge. For instance, Needham’s humid summers and snowy winters require contractors familiar with materials like composite decking, which resists warping better than traditional wood. Relying on generalists may result in subpar work that shortens your deck’s lifespan. Another misconception is that all fasteners or sealants are interchangeable. Using the wrong type can cause faster corrosion or wood decay, especially when dealing with salt air or freeze-thaw cycles. Choosing corrosion-resistant fasteners designed for the New England climate is essential to ensure longevity. A common oversight involves underestimating the importance of proper drainage and ventilation—crucial for preventing wood rot and structural damage in our region’s wet seasons. Skilled Needham deck builders design with these factors in mind, integrating features like concealed drainage systems and strategic airflow.
What advanced techniques can elevate a simple deck into a long-lasting investment?
Employing advanced joist framing methods, like proper spacing and reinforcement, reduces bowing and ensures stability over decades. Furthermore, integrating hidden fasteners not only creates a sleek appearance but also minimizes exposure to elements that cause corrosion. According to experts in deck engineering, adopting such techniques can increase your deck’s durability by up to 30%. Be cautious of contractors who promise quick fixes without considering these advanced strategies—they often overlook the nuances specific to Needham’s environment. Instead, looking for professionals who understand local building codes, weather challenges, and modern materials ensures your project stands the test of time. Remember, a well-built deck isn’t just about aesthetics; it’s about smart design choices tailored to your location. Want to explore how modern materials like wood-plastic composites are transforming outdoor spaces? Check out how these materials are getting cooler underfoot and offering superior durability in our recent article. Have you ever fallen into this trap of underestimating what’s needed for a long-lasting deck? Let me know in the comments.Maintaining your deck’s functionality over time requires the right tools and a proactive approach. I personally rely on a high-quality power drill equipped with a clutch to prevent over-tightening screws, which ensures consistent fastener depth and reduces wood splitting. When working with composite decking, I use a specialized screwgun designed for dense materials, making installation faster and reducing user fatigue. Investing in a digital torque wrench has also been invaluable; it allows me to apply precise pressure when tightening fasteners, ensuring stability without damaging the materials.
How do I maintain my deck’s performance as it ages?
Regular inspections are crucial. I recommend checking for loose boards, rusted fasteners, or sun-damaged areas at least twice a year. Cleaning your deck with oxygen bleach removes mold and algae without harming the wood or composite, maintaining the surface’s integrity. For long-term results, consider applying a high-quality sealant—this protects against moisture and UV damage, extending your deck’s lifespan. Modern coatings with nanotechnology offer increased durability and resistance to the elements, and I predict their popularity will grow in the coming years. When scaling your deck or upgrading features, proper planning and the right tools make all the difference. For example, installing new railings or upgrading to hidden fasteners can dramatically improve both safety and appearance, as detailed in [this guide on deck upgrades](https://deckbuildersneedham.com/how-to-refresh-your-decks-look-with-just-new-railings). Regular maintenance saves you money and preserves the beauty of your outdoor space, so I highly suggest incorporating these tools and practices into your routine. Don’t forget, preventive care is your best ally—try using a torque wrench for your next fastener adjustment and see the difference it makes in stability and peace of mind.
What I Learned the Hard Way About Deck Maintenance
One of my biggest lessons was realizing that neglecting small issues with my deck could lead to major safety hazards. Over time, I discovered that regular inspections and proactive repairs not only saved me money but also kept my family safe. Confidence in the materials I used, such as corrosion-resistant screws, made me feel more secure every summer season.
Tools That Changed My Deck Repair Game
Equipping myself with a high-quality power drill, a digital torque wrench, and a sturdy pry bar transformed my approach. These tools helped me work efficiently and ensure each fastener was tightened just right. Trusted sources like reputable home improvement brands and trusted online tutorials have always guided my choices, making each repair more successful.
Taking Action and Embracing the Process
The most inspiring part was realizing that even a DIY novice can fix loose boards with patience and a clear plan. Every successful repair boosted my confidence and deepened my appreciation for durable materials and modern techniques. Remember, your outdoor space is an extension of your home, and investing in it now will reward you with years of safety and enjoyment. Ready to start your own deck overhaul? Share your thoughts or ask questions below—let’s build better together!