It was a chilly Saturday morning when I stepped out onto my backyard deck and felt that unsettling wobble beneath my feet. That sinking, creaky sensation was my lightbulb moment—my deck’s joists, the backbone of my outdoor oasis, had started to sag. Talk about a wake-up call! I realized then how dangerously overlooked this issue could be. If you’ve noticed your deck sloping, squeaking, or just looking less sturdy, you’re not alone—and more importantly, you’re not helpless.
Why Fixing Sagging Deck Joists Matters Now More Than Ever
When I first noticed my deck’s uneven surface, I thought, ‘Maybe it’s just the new furniture settling in.’ But as days passed, the problem worsened. Sagging joists can compromise your deck’s safety and raise property value concerns. In older neighborhoods like Needham, many decks are built with traditional materials that are prone to decay over time, especially if not properly maintained. Neglecting this can lead to catastrophic failure,
dangerous for family gatherings or quiet evenings with friends.
Did you know that structural issues like these are among the leading causes of deck failures in residential properties? According to the *American Wood Protection Association*, untreated or poorly maintained wooden joists are especially susceptible to rot, insect damage, and warping—issues that can cause serious accidents if ignored.
Early in my fix-it journey, I made the mistake of trying to patch the surface without addressing the deeper structural concerns. That was a rookie mistake. Now, I want to guide you through the pro-active steps I wish I knew back then, so you can restore your deck’s stability and confidence.
Are you facing this exact problem on your Needham deck? If so, keep reading. We’ll go through practical, step-by-step solutions to repair or replace sagging joists, ensuring your outdoor space is safe, beautiful, and ready for seasons to come.
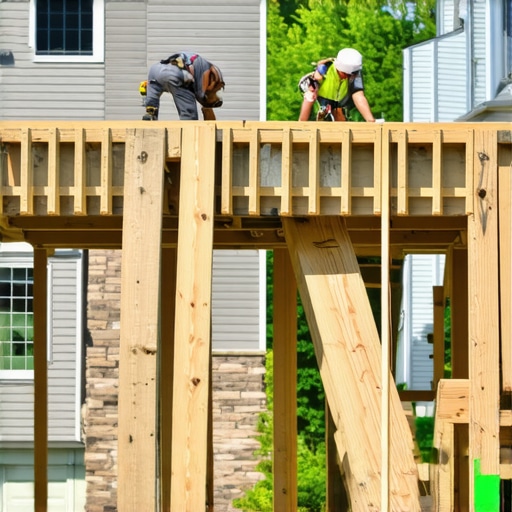
Assess the Damage and Prepare Your Workspace
Start by carefully inspecting your deck to identify which joists are sagging or compromised. Use a level and a measuring tape to gauge the extent of the sagging at each point. Clear the area beneath the deck to create a safe workspace—remove any furniture, plants, or debris. Wearing safety gear is essential—gloves, safety glasses, and a dust mask if needed. During my last repair, I discovered a severely rotting joist and made sure to mark all weakened supports for replacement.
Remove Damaged Joists and Hardware
Cutting out the damaged joist is like removing a broken link in a chain. Use a reciprocating saw to carefully cut through nails or screws securing the joist to the ledger and beam. Make sure to support adjacent joists temporarily to prevent further sagging during removal. When I replaced my broken joist, I found that simple hand tools weren’t enough—power tools made the process quicker and safer. Keep the removed pieces for reference or recycling.
Choose and Prepare Replacement Materials
Select new joists that match the original size and material—pressure-treated lumber is often best for durability outdoors. Check out the [best pressure-treated wood brands in Needham for 2026](https://deckbuildersneedham.com/best-pressure-treated-wood-brands-in-needham-for-2026) for guidance. Cut the new joist to length, adding a few extra inches for fitting. Ensure the ends are smooth and free of splinters. Personally, I always double-check the measurements; a slight miscut now means more work later.
Install the New Joist Securely
Position the new joist into place, aligning it precisely with neighboring joists and supports. Use galvanized nails or lag bolts to fasten the joist to the ledger board and beam—tighten securely to prevent future wobbling. Clamps can hold the joist steady while you work. I learned this the hard way—failing to properly secure a joist led to more sag later. For added stability, consider sistering the new joist with an existing one to share the load.
Strengthen and Reinforce the Deck Structure
After installing the new joist, double-check the overall levelness of the deck surface. Use shims or additional supports where necessary. Apply a weather-resistant sealant or stain to the new wood to promote longevity and prevent future rot. Regular maintenance is key—consider updating your deck’s look with modern rails or low-maintenance decking options, which can be found at [updating old railings for a modern Needham look](https://deckbuildersneedham.com/updating-old-railings-for-a-modern-needham-look). This proactive approach not only repairs existing problems but also extends your deck’s lifespan.
Test and Finalize the Repair
Once everything is in place, carefully walk over the deck to check for any remaining wobbles or issues. Use a level to ensure the surface is even. Observe how the new joist supports the structure under weight. If needed, make adjustments by adding shims or tightening fasteners. For ongoing safety, schedule periodic inspections—especially after severe weather or seasonal changes. Remember, a well-supported deck isn’t just about safety; it’s your own backyard sanctuary waiting to be enjoyed in style and comfort.
 Many homeowners in Needham assume that hiring a local deck builder is simply a matter of choosing the lowest bid or the fastest contractor. However, this misconception can lead to costly mistakes and subpar results. Contrary to popular belief, not all deck builders are equally qualified or experienced. Some may cut corners to save time or money, ultimately risking your home’s safety and your investment. It’s vital to evaluate credentials, ask for references, and verify insurance and licensing before making a decision. Remember, a well-built deck adds value and enjoyment to your property, but only if it’s crafted by knowledgeable professionals who understand local building codes and climate considerations. For an in-depth guide on selecting reputable Needham deck contractors, visit our comprehensive [needham-deck-contractors red flags](https://deckbuildersneedham.com/needham-deck-contractors-red-flags-to-watch-for-in-2026). Additionally, many overlook the importance of ongoing maintenance and modern design options that can prevent future structural issues. Instead of settling for outdated techniques or materials, consider contemporary solutions like low-maintenance decking and innovative railing designs available in our neighborhood. For ideas, explore our article on [updating old railings for a modern Needham look](https://deckbuildersneedham.com/updating-old-railings-for-a-modern-needham-look). Recognizing these nuanced factors ensures that your deck remains safe, stylish, and durable for years to come. Have you ever fallen into this trap? Let me know in the comments.
Maintaining and repairing a deck requires more than just basic hand tools; it involves specialized equipment and proven methods to ensure safety, durability, and aesthetic appeal. Over the years, I’ve refined my toolkit based on personal experience and professional standards, enabling me to execute repairs efficiently and effectively. In this guide, I’ll share the tools I recommend for maintaining your Needham deck, along with insights into how they make a real difference.
Power Saws for Precision and Speed
A high-quality reciprocating saw is my go-to for removing damaged joists or boards. I prefer models with variable speed control because it allows me to handle delicate cuts and tough decayed wood without splintering. For larger removal or adjustments, a circular saw is indispensable for clean, straight cuts—saving time and preventing mistakes. Investing in cordless models adds portability, especially when working in less accessible areas, and ensures you won’t be tethered by cords, a convenience I absolutely value when working in Needham’s yards.
Level and Measuring Devices for Accuracy
Ensuring your deck remains level after repairs is critical. I rely on a laser level for its precision—this tool projects a perfectly straight line across a wide area, making it easy to spot subtle slopes. A measuring tape, preferably with fractional markings, guarantees the right length for replacement joists and supports. Door and window levels are also handy for quick checks, particularly if you notice unevenness in the deck surface after fixing joists.
Clamps and Supports to Stabilize Repairs
When installing new joists or reinforcing existing supports, clamps serve as your hands to hold pieces steady. Heavy-duty C-clamps are versatile, especially when working with uneven surfaces or awkward angles. Supported workbenches or temporary braces can prevent movement during fastening, which is essential for safety and precision. These tools help me maintain control—particularly important in Needham’s variable weather conditions where slippage can cause mishaps.
Fastening Tools and Hardware for Secure Connections
Using the right fasteners makes all the difference. Galvanized or stainless-steel nails and lag bolts resist rust and corrosion—crucial for outdoor durability. A high-torque impact driver simplifies fastening, especially when working with tough pressure-treated lumber. I recommend locking torque settings to avoid overtightening, which can damage the wood or weaken the connection over time. Consistent, quality fasteners prevent future issues like wobbling or looseness.
Weather-Resistant Sealants and Application Tools
Applying a weatherproof sealant or stain is vital post-repair. I use a brush or sprayer fitted with a high-quality nozzle to ensure even coverage—a key factor in extending your deck’s lifespan. Proper preparation, including cleanup with mineral spirits, guarantees adhesion and longevity. These products, combined with the right tools, keep your deck resistant to moisture, mold, and decay—especially important in Needham’s humid summers.
Planning for Future Maintenance and Trend Integration
Looking ahead, I believe technological advancements will introduce smarter tools—like IoT-connected sensors monitoring structural integrity—making ongoing maintenance more proactive. For now, having a well-stocked toolkit is essential. Regular inspections with precise tools save money and extend your deck’s life. (Check out our detailed inspection guide.)
Try incorporating a laser level or impact driver into your next project, and you’ll notice how much smoother repairs become. Proper tools empower your skills and protect your investment—so equip yourself well and keep your Needham deck in pristine condition for years to come!
Lessons That Changed How I Approach Deck Repairs in Needham
One of the toughest lessons I learned was the importance of inspecting beyond the surface. I once thought a slight sag was just cosmetic, but it revealed deeper structural issues that could’ve been dangerous. This eye-opening experience taught me not to overlook small signs; often, they hint at major problems hiding beneath. Additionally, I discovered that patience and proper planning save time and money in the long run, especially when sourcing quality materials and tools. Don’t be tempted by shortcuts—thoroughness pays off, ensuring your deck remains safe and stunning for years.
My Go-To Gear for Deck Fixes That Stand the Test of Time
Over the years, I’ve trusted a few tools that truly make deck repairs more manageable. A reliable laser level helps me spot even subtle unevenness, which is crucial for ensuring a safe surface. A powerful reciprocating saw allows me to remove damaged joists swiftly, preventing further decay. High-quality impact drivers with corrosion-resistant fasteners ensure connections stay firm despite our humid Needham summers. For sealing, I prefer sprayers that give me an even coat, protecting my investment. Investing in these tools has made all the difference in achieving professional results with confidence.
Ready to Give Your Deck a New Life? Here’s Your Push
Your outdoor space is more than just a backyard feature—it’s your personal retreat. Taking the right steps now can transform a sagging, unsafe deck into a beautiful, durable haven for gatherings and relaxation. Whether you’re tackling repairs yourself or planning to hire a local expert, remember that your effort directly impacts safety, style, and longevity. Don’t wait for failure; act proactively to preserve your Needham home’s charm and value. The first step is yours—start today and turn your outdoor space into the paradise you’ve envisioned.