There was a sunny Saturday last spring when I decided to finally tackle the installation of post caps on my Needham deck. I had watched enough DIY videos, read the guides, and even bought what I thought were the perfect caps. But as I fumbled through the process, I realized I might have bitten off more than I could chew. The caps wouldn’t sit snugly; some kept wobbling, and I felt that familiar sinking feeling—that I was about to ruin my project before it truly began. It was a real lightbulb moment for me, one that made me question my own approach and, honestly, whether I could do this at all.
Why Ace-ing Your Post Caps Matters More Than You Think
If you’re like me, you probably thought installing post caps was just a cosmetic touch. But I learned pretty quickly that proper installation impacts safety, durability, and the overall look of your deck. Poorly fitted caps can lead to water accumulation, causing the wood beneath to rot and compromising the structural integrity of your deck. Plus, they protect the posts and add a finished, polished look that makes your deck stand out in Needham. Skipping steps or rushing this detail ends up costing more down the line—think warped posts or even costly repairs. Early on, I made the mistake of choosing the cheapest caps I could find, assuming all would serve the same purpose. Turns out, that’s not the case, and choosing the right ones is crucial. If you want your deck to look great and last for years, mastering this step is essential.
Is Installing Post Caps Really Worth the Extra Effort?
Many folks worry that focusing on post caps just adds to the workload without much payoff. I admit, I shared that skepticism initially. But here’s the truth: an average deck can last decades if you take care of the details. Skimping on elements like caps can lead to quicker degradation, especially in our humid Needham climate, where moisture can sneak in and cause real damage. According to the local experts, small protective upgrades—like proper post caps—are some of the easiest ways to extend your deck’s life. So, yes, putting in the effort really does make a difference. If you’ve faced the frustration of wobbly posts or, worse, rotting wood, know that you’re not alone, and I’ve been there too. That’s why I’m excited to share how I cracked the code and prevented future problems with just a few smart steps. Ready to stop the wobbling and start your upgrade?
,
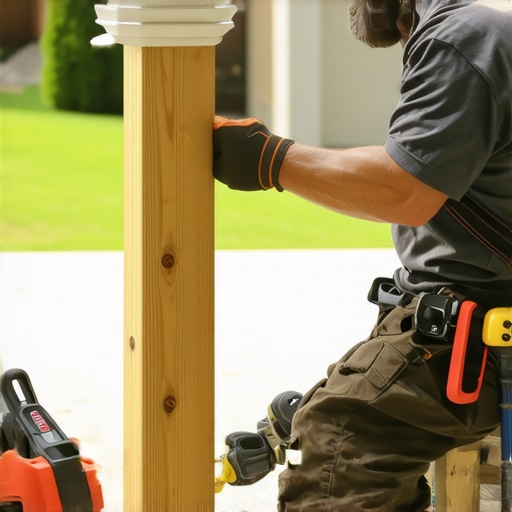
Choose the Right Post Caps with Precision
Start by selecting post caps designed for your deck posts’ dimensions and material. Measure your posts carefully using a tape measure—note the width, height, and shape. When I tackled my deck, I brought a sample post to the hardware store to ensure I picked caps that fit snugly. Choosing the right caps prevents wobbling and water infiltration, extending your deck’s lifespan. For local options, consider consulting Needham-specific material guides.
Prepare Your Posts for a Flawless Fit
Cleaning and smoothing the post surfaces is critical. Use a wire brush or sandpaper to remove rust, old paint, or debris. I once tried installing caps directly over weathered posts; it was messy, and the caps wouldn’t sit properly. After cleaning, dry the posts thoroughly to ensure adhesives or sealants adhere properly. Proper prep eliminates wobbling and water seepage issues later on. If your posts are rotted or severely damaged, visit structural repair guides before proceeding.
Secure the Caps for Long-Term Stability
Option 1: Use Adhesive Sealant
Apply a high-quality construction adhesive around the inner rim of the cap before fitting it onto the post. Press firmly and hold for a minute to ensure uniform contact. This method is ideal for metal caps or when extra bonding strength is needed. I used silicone-based sealant on my last deck project, which prevented wobbling and water ingress. After installation, wait at least 24 hours before exposing the cap to weather to cure fully. For product suggestions, check out sealant options for Needham decks.
Option 2: Mechanical Fastening
Use screws or nails explicitly designed for outdoor use. Drill pilot holes through the cap into the post to prevent splitting. Secure caps firmly in place, ensuring they sit flush and level. When I did this on my deck, I pre-drilled holes with a drill bit slightly smaller than the screw diameter, so the caps didn’t crack. This method provides a sturdy fit resistant to wind and impact. For safety checks, consider reviewing wobbly railing fixes.
Verify and Maintain Your Installation
After mounting your caps, inspect them for tightness and alignment. Tap easing tools or a level to check that caps are flush and stable. I once missed aligning a few caps, which looked off but were functional. Regular maintenance involves cleaning to remove dirt and debris preventing moisture buildup. Check periodically for signs of looseness or rot, especially before winter in Needham. If any issues surface, revisit your installation process or consult professional advice to address problems promptly.
Many homeowners in Needham assume that choosing a local deck builder is as simple as picking the one with the lowest estimate or the quickest turnaround. However, this misconception can lead to costly mistakes on your project. One common myth is that all deck contractors are interchangeable, but the truth is that experience with local codes, climate considerations, and innovative techniques really matter. Without understanding these nuances, you risk issues like non-compliance with zoning laws or the use of subpar materials that won’t withstand Needham’s harsh winters.
Another frequent mistake is underestimating the importance of detailed contracts. Some think that a verbal agreement or a handshake suffices, but this can cause misunderstandings or hidden costs later. To avoid this, always review your contract thoroughly, ensuring it specifies scope, materials, permits, and warranties. Visit Needham deck contract tips for more details.
Let’s talk about a less obvious pitfall: not verifying a builder’s familiarity with modern materials and techniques. Many experienced local builders have shifted toward eco-friendly decking options and advanced fastening systems that enhance durability. Overlooking this may lead you to miss out on longer-lasting, low-maintenance decks. I suggest asking prospective contractors about their experience with green materials and new fasteners.
One critical aspect often neglected is understanding the true scope of permit requirements. It’s a common assumption that permits are a formality, but failing to secure necessary approvals can result in fines or project delays. This is especially relevant as local regulations evolve, such as recent updates to Needham’s zoning laws for 2026. Ensuring your builder is knowledgeable about these updates prevents surprises down the line.
Are New Trends Taking Away from Quality Work?
In the push for trendy designs like glass railings or multi-level decks, some builders might prioritize looks over structure. The danger is opting for flashy features that compromise safety or longevity. For example, the craze for ultra-lightweight materials may seem appealing, but they often have less resistance to moisture and temperature swings. Always ask your builder to justify their material choices with regard to the local climate and trends. Remember, a well-built deck isn’t just about aesthetics but also about resilience. As noted by experts in deck construction, quality materials paired with expert craftsmanship create decks that last decades, not years. Don’t fall for quick fixes—invest in the right expertise to safeguard your investment.
Have you ever fallen into this trap? Let me know in the comments.
Keeping your deck in top shape over the years requires more than just initial construction skills; it demands consistent maintenance and the right set of tools. As someone who’s spent years working on Needham decks, I can attest that investing in specific equipment and adopting systematic routines pays dividends in durability and safety. In this section, I’ll share the tools I personally rely on and discuss the best practices for long-term upkeep.
Tools That Make Maintenance Seamless
One of the most valuable tools I use is a high-quality cordless power drill with variable speed settings. Precision is key when tightening or replacing fasteners on railings or deck boards. For example, I prefer a model like the Makita XFD10Z because it offers reliable battery life and adjustable torque control, preventing over-tightening that can crack wood or damage composite materials. Additionally, a digital moisture meter becomes indispensable when assessing wood condition—particularly important in Needham’s humid climate. I recommend the Tramex Moisture Encounter ME7, which accurately detects hidden moisture pockets behind siding or within wooden posts, helping prevent rot before visible signs appear.
To keep surfaces clean without damaging finishes, I use a soft-bristle deck brush combined with a gentle pressure washer. If stubborn mold or algae develop, a biocide cleaner like Wet & Forget clears it without harming the deck’s surface. For repairs, a good set of cordless impact drivers and a collection of deck-specific screws—preferably stainless steel or composites—make replacing damaged boards straightforward and long-lasting.
Regular Inspection and Preventative Measures
Routine inspections are crucial to catch issues early. I schedule bi-annual checkups, focusing on loose railings, cracked boards, or signs of water ingress. Having a set of quick-detach screwdrivers and a level on hand allows me to adjust or tighten components swiftly. When inspecting posts, I use the moisture meter to verify they remain dry, especially after heavy rains or snowmelt. Addressing small problems early saves significant costs and helps maintain safety standards, such as avoiding wobbly railings, which you can learn to fix with guidance from Needham safety checks.
Considering Future Trends in Deck Maintenance
The future of deck upkeep leans toward automation and smarter monitoring. Emerging tech like IoT sensors embedded in wood can alert homeowners to moisture levels or structural movement in real time, drastically reducing the chance of unexpected failures. While these innovations are still gaining traction, it’s a trend that will make maintenance both easier and more precise. Predictably, in the coming years, I foresee a shift toward software apps that sync with your tools for scheduling inspections and reminders, ensuring your deck remains safe and attractive without guesswork.
How do I maintain my deck over time?
Developing a systematic maintenance routine is essential. I recommend setting seasonal reminders to clean, inspect, and reseal your deck if necessary. Using the right tools, like moisture meters and impact drivers, accelerates repairs and helps prevent issues from escalating. Remember, early detection of problems like rot or loose fasteners keeps your deck safe, extends its lifespan, and saves you money in the long run. For more expert tips on avoiding costly mistakes, take a look at common permit pitfalls. Try implementing a regular inspection schedule with the tools I mentioned, and you’ll see how easy maintaining a beautiful, durable deck in Needham can be.
Ultimately, the small details like properly installing post caps can make a significant difference in the longevity and beauty of your deck. From my personal journey, I learned that patience and attention to detail aren’t just virtues—they’re essentials in creating a structure that withstands Needham’s climate and stands the test of time. Investing time in selecting the right caps, preparing your posts correctly, and securing them with quality materials transforms a mundane task into a rewarding upgrade that elevates your entire outdoor space. Remember, the lessons learned along the way—like verifying fit and taking maintenance seriously—are the true gold that guarantees your deck remains safe and stunning for years to come. So, embrace these small, strategic steps; they hold the power to save you money, prevent headaches, and give you pride in your outdoor oasis.