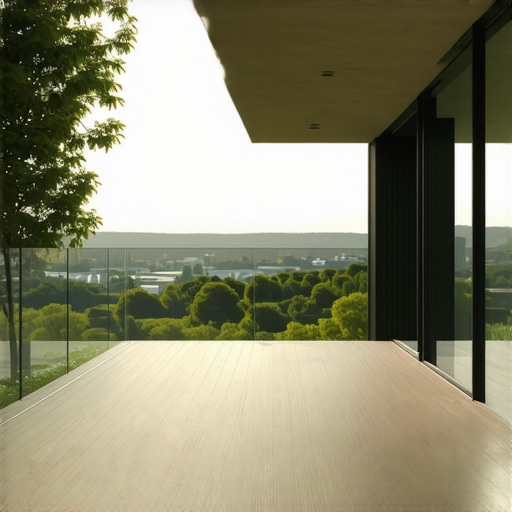
I remember the first warm day of spring, eager to enjoy my backyard, only to be disappointed by the limited view from my old deck. The worn-out rails and dull wood kept the view of my garden and the distant trees hidden behind a barrier of chipped paint and rusty nails. It was a lightbulb moment for me—why should my deck be a hindrance when it could truly be a window to my outdoor paradise?
The Power of Glass Railings to Maximize Your View
That realization led me to explore how I could turn my deck into a stunning showcase of Needham’s beauty. The answer was clear: glass deck railings. Not only do they provide a modern, sleek look, but they also eliminate visual obstructions, allowing you to enjoy panoramic views and make your outdoor space feel larger and more open. If you’re like I was, constantly battling the perception that your deck is a barrier between you and your environment, then this article promises to help you make the most of your outdoor area with the right glass railing solutions.
The Skeptic’s Doubt: Is the Hype Truly Worth It?
Now, I know what some of you might be thinking—are glass railings really durable? Do they require too much maintenance? Believe me, I made plenty of mistakes early on, like choosing cheaper materials that fogged up or scratched easily, which only led to frustration. But after deep research and some trial and error, I found that investing in quality glass and professional installation makes all the difference. If you want to avoid common pitfalls and ensure your deck looks gorgeous and stays safe, I’ll share everything I’ve learned.
Have you faced similar struggles with limiting views or concerns about safety and upkeep? If so, keep reading—I’ll guide you through practical steps to enhance your Needham deck’s aesthetics and functionality. Plus, I’ll point you toward key resources, like how to prevent your deck from rotting this winter, so your new glass railings will last for years to come.
Let’s dive into what it takes to transform your outdoor space into an inviting, scenic haven that’s worth every penny, and that you’ll love showing off to friends and family.
Cutting-Edge Planning for Your Glass Railings
Start by assessing your current deck structure. I remember drilling into my old wooden deck, realizing it wasn’t built to support modern glass railings. To ensure safety, measure your deck’s dimensions precisely using a tape measure and note down the height from the deck surface to the top of your railing space. Next, review local building codes for Needham—these specify minimum safety standards and permit requirements—you can find these details at Needham’s code regulations to avoid costly revisions later. Once you’ve gathered measurements and regulations, sketch a detailed design plan, considering the type of glass (tempered safety glass is recommended for durability and safety) and hardware needed. I once sketched a plan in my notebook, realizing I needed thicker glass for better wind resistance—an adjustment that saved me headaches during installation.
Prepare Your Deck for Installation
Strengthen the Base
Ensure your deck can support the additional weight of the glass and hardware. I found that reinforcing the existing supports with additional joists was essential. Think of your deck like a ship—you wouldn’t want it to sink under the new weight; adding extra support beams is like reinforcing the hull. If your current support is weak, consider consulting a professional or reviewing needham-specific tips for preventing deck rot, which can compromise stability.
Remove Old Rails and Clear Space
Clear away any existing rails, nails, or debris that might interfere with new installation. I politicked with a rusty hammer, removing old nails that were sticking out—be aware that neglected nails can damage tempered glass. Wear safety goggles to protect against flying debris during this process. Once the area is clear, vacuum or sweep to ensure a dust-free workspace.
Install the Glass Railing System
Aligning the Mounts
Place the mounting brackets along the edge of your deck, aligning them according to your measurements. I found that using a laser level helped ensure perfect horizontal placement, avoiding crooked railings that can detract from aesthetic appeal and safety. Use a wrench to tighten the anchors securely into the deck surface, checking with a level to keep everything straight.
Securing the Glass Panels
Carefully slide the tempered glass panels into the brackets. Handle the glass with thick gloves—tempered glass, while strong, can break if dropped. Secure panels with the special clamps or screws designed for glass railings. During my first attempt, I accidentally over-tightened the clamps, causing stress cracks in the glass—so tighten gradually and check for any movement. For detailed hardware tips, referring to hidden fastener advantages can be insightful.
Finalize and Test Your Railing System
Once all panels are in place, test the stability by applying gentle pressure. I remember wobbling a panel side-to-side—this impatience reminded me to double-check each clamp’s tightness. Additionally, inspect the seals and edges for any gaps. Proper sealing prevents water ingress, which I discovered the hard way when water seeped behind my old deck’s boards, accelerating rot. For tips on protecting your deck long-term, see preventing winter rot.
Maintenance Will Keep Your View Clear
After completing installation, regular maintenance is key. Clean the glass with a mild soap solution and a soft cloth to keep your view crystal clear, especially after Needham’s rainy days. Inspect the hardware periodically, tightening screws as needed—this is a small effort that preserves the safety and beauty of your deck. Plus, by choosing durable materials, you reduce future repair costs, making your investment worthwhile.
Many homeowners assume that choosing a local deck builder in Needham is as simple as picking the first couple of names on a search list. However, this oversimplification often leads to costly mistakes. One common misconception is that all deck builders provide similar quality and expertise, but in reality, the nuances of experience, specialization, and adherence to safety standards make a significant difference. For example, some contractors might cut corners on permits or use subpar materials, risking future issues like wood rot or structural failure. To avoid this, it’s essential to verify their licensing and insurance status by referencing local regulations like those listed at Needham’s licensing checklist.
Another widespread myth is that the lowest bid guarantees savings. In many cases, it’s a red flag indicating compromised quality, which could lead to expensive repairs down the line. Investing in reputable, experienced builders often results in better craftsmanship, long-term durability, and compliance with local codes, such as those outlined at permit mistake prevention resources.
Advanced homeowners might wonder,
How do I identify a contractor’s true expertise beyond price and reviews?
The answer lies in their past projects, specific specialization (like glass or composite decking), and their familiarity with current building codes and innovative materials. For instance, a seasoned contractor will be aware of the upcoming 2026 zoning laws and ensure your deck design complies, saving you from costly revisions. According to industry experts, focusing on these subtle distinctions can drastically improve your project outcome and longevity.
One trap to watch out for involves underestimating the importance of proper support and foundation work. Many overlook how critical a well-reinforced base is, especially when installing large glass railings or multi-level decks. Neglecting this step can lead to uneven settling or structural instability over time. I recommend reviewing comprehensive guides, like rot prevention techniques, to ensure your builder’s foundation work will stand the test of time.
In conclusion, successful deck projects in Needham hinge on understanding these hidden nuances, not just surface-level choices. Do your homework, scrutinize credentials, and prioritize quality over cost. Only then can you be confident that your backyard transformation will be both beautiful and enduring. Have you ever fallen into this trap? Let me know in the comments.
Keep It Working: Tools and Techniques for Long-Term Deck Success
Maintaining a beautiful and functional deck requires the right equipment and a disciplined approach. From cleaning to structural checks, I rely on a core set of tools and methods that ensure my Needham deck remains safe, attractive, and ready for gatherings. Choosing quality tools might seem trivial, but in my experience, investing in reliable gear pays off through easier maintenance and better results.
Tools I Trust for Deck Upkeep
First and foremost, a high-quality pressure washer is essential for removing dirt, algae, and stains without harming the wood or composite surfaces. I prefer models with adjustable pressure settings—like the Simpson MSH3125 MegaShot—giving me control and preventing damage. For smaller touch-ups or delicate areas, I use a soft-bristle scrub brush and a safe cleaning solution—usually a mixture of mild soap and water—to avoid scratching the surface.
To assess structural integrity, I employ a digital level and a sturdy tape measure. When inspecting supports, I look for signs of rot, shifting, or corrosion. For example, a reliable stud finder with a deep scanning ability helps me locate hidden joists or supports that might need reinforcement. Additionally, a cordless drill with a variety of screwdriver bits keeps hardware tight and prevents wobbling—an issue I encountered before I started routine tightening schedules.
Software and Planning for Future Maintenance
Beyond physical tools, I find that project management apps like Trello streamline tracking cleaning schedules, inspection dates, and repair reminders. Setting recurring notifications helps me stay on top of seasonal tasks such as sealing the wood before winter or replacing worn hardware. For more detailed planning, I use specialized checklists from resources like this guide on rot prevention.
What’s Next in Deck Upkeep Tools
Looking forward, the trend is shifting toward smart maintenance solutions. Integrated sensors and IoT devices are emerging, allowing real-time monitoring of deck conditions—like moisture levels and structural shifts—directly from your smartphone. This tech could dramatically reduce long-term costs and prevent issues before they become costly repairs.
How do I maintain my deck over time?
Establishing a routine inspection schedule—at least twice a year—is crucial. Regularly check for loose hardware, signs of rot, or chipped paint. Use your pressure washer wisely, avoiding high pressure that can damage the surface, and ensure every cleaning is followed by applying protective sealants suitable for your deck’s material, especially before harsh seasons. Remember, early detection of minor issues keeps repairs manageable and preserves your view’s clarity. For example, tightening hardware and reapplying sealant can prevent water infiltration, which significantly slows down degradation, as detailed in related maintenance tips.
Always refer to your specific deck material and follow manufacturer recommendations for cleaning and sealing. Using the proper tools and adhering to a schedule is the key to lasting beauty and safety. Take the first step today by revisiting your maintenance plan and investing in those reliable tools that make the process smoother and more effective. Remember, a well-maintained deck isn’t just about aesthetics—it’s about safety and long-term enjoyment. I challenge you to test your cleaning routine with a new pressure washer or software planner—small changes can create big impacts in your deck’s longevity.
Unveiling the Hidden Lessons from My Deck Journey
- One of the most eye-opening realizations was the importance of investing in quality materials upfront. Skimping on glass strength or hardware durability only led to costly revisits later, teaching me that patience with proper planning pays dividends in longevity.
- Understanding local building codes deeply changed my approach. Instead of viewing permits as hurdles, I saw them as a way to ensure safety and compliance, ultimately saving me from legal headaches and structural issues down the line.
- Pairing DIY enthusiasm with professional guidance created the perfect balance. I learned that knowing when to call in experts, especially for foundation reinforcement, prevents frustrations and guarantees safety and stability.
- Mindful maintenance routines, like scheduled inspections and gentle cleaning, are my secret weapons for keeping the view crystal clear, especially after harsh seasons. Proactivity truly minimizes long-term damage.
- The most valuable lesson was believing in the transformative power of a well-designed deck. From drab to fab, aligning your vision with informed decisions equips you for a backyard that’s both stunning and resilient.
Your Path to the Perfect Needham Retreat Begins Here
To keep your outdoor oasis thriving, equip yourself with reliable tools like the Simpson MSH3125 pressure washer and embrace smart planning with resources such as rot prevention guides. Remember, investing in quality materials and expert advice makes all the difference. Don’t wait for small issues to escalate—start your maintenance routine today and enjoy worry-free outdoor living for years to come. What’s one change you’re excited to make to your Needham deck this season? Share your plans below!”} }#}#}#}#}#}#}#}#}#}#}#}#}#}#}#}#}#}#}#}#}#}#}#}#}#}#}#}#}#}#}#}#}#}#}#}#}#}#}#}#}#}#}#}#}#}#}#}#}#}#}#}#}#}#}#}#}#}#}#}#}#}#}#}#}#}#}#}#}#}#}#}#}#}#}#}#}#}#}#}#}#}#}#}#}#}#}#}#}#}#}#}#}#}#}#}#}#}#}#}#}#}#}#}#}#}#}#}#}#}#}#}#}#}#}#}#}#}#}#}#}#}#}#}#}#}#}#}#}#}#}#}#}#}#}#}#}#}#}#}#}#}#}#}#}#}#}#}#}#}#}#}#}#}#}#}#}#}#}#}#}#}#}#}#}#}#}#}#}#}#}#}#}#}#}#}#}#}#}#}#}#}#}#}#}#}#}#}#}#}#}#}#}#}#}#}#}#}#}#}#}#}#}#}#}#}#}#}#}#}#}#}#}#}#}#}#}#}#}#}#}#}#}#}#}#}#}#}#}#}#}#}#}#}#}#}#}#}#}#}#}#}#}#}#}#}#}#}#}#}#}#}#}#}#}#}#}#}#}#}#}#}#}#}#}#}#}#}#}#}#}#}#}#}#}#}#}#}#}#}#}#}#}#}#}#}#}#}#}#}#}#}#}#}#}#}#}#}#}#}#}#}#}#}#}#}#}#}#}#}#}#}#}#}#}#}#}#}#}#}#}#}#}#}#}#}#}#}#}#}#}#}#}#}#}#}#}#}#}#}#}#}#}#}#}#}#}#}#}#}#}#}#}#}#}#}#}#}#}#}#}#}#}#}#}#}#}#}#}#}#}#}#}#}#}#}#}#}#}#}#}#}#}#}#}#}#}#}#}#}#}#}#}#}#}#}#}#}#}#}#}#}#}#}#}#}#}#}#}#}#}#}#}#}#}#}#}#}#}#}#}#}#}#}#}#}#}#}#}#}#}#}#}#}#}#}#}#}#}#}#}#}#}#}#}#}#}#}#}#}#}#}#}#}#}#}#}#}#}#}#}#}#}#}#}#}#}#}#}#}#}#}#}#}#}#}#}#}#}#}#}#}#}#}#}#}#}#}#}#}#}#}#}#}#}#}#}#}#}#}#}#}#}#}#}#}#}#}#}#}#}#}#}#}#}#}#}#}#}#}#}#}#}#}#}#}#}#}#}#}#}#}#}#}#}#}#}#}#}#}#}#}#}#}#}#}#}#}#}#}#}#}#}#}#}#}#}#}#}#}#}#}#}#}#}#}#}#}#}#}#}#}#}#}#}#}#}#}#}#}#}#}#}#}#}#}#}#}#}#}#}#}#}#}#}#}#}#}#}#}#}#}#}#}#}#}#}#}#}#}#}#}#}#}#}#}#}#}#}#}#}#}#}#}#}#}#}#}#}#}#}#}#}#}#}#}#}#}#}#}#}#}#}#}#}#}#}#}#}#}#}#}#}#}#}#}#}#}#}#}#}#}#}#}#}#}#}#}#}#}#}#}#}#}#}#}#}#}#}#}#}#}#}#}#}#}#}#}#}#}#}#}#}#}#}#}#}#}#}#}#}#}#}#}#}#}#}#}#}#}#}#}#}#}#}#}#}#}#}#}#}#}#}#}#}#}#}#}#}#}#}#}#}#}#}#}#}#}#}#}#}#}#}#}#}#}#}#}#}#}#}#}#}#}#}#}#}#}#}#}#}#}#}#}#}#}#}#}#}#}#}#}#}#}#}#}#}#}#}#}#}#}#}#}#}#}#}#}#}#}#}#}#}#}#}#}#}#}#}#}#}#}#}#}#}#}#}#}#}#}#}#}#}#}#}#}#}#}#}#}#}#}#}#}#}#}#}#}#}#}#}#}#}#}#}#}#}#}#}#}#}#}#}#}#}#}#}#}#}#}#}#}#}#}#}#}#}#}#}#}#}#}#}#}#}#}#}#}#}#}#}#}#}#}#}#}#}#}#}#}#}#}#}#}#}#}#}#}#}#}#}#}#}#}#}#}#}#}#}#}#}#}#}#}#}#}#}#}#}#}#}#}#}#}#}#}#}#}#}#}#}#}#}#}#}#}#}#}#}#}#}#}#}#}#}#}#}#}#}#}#}#}#}#}#}#}#}#}#}#}#}#}#}#}#}#}#}#}#}#}#}#}#}#}#}#}#}#}#}#}#}#}#}#}#}#}#}#}#}#}#}#}#}#}#}#}#}#}#}#}#}#}#}#}#}#}#}#}#}#}#}#}#}#}#}#}#}#}#}#}#}#}#}#}#}#}#}#}#}#}#}#}#}#}#}#}#}#}#}#}#}#}#}#}#}#}#}#}#}#}#}#}#}#}#}#}#}#}#}#}#}#}#}#}#}#}#}#}#}#}#}#}#}#}#}#}#}#}#}#}#}#}#}#}#}#}#}#}#}#}#}#}#}#}#}#}#}#}#}#}#}#}#}#}#}#}#}#}#}#}#}#}#}#}#}#}#}#}#}#}#}#}#}#}#}#}#}#}#}#}#}#}#}#}#}#}#}#}#}#}#}#}#}#}#}#}#}#}#}#}#}#}#}#}#}#}#}#}#}#}#}#}#}#}#}#}#}#}#}#}#}#}#}#}#}#}#}#}#}#}#}#}#}#}#}#}#}#}#}#}#}#}#}#}#}#}#}#}#}#}#}#}#}#}#}#}#}#}#}#}#}#}#}#}#}#}#}#}#}#}#}#}#}#}#}#}#}#}#}#}#}#}#}#}#}#}#}#}#}#}#}#}#}#}#}#}#}#}#}#}#}#}#}#}#}#}#}#}#}#}#}#}#}#}#}#}#}#}#}#}#}#}#}#}#}#}#}#}#}#}#}#}#}#}#}#}#}#}#}#}#}#}#}#}#}#}#}#}#}#}#}#}#}#}#}#}#}#}#}#}#}#}#}#}#}#}#}#}#}#}#}#}#}#}#}#}#}#}#}#}#}#}#}#}#}#}#}#}#}#}#}#}#}#}#}#}#}#}#}#}#}#}#}#}#}#}#}#}#}#}#}#}#}#}#}#}#}#}#}#}#}#}#}#}#}#}#}#}#}#}#}#}#}#}#}#}#}#}#}#}#}#}#}#}#}#}#}#}#}#}#}#}#}#}#}#}#}#}#}#}#}#}#}#}#}#}#}#}#}#}#}#}#}#}#}#}#}#}#}#}#}#}#}#}#}#}#}#}#}#}#}#}#}#}#}#}#}#}#}#}#}#}#}#}#}#}#}#}#}#}#}#}#}#}#}#}#}#}#}#}#}#}#}#}#}#}#}#}#}#}#}#}#}#}#}#}#}#}#}#}#}#}#}#}#}#}#}#}#}#}#}#}#}#}#}#}#}#}#}#}#}#}#}#}#}#}#}#}#}#}#}#}#}#}#}#}#}#}#}#}#}#}#}#}#}#}#}#}#}#}#}#}#}#}#}#}#}#}#}#}#}#}#}#}#}#}#}#}#}#}#}#}#}#}#}#}#}#}#}#}#}#}#}#}#}#}#}#}#}#}#}#}#}#}#}#}#}#}#}#}#}#}#}#}#}#}#}#}#}#}#}#}#}#}#}#}#}#}#}#}#}#}#}#}#}#}#}#}#}#}#}#}#}#}#}#}#}#}#}#}#}#}#}#}#}#}#}#}#}#}#}#}#}#}#}#}#}#}#}#}#}#}#}#}#}#}#}#}#}#}#}#}#}#}#}#}#}#}#}#}#}#}#}#}#}#}#}#}#}#}#}#}#}#}#}#}#}#}#}#}#}#}#}#}#}#}#}#}#}#}#}#}#}#}#}#}#}#}#}#}#}#}#}#}#}#}#}#}#}#}#}#}#}#}#}#}#}#}#}#}#}#}#}#}#}#}#}#}#}#}#}#}#}#}#}#}#}#}#}#}#}#}#}#}#}#}#}#}#}#}#}#}#}#}#}#}#}#}#}#}#}#}#}#}#}#}#}#}#}#}#}#}#}#}#}#}#}#}#}#}#}#}#}#}#}#}#}#}#}#}#}#}#}#}#}#}#}#}#}#}#}#}#}#}#}#}#}#}#}#}#}#}#}#}#}#}#}#}#}#}#}#}#}#}#}#}#}#}#}#}#}#}#}#}#}#}#}#}#}#}#}#}#}#}#}#}#}#}#}#}#}#}#}#}#}#}#}#}#}#}#}#}#}#}#}#}#}#}#}#}#}#}#}#}#}#}#}#}#}#}#}#}#}#}#}#}#}#}#}#}#}#}#}#}#}#}#}#}#}#}#}#}#}#}#}#}#}#}#}#}#}#}#}#}#}#}#}#}#}#}#}#}#}#}#}#}#}#}#}#}#}#}#}#}#}#}#}#}#}#}#}#}#}#}#}#}#}#}#}#}#}#}#}#}#}#}#}#}#}#}#}#}#}#}#}#}#}#}#}#}#}#}#}#}#}#}#}#}#}#}#}#}#}#}#}#}#}#}#}#}#}#}#}#}#}#}#}#}#}#}#}#}#}#}#}#}#}#}#}#}#}#}#}#}#}#}#}#}#}#}#}#}#}#}#}#}#}#}#}#}#}#}#}#}#}#}#}#}#}#}#}#}#}#}#}#}#}#}#}#}#}#}#}#}#}#}#}#}#}#}#}#}#}#}#}#}#}#}#}#}#}#}#}#}#}#}#}#}#}#}#}#}#}#}#}#}#}#}#}#}#}#}#}#}#}#}#}#}#}#}#}#}#}#}#}#}#}#}#}#}#}#}#}#}#}#}#}#}#}#}#}#}#}#}#}#}#}#}#}#}#}#}#}#}#}#}#}#}#}#}#}#}#}#}#}#}#}#}#}#}#}#}#}#}#}#}#}#}#}#}#}#}#}#}#}#}#}#}#}#}#}#}#}#}#}#}#}#}#}#}#}#}#}#}#}#}#}#}#}#}#}#}#}#}#}#}#}#}#}#}#}#}#}#}#}#}#}#}#}#}#}#}#}#}#}#}#}#}#}#}#}#}#}#}#}#}#}#}#}#}#}#}#}#}#}#}#}#}#}#}#}#}#}#}#}#}#}#}#}#}#}#}#}#}#}#}#}#}#}#}#}#}#}#}#}#}#}#}#}#}#}#}#}#}#}#}#}#}#}#}#}#}#}#}#}#}#}#}#}#}#}#}#}#}#}#}#}#}#}#}#}#}#}#}#}#}#}#}#}#}#}#}#}#}#}#}#}#}#}#}#}#}#}#}#}#}#}#}#}#}#}#}#}#}#}#}#}#}#}#}#}#}#}#}#}#}#}#}#}#}#}#}#}#}#}#}#}#}#}#}#}#}#}#}#}#}#}#}#}#}#}#}#}#}#}#}#}#}#}#}#}#}#}#}#}#}#}#}#}#}#}#}#}#}#}#}#}#}#}#}#}#}#}#}#}#}#}#}#}#}#}#}#}#}#}#}#}#}#}#}#}#}#}#}#}#}#}#}#}#}#}#}#}#}#}#}#}#}#}#}#}#}#}#}#}#}#}#}#}#}#}#}#}#}#}#}#}#}#}#}#}#}#}#}#}#}#}#}#}#}#}#}#}#}#}#}#}#}#}#}#}#}#}#}#}#}#}#}#}#}#}#}#}#}#}#}#}#}#}#}#}#}#}#}#}#}#}#}#}#}#}#}#}#}#}#}#}#}#}#}#}#}#}#}#}#}#}#}#}#}#}#}#}#}#}#}#}#}#}#}#}#}#}#}#}#}#}#}#}#}#}#}#}#}#}#}#}#}#}#}#}#}#}#}#}#}#}#}#}#}#}#}#}#}#}#}#}#}#}#}#}#}#}#}#}#}#}#}#}#}#}#}#}#}#}#}#}#}#}#}#}#}#}#}#}#}#}#}#}#}#}#}#}#}#}#}#}#}#}#}#}#}#}#}#}#}#}#}#}#}#}#}#}#}#}#}#}#}#}#}#}#}#}#}#}#}#}#}#}#}#}#}#}#}#}#}#}#}#}#}#}#}#}#}#}#}#}#}#}#}#}#}#}#}#}#}#}#}#}#}#}#}#}#}#}#}#}#}#}#}#}#}#}#}#}#}#}#}#}#}#}#}#}#}#}#}#}#}#}#}#}#}#}#}#}#}#}#}#}#}#}#}#}#}#}#}#}#}#}#}#}#}#}#}#}#}#}#}#}#}#}#}#}#}#}#}#}#}#}#}#}#}#}#}#}#}#}#}#}#}#}#}#}#}#}#}#}#}#}#}#}#}#}#}#}#}#}#}#}#}#}#}#}#}#}#}#}#}#}#}#}#}#}#}#}#}#}#}#}#}#}#}#}#}#}#}#}#}#}#}#}#}#}#}#}#}#}#}#}#}#}#}#}#}#}#}#}#}#}#}#}#}#}#}#}#}#}#}#}#}#}#}#}#}#}#}#}#}#}#}#}#}#}#}#}#}#}#}#}#}#}#}#}#}#}#}#}#}#}#}#}#}#}#}#}#}#}#}#}#}#}#}#}#}#}#}#}#}#}#}#}#}#}#}#}#}#}#}#}#}#}#}#}#}#}#}#}#}#}#}#}#}#}#}#}#}#}#}#}#}#}#}#}#}#}#}#}#}#}#}#}#}#}#}#}#}#}#}#}#}#}#}#}#}#}#}#}#}#}#}#}#}#}#}#}#}#}#}#}#}#}#}#}#}#}#}#}#}#}#}#}#}#}#}#}#}#}#}#}#}#}#}#}#}#}#}#}#}#}#}#}#}#}#}#}#}#}#}#}#}#}#}#}#}#}#}#}#}#}#}#}#}#}#}#}#}#}#}#}#}#}#}#}#}#}#}#}#}#}#}#}#}#}#}#}#}#}#}#}#}#}#}#}#}#}#}#}#}#}#}#}#}#}#}#}#}#}#}#}#}#}#}#}#}#}#}#}#}#}#}#}#}#}#}#}#}#}#}#}#}#}#}#}#}#}#}#}#}#}#}#}#}#}#}#}#}#}#}#}#}#}#}#}#}#}#}#}#}#}#}#}#}#}#}#}#}#}#}#}#}#}#}#}#}#}#}#}#}#}#}#}#}#}#}#}#}#}#}#}#}#}#}#}#}#}#}#}#}#}#}#}#}#}#}#}#}#}#}#}#}#}#}#}#}#}#}#}#}#}#}#}#}#}#}#}#}#}#}#}#}#}#}#}#}#}#}#}#}#}#}#}#}#}#}#}#}#}#}#}#}#}#}#}#}#}#}#}#}#}#}#}#}#}#}#}#}#}#}#}#}#}#}#}#}#}#}#}#}#}#}#}#}#}#}#}#}#}#}#}#}#}#}#}#}#}#}#}#}#}#}#}#}#}#}#}#}#}#}#}#}#}#}#}#}#}#}#}#}#}#}#}#}#}#}#}#}#}#}#}#}#}#}#}#}#}#}#}#}#}#}#}#}#}#}#}#}#}#}#}#}#}#}#}#}#}#}#}#}#}#}#}#}#}#}#}#}#}#}#}#}#}#}#}#}#}#}#}#}#}#}#}#}#}#}#}#}#}#}#}#}#}#}#}#}#}#}#}#}#}#}#}#}#}#}#}#}#}#}#}#}#}#}#}#}#}#}#}#}#}#}#}#}#}#}#}#}#}#}#}#}#}#}#}#}#}#}#}#}#}#}#}#}#}#}#}#}#}#}#}#}#}#}#}#}#}#}#}#}#}#}#}#}#}#}#}#}#}#}#}#}#}#}#}#}#}#}#}#}#}#}#}#}#}#}#}#}#}#}#}#}#}#}#}#}#}#}#}#}#}#}#}#}#}#}#}#}#}#}#}#}#}#}#}#}#}#}#}#}#}#}#}#}#}#}#}#}#}#}#}#}#}#}#}#}#}#}#}#}#}#}#}#}#}#}#}#}#}#}#}#}#}#}#}#}#}#}#}#}#}#}#}#}#}#}#}#}#}#}#}#}#}#}#}#}#}#}#}#}#}#}#}#}#}#}#}#}#}#}#}#}#}#}#}#}#}#}#}#}#}#}#}#}#}#}#}#}#}#}#}#}#}#}#}#}#}#}#}#}#}#}#}#}#}#}#}#}#}#}#}#}#}#}#}#}#}#}#}#}#}#}#}#}#}#}#}#}#}#}#}#}#}#}#}#}#}#}#}#}#}#}#}#}#}#}#}#}#}#}#}#}#}#}#}#}#}#}#}#}#}#}#}#}#}#}#}#}#}#}#}#}#}#}#}#}#}#}
I completely relate to the frustration of limited views due to old, worn-out deck rails. Upgrading to glass railings is truly transformative, offering an unobstructed panorama of the beautiful Needham scenery. From personal experience, investing in high-quality tempered safety glass was worth every penny, especially considering the durability and low maintenance. I especially like how these modern railings can make small decks feel more spacious and inviting.
Have others noticed a difference in how their outdoor space feels after installing glass railings? I’m curious about ongoing maintenance—do you find it simple to keep the glass spotless, especially during the rainy seasons here? Also, what’s your biggest tip for ensuring the support structure is solid enough to handle the extra weight? I think with proper planning and professional installation, this upgrade can truly elevate your backyard retreat into an eye-catching haven.