Ever stepped onto your deck only to feel a unsettling wobble beneath your feet? I’ve been there. One weekend, I leaned on my railings, trusting them for support—and suddenly, they shifted. A lightbulb flickered in my mind: those tiny, wobbly balusters aren’t just an aesthetic annoyance—they’re safety hazards waiting to happen.
What’s Really Going on with Your Wobbly Deck?
I’ve learned from personal experience—and a bit of research—that loose railings and balusters are common issues, especially in older decks or after harsh weather. Loose components can be caused by wear and tear, poor initial installation, or even extreme temperature changes that cause wood to expand and contract. The good news? Most of these problems are fixable with a few straightforward tricks. Today, I promise to share proven quick fixes that will tighten up your deck fast, saving you money and stress. So, if you’ve ever asked yourself, “Is my deck safe?” or felt hesitant to invite friends over because of wobbly railings, keep reading. We’re going to restore stability and peace of mind together.
Is the Fix Really That Simple or Just a Short-Term Patch?
In my early days, I made the mistake of believing that a dab of wood glue would fix loose balusters—that’s a common misconception. The truth is, neglecting proper assessment and using makeshift repairs can lead to bigger issues down the line. According to the Occupational Safety and Health Administration (OSHA), compromised railings are a leading cause of deck-related injuries. This realization motivated me to dive deeper into reliable, long-lasting fixes—something I’ll guide you through in the upcoming sections. Ready to stop your deck from wiggling and start creating a secure, inviting space? Let’s get to the heart of these quick and easy improvements.
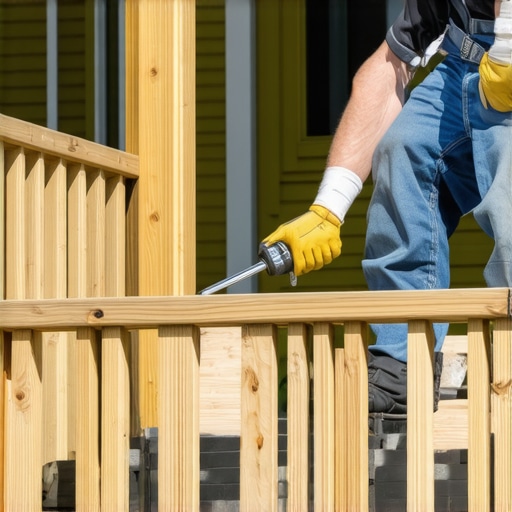
Assess the Wobbly Areas Precisely
Start by systematically inspecting all railings, balusters, and joists. I once found a loose baluster by gently wiggling each component with my hand—some moved more than they should. Use a screwdriver to test screw tightness; if any screws are stripped or missing, replace or tighten them accordingly. This step is like being a detective, identifying exactly where the weaknesses lie before proceeding.
Gather Necessary Tools and Materials
Equip yourself with a cordless drill, a socket wrench, weather-resistant screws (preferably stainless steel or deck-specific fasteners), and a pry bar for stubborn components. I learned this the hard way when I started repairs with just a hammer—items kept splitting. Proper tools ensure a clean, sturdy fix that lasts through seasons.
Detach and Replace or Reinforce Loose Parts
Begin removing loose balusters or railing sections carefully with the pry bar. For each loose component, check if the existing fasteners are good; if not, replace them with new, longer screws designed for outdoor use. I replaced several loose balusters with heavy-duty fasteners, which held firm even during Nor’easters. Think of it as upgrading your deck’s hardware to withstand the harshest weather.
Secure Joists and Support Beams
If you notice sagging or shifting, examine the underlying joists. Use a level to identify uneven areas. Reinforce them using joist hangers or sistering new joists alongside existing ones for added support. I once reinforced a sagging section by sistering a new joist, instantly improving stability. This process is like giving your deck a backbone—crucial for safety.
Check for Consistency and Stability
After tightening and replacing parts, test each component’s stability. Gently shake the rails and balusters; they should resist movement. Confirm all screws are flush and secure. Feel free to bump the deck slightly—if everything stays put, you’re on the right track. This step ensures your repairs are not just superficial but provide genuine safety.
Apply Protective Coatings and Prevent Future Looseness
Finish by sealing or staining your deck to protect fasteners from moisture. Using a high-quality, weatherproof sealant such as those listed in your best deck sealers can extend the life of your repairs. I recommend applying a fresh coat of stain or sealant after tightening—this helps prevent wood expansion and contraction that can loosen fasteners over time.
Monitor and Maintain Regularly
Schedule periodic inspections, especially after storms or harsh weather, to tighten any new wobbling components immediately. Keeping a simple checklist of critical areas can save you from bigger issues down the line. Remember, proactive maintainer ensures your deck remains a safe, inviting space for years to come.
Many homeowners assume that choosing a generic deck design or relying solely on a contractor’s basic skills guarantees a durable, safe outdoor space. However, this oversimplification often leads to costly mistakes and missed opportunities for customization that can truly enhance your home’s value. In my experience, one of the common myths is that all deck builders are equally qualified, but the truth is, expertise in local climate conditions and building codes is key to a lasting structure. For instance, a builder well-versed in Needham’s weather patterns will know the best materials and techniques to prevent issues like rot or warping, aspects that generic contractors might overlook. Additionally, many believe that consulting online reviews or a quick quote suffices, but I’ve learned that checking a builder’s portfolio and understanding their specialization—like custom gates for safety or luxury features—delivers much better results. This nuance is often lost on DIY renovations or inexperienced builders who may underinvest in proper fastening systems, leading to safety hazards. Notably, hidden fasteners may seem like a minor detail, but as experts indicate, they are essential for long-term stability and safety, especially in high-salt environments or areas prone to heavy rain. Furthermore, many fall into the trap of opting for the cheapest quote without assessing the quality of materials or warranty policies—this is a mistake that could cost you more later. To avoid this, I recommend thoroughly vetting your contractor’s experience in designing resilient decks tailored to Needham’s unique needs, and exploring advanced features like eco-friendly preservatives or multi-tone decking, which can significantly elevate your outdoor space’s aesthetics and lifespan. The mistake of neglecting these details can result in structural issues, frequent repairs, or even safety violations. For example, while it might seem straightforward to install standard support beams, investing in expert advice on proper foundation reinforcement—like using helical piles in challenging soils—can prevent disastrous sagging or sinking down the line. If you want a deck that not only looks great but also endures the test of time and weather, understanding these nuances is essential. To deepen your knowledge, check out specialized articles on how to read the fine print when choosing your builder or select premium materials to maximize your investment. Remember, the real secret to a successful deck project lies in expert craftsmanship and attention to detail—don’t settle for less. Have you ever fallen into this trap? Let me know in the comments.
Maintaining your deck’s functionality over time requires more than just routine inspections; it demands the right tools and a strategic approach to upkeep. As an experienced Needham deck builder, I’ve honed my toolkit and methods to ensure long-term durability and aesthetic appeal of outdoor spaces. One indispensable tool is a high-quality cordless drill equipped with various screwdriver bits. I rely on a DeWalt DCD791D2 because of its exceptional power-to-weight ratio, making quick work of tightening loose fasteners or installing new ones, even in hard-to-reach corners. Additionally, a digital moisture meter, such as the

These tools form the backbone of my maintenance routine, enabling precise repairs, thorough cleaning, and protective treatments that extend the life of every deck I work on. Over years of experience, I’ve noticed that proactive maintenance not only prevents costly repairs but also keeps your outdoor oasis looking inviting. Moving forward, I predict that smart technology integration—like IoT sensors monitoring wood moisture levels—will revolutionize deck care, providing real-time alerts and recommendations. Think about installing a moisture sensor linked to your home automation system; it’s a game-changer for long-term preservation and peace of mind.
How do I keep my deck performing year after year?
Regular inspections are vital. After every major storm or weather event, give your deck a thorough look over, checking for loose fasteners, rotting wood, or pest damage. Repainting or sealing every 2–3 years, especially in humid climates like Needham, protects the wood from moisture infiltration. I recommend using a high-quality sealant, such as this product, which resists weathering and UV damage, ensuring your investment lasts. Don’t forget to also clean your deck using gentle methods—pressure washing at low settings and applying eco-friendly cleaners helps maintain the surface without degradation. Incorporate pest prevention measures from this resource to keep pests from undermining your deck’s structure.
By integrating these tools and practices, you can dramatically improve your deck’s performance and longevity. I challenge you to try out a moisture meter or upgrade your cleaning equipment this season—the difference in your deck’s resilience will be evident. Remember, a well-maintained deck is not just beautiful; it’s a safe, reliable space to gather for years to come.
What I Wish I Knew When Fixing My First Deck
One of the biggest surprises I faced was realizing that quick fixes rarely lead to lasting safety—especially if you overlook the underlying causes of wobbling or structural wear. I once tried replacing a few screws without checking the support beams, only to have the issue reappear after the next storm. That taught me to dig deeper, understanding that every squeak or wobble is a sign to assess the whole structure, not just the superficial parts. Trust me, paying attention to these details can save you money and prevent accidents down the line.
Tools of the Trade That Changed the Game
Investing in a few high-quality tools transformed my deck repair routine. A cordless drill like the DeWalt DCD791D2, coupled with weather-resistant fasteners, makes tightening and replacing components effortless and durable. Additionally, a moisture meter helps prevent hidden decay, saving you from costly repairs later. These tools are more than gadgets—they are my trusted allies against time and weather, ensuring every repair I make withstands the test of time and elements.
Invest in Long-Term Confidence for Your Deck
Nothing beats knowing your deck can handle whatever Needham’s climate throws at it. Applying a quality sealer, like the top-rated deck sealers, significantly extends its lifespan. Regular inspections, combined with proactive sealing and cleaning, turn maintenance from a chore into a safeguard. Make it a habit—your deck’s longevity and your peace of mind depend on it.
Insider Wisdom From My Deck Journey
- Quality Fasteners Matter More Than You Think: Using stainless steel or deck-specific fasteners prevents rust and ensures structural integrity over decades.
- Every Wobble Tells a Story: Wobbles or creaks indicate issues that, if addressed early, can save you costly repairs and potential safety hazards.
- Weather Resistance Is Non-Negotiable: In climates like Needham’s, selecting materials and treatments that withstand moisture and temperature swings is vital for durability.
- DIY Can Be Safe—If You Know Your Limits: I’ve learned that with the right tools and knowledge, many repairs are accessible. When in doubt, consulting local experts or referencing trusted resources ensures safety and quality.
My Secret Arsenal for Deck Care
Over the years, I’ve found that certain tools and resources make all the difference in maintaining a beautiful, safe deck. Apart from reliable fasteners and a moisture meter, I always keep a pressure washer like the Sun Joe SPX3000 handy for periodic cleaning that prevents algae and dirt buildup. For sealing, I prefer applying products with a sprayer to achieve even coatings, avoiding missed spots that can lead to uneven wear. These investments in quality tools keep my decks looking like new and functioning safely year after year.
Turn Your Knowledge Into Action Today
Every deck, no matter how sturdy it appears, benefits from informed maintenance and timely repairs. Embrace the tools, insights, and routines shared here to transform your backyard into a safe haven and a beautiful focal point. Remember, a well-maintained deck isn’t just about aesthetics—it’s about the safety and comfort of everyone who steps onto it.
What’s the first small improvement you plan to make on your deck this season? Share your thoughts below—I’d love to hear your plans and help you succeed!
,
I recently faced the challenge of wobbly rails on my deck after a harsh winter, and this post hits all the right points about assessing the root causes. I especially agree with the importance of using weather-resistant fasteners and inspecting joists—those are often overlooked in quick fixes but are so critical for long-term safety. One thing I found helpful was investing in a good level and a moisture meter to identify hidden issues before they become costly repairs. I’ve also started scheduling seasonal inspections to get ahead of any potential problems, which has saved me both money and stress. Has anyone tried using joist hangers or sistering new joists as part of their maintenance routine? I’m curious if that approach has made any difference in your experience, especially in areas prone to temperature fluctuations like here in Virginia. Looking forward to hearing if others have found unique tips or tools that helped keep their decks stable and safe over the years.