Ever stepped onto your deck and felt that unsettling wobble or noticed it sinking unevenly in some spots? I’ve been there myself—after months of neglect, my once-sturdy deck was more of a wobbly walkway than a safe outdoor retreat. That moment when I realized I couldn’t just slap on new decking boards and call it a day—that’s when I discovered the importance of properly leveling the old frame first.
Why Neglecting the Frame Can Turn Your Dream Deck into a Nightmarish Nightmare
Let’s face it: decks are a significant investment — not just in money but in safety and enjoyment. If the foundation isn’t solid, every additional upgrade or style change is pointless. An uneven frame can lead to squeaky boards, water pooling, and even structural failure over time. I vividly remember the first time I tried to install new boards directly over a warped frame—trust me, the result was a crooked, frustrating mess.
But here’s the good news: with the right approach, you can correct these issues and reinstate your deck’s stability and safety. Today, I’ll share the tried-and-true method I personally used to level my decaying old deck frame, transforming it into a reliable platform for relaxing and entertaining. Perfect for enjoying [Needham’s beautiful outdoors](https://deckbuildersneedham.com/3-low-cost-deck-railing-ideas-that-look-expensive), this step is crucial before laying new decking material.
Will a tedious leveling process ruin my project or is it worth the trouble?
I’ll admit, I made a mistake early on—skipping thorough inspections and rushing through the leveling process. That led to costly fixes later. Small mistakes can turn into big headaches, and I want to help you avoid that. Properly leveling your old deck frame isn’t just about aesthetics; it’s about safety, durability, and peace of mind—making the effort totally worthwhile. Ready to bring your deck back to life? Let’s get into the details of how I tackled this challenge.
Assess the Damage and Prepare for Leveling
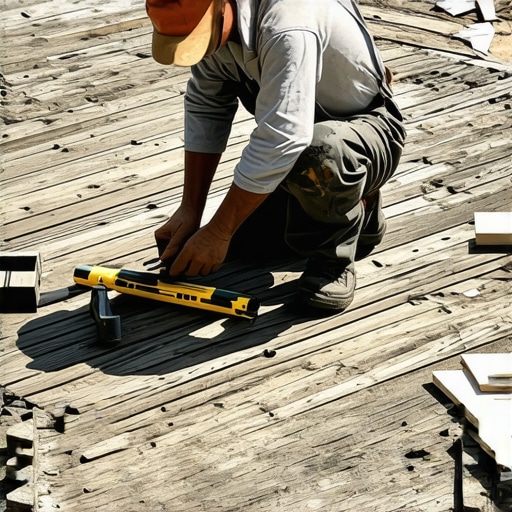
First, I removed any loose or damaged boards to get an unobstructed view of the frame. This clarified where the uneven spots were and made the subsequent steps smoother. Imagine peeling back the layers of an onion—you need to see what you’re working with clearly before making revisions. I used a long carpenter’s level and a 4-foot straightedge, placing them across the joists to identify high and low points. During my inspection, I noticed a few joists had shifted and some had rotted at the ends, which could cause the frame to sag irregularly. Noticing these issues early saved me from problems down the line and helped me plan the fixes more precisely.
Stabilize and Adjust the Foundation
Shim the Low Spots
To level the frame, I started shimmying in adjustable deck shims—these are like tiny, sturdy wedges. I placed them under the sagging joists, one at a time, to lift them slightly. Don’t just shove shims randomly; use your level to check height as you go. A crucial tip: take your time, adding small shims and rechecking frequently. I remember the first time I tried this, I over-shimmed a section and had to backtrack. It was a learning experience that taught me patience and precision are key here. The shims helped bring the entire frame closer to level, but some sections still needed further correction.
Replace Rotted or Damaged Joists
If you notice significant decay or rot—like I did with a couple of joists near the edge—it’s better to replace them entirely. I carefully removed the damaged joists using a reciprocating saw, taking care not to disturb the neighboring framing unnecessarily. To ensure the new joists sit flush, I set them on temporary blocks to match the height of the shims. When installing the new joists, I used galvanized joist hangers and confirmed proper alignment with my level. This step is akin to repairing the foundation of a building—skimping here can cause woes later, such as uneven decking or safety hazards. Proper replacement ensures your deck remains solid and safe for future use.
Secure and Stabilize the Frame
Next, I focused on securing all the adjustments. I used concrete deck blocks to support the shims under temporary load, reducing movement. Then, I reinforced the frame by tightening all existing lag screws and installing new joist hangers on loose or overburdened joists. This strengthens the frame’s integrity, much like adding braces to a crooked door frame. Once everything was stable, I double-checked the level in multiple directions, ensuring no twists or dips remained. This thorough stabilization process prevents future sagging and provides a reliable base for your new decking material.
Final Checks and Long-Term Maintenance
After completing the leveling, I examined the entire frame for any overlooked issues, like nail pops or minor shifts. I also applied a protective sealant to exposed wood to prevent moisture absorption, which could lead to future warping. Remember, a well-maintained frame not only supports your deck but extends its lifespan—think of it as giving your outdoor space a strong backbone. Regular inspections and timely repairs, like analyzing your [Needham deck’s safety features](https://deckbuildersneedham.com/safety-features-every-needham-deck-needs-in-2026), are key to keeping your deck safe and looking great for years to come.
While many homeowners assume that hiring a local Deck Builder in Needham is simply about finding someone affordable and skilled, there’s a less obvious but critical aspect that often gets overlooked: understanding the intricacies of local climate and how they influence decking choices and construction techniques. This nuance can make or break your project’s longevity and safety.
For instance, a common myth is that any wood or composite material works equally well in the Massachusetts climate. However, seasoned professionals know that some products expand, contract, or fade faster depending on humidity levels, temperature swings, and exposure to salt or snow. According to expert studies, choosing materials with the right moisture resistance dramatically extends your deck’s life—yet many skip this step in favor of cheaper options, risking costly repairs down the line.
What advanced homeowners should consider about local wear and tear
Beyond material choice, the installation method itself must account for underground moisture, proper drainage, and ventilation. For example, improper ledger board installation or inadequate flashing can lead to water infiltration, wood decay, and, ultimately, structural failure. As highlighted in recent research on building longevity, precise flashings and sealants are essential in damp climates like Needham’s to prevent hidden rot—more than just an aesthetic concern but a safety imperative. This is where a professional deck builder’s expertise, especially one who understands subtle local factors, proves invaluable. For comprehensive guidance on safety, check out safety features every Needham deck needs in 2026.
Many mistakenly believe that DIY approaches can substitute for expert knowledge, but this oft-overlooked nuance can cause long-term headaches. Correctly accounting for local conditions ensures your deck remains safe, stable, and beautiful across seasons. So, when selecting your Needham deck contractor, prioritize those who demonstrate an understanding of these sophisticated environmental factors, not just basic construction skills.
Next time you see a deck that has lasted decades despite harsh weather, remember the importance of these subtle but crucial details. Have you ever fallen into this trap? Let me know in the comments.

Maintaining a beautiful and safe deck in Needham requires more than just occasional inspections; it demands the right tools and methods to ensure longevity and ease of work. Over time, I’ve refined my toolkit to include equipment that makes assessments faster and repairs more precise, saving both time and money. Today, I’ll share the essential tools I recommend for every homeowner serious about deck maintenance.
Why a Quality Digital Moisture Meter Matters
That’s my first essential: a high-quality digital moisture meter. It’s vital for identifying hidden rot or moisture issues within the wood, especially in Needham’s humid climate. I personally use the
The Power of a Cordless Impact Driver
When it’s time to tighten or replace joist hangers and fasteners, a cordless impact driver is indispensable. I trust my Makita XDT16 impact driver because it delivers high torque without slipping, which is crucial when working with weathered or hard-to-reach fasteners. Its compact design allows me to work comfortably over extended periods, reducing fatigue. This tool speeds up projects and ensures all connections are secure, avoiding future wobbliness or safety issues.
Using Laser Levels for Accuracy
Achieving a perfectly level deck frame is essential—and for that, I rely on a laser level. I prefer the Bosch GLL 3-330 because it projects a bright, accurate laser across a larger area, making it easier to visualize uneven spots from a distance. Precise leveling not only enhances appearance but also extends your deck’s lifespan by evenly distributing weight and minimizing stress on individual joists. This method, backed by structural engineering principles, is the smart way to ensure long-term stability.
Why a Heavy-Duty Circular Saw Is a Must
Cutting new or replacement lumber accurately is vital for a professional finish. I recommend the DeWalt DWE575 because it’s powerful, lightweight, and offers precise cuts, including bevels if needed. Having a reliable saw makes quick work of replacing rotted joists or trimming decking boards to fit. Always use fresh blades and proper safety gear for best results and personal safety.
Future Trends in Deck Maintenance Tools
As technology evolves, I predict smarter, integrated systems—such as app-controlled moisture meters or laser levels with augmented reality features—will become standard. These innovations will streamline maintenance, allowing homeowners to perform routine inspections without professional help, ultimately prolonging deck life and enhancing safety. Keeping updated with these trends can give you a significant advantage in deck upkeep.
If you’re ready to take your deck maintenance to the next level, I highly suggest investing in a quality moisture meter and laser level. These tools empower you to identify issues early and ensure precise repairs, saving you time and money. For instance, regularly checking moisture levels can prevent rot from developing unseen beneath the surface, in line with industry standards outlined by OSHA guidelines.
Start with these tools, and you’ll find maintaining your Needham deck becomes more manageable—plus, you’ll enjoy peace of mind knowing your outdoor space remains safe and beautiful for years to come.

The Hardest Lesson I Learned About Deck Builders Needham
One of my biggest realizations was that even the best materials can’t compensate for neglecting proper framing and leveling. Skipping thorough inspections initially led me to costly repairs, highlighting that attention to detail is everything in deck restoration. Don’t assume your deck is fine without a detailed check—sometimes, the most hidden issues cause the biggest headaches.
3 Myths About Deck Builders Needham That Held Me Back
I used to believe that all decking materials are equally suitable for the Massachusetts climate, but experienced professionals know otherwise. For example, choosing the right moisture-resistant materials and proper installation techniques can dramatically extend your deck’s lifespan. Educate yourself before making quick decisions to avoid regrets later.
What Experts Won’t Tell You About Deck Builders Needham
Many overlook the importance of local climate awareness when selecting materials or planning maintenance. Understanding how salt, snow, and humidity affect your deck allows for smarter choices—like proper drainage and sealants—that prevent long-term damage. Trusting a contractor with local expertise can be the difference between a deck that lasts decades and one that needs frequent repairs.
My Essential Toolkit for Maintaining a Sturdy, Safe Deck
A quality digital moisture meter is my go-to tool for early detection of rot or water infiltration—essential in Needham’s humid summers. Paired with a cordless impact driver for fast and secure fastener work, and laser levels for precise framing, these tools make maintenance manageable and effective. They help catch issues before they escalate, saving money and ensuring safety.
Sometimes, Giving Your Deck a Fresh Look Is Easier Than You Think
If your deck shows signs of aging, consider simple upgrades like applying a fresh stain or adding stylish railings. Techniques like installing low-cost lighting or decorative accents can transform your outdoor space without a full rebuild. For ideas on upgrading your existing deck, check out this guide.
Seize the Moment and Reclaim Your Outdoor Haven
Revitalizing your Needham deck doesn’t have to be daunting—with the right knowledge and tools, you can craft a safe, beautiful space for years to come. Start small, stay patient, and remember: every expert was once a beginner. Your outdoor retreat is within reach, and the effort will be well worth it.
What aspect of deck restoration surprised you the most? Share your experiences below—I’d love to hear your stories!