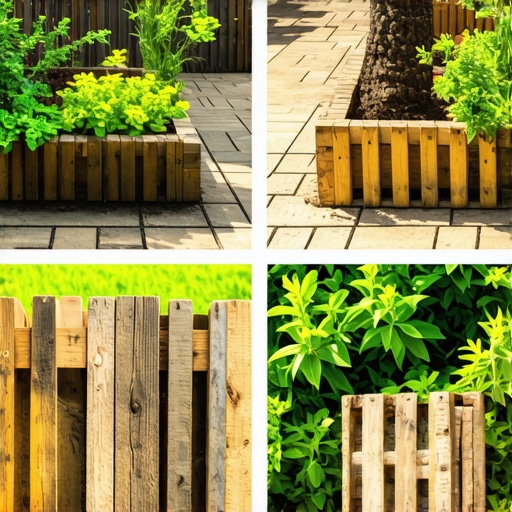
I vividly remember the moment I looked out over my cluttered backyard and wondered if those leftover deck boards and scraps could somehow be put to better use instead of piling up in the corner. Like many homeowners, I faced the common dilemma: piles of unused wood and materials that seemed too good to toss but too inconvenient to store. It was a lightbulb moment when I realized that those humble scraps might just hold the key to creating charming, eco-friendly garden features.
Discovering the Hidden Potential in Deck Scraps
Certainly, it’s tempting to simply toss away or recycle deck remnants. But I’ve found that with a bit of imagination and some straightforward techniques, you can turn scraps into delightful accents that boost your garden’s personality. Whether it’s repurposing old balusters as plant stands or using leftover planks to craft raised beds, there’s a satisfying joy in giving new life to what others see as trash. Plus, you’re reducing waste and saving money—win-win!
If you’re wondering whether you can even get started, don’t worry. I’ll walk you through practical ideas that require minimal tools but deliver maximum impact. And if you’re skeptical about the results, I completely understand—initial missteps are part of the process. But trust me, once you see your backyard transform with these simple projects, you’ll wonder why you didn’t start sooner.
Is Using Deck Scraps Actually Worth the Hype?
Early in my journey, I made the mistake of underestimating the durability of recycled wood. I painted some scraps for a garden border, only to find them weathered and rotted within a year. That taught me a valuable lesson: choosing the right type of wood and sealing it properly makes all the difference. Today, I pay attention to material type and finish, and I can proudly say that many of my DIY garden features have lasted years. A quick tip: always research the best sealants for outdoor use, such as those recommended for cedar deck sealants.
Transforming deck scraps isn’t just a cost-effective way to embellish your garden—it’s also a chance to showcase your creativity and environmental consciousness. Ready to turn that pile of wood into your favorite garden corner? Let’s dive into simple, effective ideas and tips that will make this project a rewarding experience.
Prepare Your Materials and Workspace
Start by sorting your deck scraps based on size, type, and condition. For example, separate long planks from small fragments and discard any wood with mold or rot. Clear a flat workspace in your garage or yard, and gather essential tools like a saw, drill, hammer, nails, screws, measuring tape, and safety equipment. I once spent an afternoon in my driveway, organizing old cedar boards and wielding a handheld saw to cut them into manageable pieces for my raised garden beds, which resulted in a tidy DIY project that added charm to my backyard.
Design Your Garden Feature
Draft and Measure Your Plans
Sketch your desired garden feature—be it a flower bed border, a small table, or a decorative trellis. Use measurements that fit within your available space and match your aesthetic. Take note of the dimensions, and double-check your plans before cutting to avoid costly mistakes. I used painter’s tape on my deck to outline the shape of my new border, ensuring everything fit perfectly before assembly.
Calculate Material Needs
Calculate the number of planks or scraps needed based on your design. For instance, if building a raised bed, determine the length, width, and height, then count how many boards of appropriate length you’d need. Remember, not all scraps will be usable; some may need trimming or joining. I once thought I could build a small bench out of leftover balusters, but end up needing additional pieces, which I sourced from similar recycled wood to complete the project seamlessly.
Cut, Assemble, and Secure
Begin by marking your cuts carefully, using a measuring tape and pencil for precision. Use a saw suited for your wood type—my choice was a fine-tooth hand saw for clean cuts on cedar. When assembling, pilot drill holes to prevent splitting, especially with older, brittle wood. Secure pieces with nails or screws, ensuring they are flush and stable. I remember spending a weekend attaching short wooden segments to create a decorative lattice, which required patience but resulted in a sturdy trellis that now supports climbing plants.
Seal and Protect Your Creation
Once assembled, apply a weatherproof sealant suitable for outdoor wood—like the best deck sealers. This step is crucial for longevity, especially in climates like Massachusetts, where rain and snow are common. My first attempt at sealing a compost bin lid failed because I skipped this step, leading to rapid deterioration. Now, I always seal all surfaces thoroughly to prevent rot and maintain appearance.
Position and Anchor Your Structure
Place your finished feature in the desired location, making sure it sits level. If combining with existing structures, secure it with anchors or stakes for added stability. For borders or raised beds, digging slight trenches and using concrete or heavy-duty stakes can prevent shifting over time. I once installed a small wooden planter on a slope, anchoring it with stakes and gravel to keep it stable during heavy rains.
Final Touches and Maintenance
Add decorative paint, stain, or finish to match your garden theme. Regular maintenance, like resealing annually, will extend your project’s lifespan. Keep an eye on signs of wear or damage, especially after harsh weather. I learned this the hard way when a poorly sealed border developed rot within two seasons, prompting me to improve my sealing process for future projects.
Many homeowners assume that hiring a deck builder in Needham is simply about choosing the lowest bid or the fastest contractor. However, this oversimplification overlooks crucial nuances that can make or break your project’s success. One common misconception is that all deck builders are equally equipped to handle your specific needs. In reality, many fail to understand the local climatic challenges, like New England’s harsh winters, which demand specialized materials and maintenance approaches. For example, some assume that standard pressure-treated lumber suffices, but materials like cedar or composite decking—such as those discussed in [the best cedar options for Massachusetts’ weather](https://deckbuildersneedham.com/the-best-deck-lights-for-curb-appeal-in-2026)—offer improved durability and aesthetics.
Another quirk often overlooked is the finesse in structural details that experienced local builders implement. For instance, proper footing installation tailored to soil conditions prevents issues like sinking or shifting, which are common pitfalls in Needham. If neglected, you might face costly repairs down the line, or the need to rebuild altogether. It’s also worth noting that many underestimate the importance of precise drainage planning—ignoring this can lead to water pooling and wood rot. Consulting articles like [how to build a deck that lasts 30 years](https://deckbuildersneedham.com/how-to-build-a-deck-that-lasts-30-years-or-more) can shed light on what fundamental practices seasoned builders employ.
Yet, beyond construction specifics, one of the most insidious myths is that maintenance isn’t necessary if you pick the right materials. Some believe that composite decks, for instance, are maintenance-free, but they still require cleaning and occasional inspections to ensure longevity—especially in our fluctuating climate. Power washing, as explained in [how to clean pollen off your deck without damaging it](https://deckbuildersneedham.com/how-to-clean-pollen-off-your-deck-without-power-washing), can significantly extend the lifespan of any deck. Ignoring these nuanced details can lead to early wear, which many homeowners only discover after costly corrections.
Furthermore, advanced considerations like safety features—such as cable railings—are often underestimated. Many assume they are more difficult to maintain than traditional rails, but recent innovations have made these solutions more durable and low-maintenance, as discussed in [are cable railings hard to maintain in Massachusetts](https://deckbuildersneedham.com/are-cable-railings-hard-to-maintain-in-massachusetts). Understanding these subtleties ensures you invest wisely and select features that balance aesthetics and longevity.
In essence, the key to truly benefiting from expert deck construction in Needham is to pierce beyond surface-level choices and recognize the deep craftsmanship, material science, and local conditions that influence durability and satisfaction. Don’t fall into the trap of oversimplification—being informed about these nuances will help you make decisions that stand the test of time. Have you ever fallen into this trap? Let me know in the comments, and share your experiences or questions about navigating local deck construction challenges.Maintaining your Needham deck requires the right tools and a consistent approach to ensure longevity and safety. Over time, even the sturdiest materials can degrade without proper care, so investing in specialized equipment and following a strategic maintenance schedule is crucial. One essential tool I personally rely on is a high-quality power washer equipped with adjustable pressure settings. This allows me to remove dirt, pollen, and mildew without damaging the wood, especially important given Massachusetts’ variable weather. Regular cleaning using an oxygen bleach solution, as recommended in [how to clean pollen off your deck without power washing](https://deckbuildersneedham.com/how-to-clean-pollen-off-your-deck-without-power-washing), extends the life of the finish and prevents mold buildup. Additionally, I use a handheld staple gun and span longitudinally aligned nails to secure loose boards as part of routine inspections, preventing trip hazards or structural issues. For sealing, I opt for a high-grade, weather-resistant sealer like the ones detailed in [the best sealers for cedar decks in 2026](https://deckbuildersneedham.com/the-best-sealers-for-new-cedar-decks-in-2026), which I apply annually after a thorough cleaning. Looking ahead, advancements in smart deck monitoring—like sensors that track moisture levels and structural integrity—are poised to revolutionize how we care for our outdoor spaces, allowing for proactive maintenance rather than reactive repairs. How do I maintain decks over the years? I schedule semi-annual inspections—spring and fall—and follow a disciplined cleaning and sealing routine, addressing small issues before they become costly repairs. For example, checking for signs of a bowed joist or a cracked post can prevent major structural failures. I also keep a toolkit with a cordless drill, wood shims, and corrosion-resistant brackets ready. This approach not only prolongs the aesthetic appeal and safety of the deck but also saves money in the long run. Considering the upcoming trends, integrating smart sensors and high-performance sealants will be standard practice for residential decks in Needham. Don’t wait for visible damage—try using a high-pressure, adjustable power washer combined with a trusted sealer to keep your deck in top shape year after year. To get started, I recommend testing a small section first to determine the optimal pressure and product compatibility, ensuring you avoid unintended damage.
The Hardest Lesson I Learned About Deck Builders Needham
One mistake I made early on was underestimating the importance of choosing the right sealant for outdoor wood; I learned that proper sealing can double the lifespan of your DIY projects, especially in Massachusetts’s challenging weather. Now, I always research and select products like those recommended in best cedar deck sealers and apply them diligently.
How I Discovered the Value of Small Details
Sealing joint edges and pre-drilling holes might seem tedious, but these tiny steps have saved me from splitting or rotting issues. For example, I once skipped pre-drilling and ended up cracked boards, which was frustrating yet a potent lesson in patience and precision. Now, I take my time with measurements and preparation for lasting results.
My Essential Toolkit for Recycled Deck Projects
Over the years, I’ve curated a set of trusted tools that make repurposing deck scraps efficient and enjoyable. A quality hand saw, a cordless drill with various bits, weather-resistant fasteners, and a reliable measuring tape are my staples. These tools, combined with knowledge from sources like how to clean pollen off your deck, have empowered me to breathe new life into old wood while maintaining safety and durability.
What Experts Won’t Tell You About Deck Builders Needham
Many overlook the significance of soil and climate considerations when building or renovating decks. For instance, understanding local soil stability informs proper footing installation—preventing sinking or shifting—which is crucial in varied landscapes like Needham. Delving into article how to fix a bowed deck joist has taught me to anticipate potential issues and address them early, saving time and money.
Elevate Your DIY Game with Targeted Resources
To refine my approach, I rely on trusted sources and tools that mesh quality with practicality. For example, low-maintenance railing options help me choose boundary solutions that require less upkeep, perfect for busy lifestyles or aging materials. Similarly, creating outdoor entertainment spaces has inspired me to think bigger, transforming simple scraps into inviting retreats.
Guaranteed to Inspire Your Next Project
In my journey with transforming deck scraps, I’ve learned that patience, research, and quality tools are your best allies. The process of customizing your outdoor space not only saves money but also creates a unique reflection of your personality and values. Whether it’s a whimsical plant stand or a robust raised bed, the effort pays off with a space that’s both beautiful and sustainable. Are you ready to turn your leftover wood into your very own backyard masterpiece? Share your ideas or questions below—I’d love to hear about your adventures in DIY landscaping with recycled wood!
,