It was a Saturday afternoon, and I was finally ready to give my tired-looking deck a fresh new look. Armed with my sander, I dove in with enthusiasm, only to realize seconds later that I was roughing up the wood more than I had intended. The grains were splintered, some areas looked uneven, and I couldn’t help but feel a twinge of regret. That moment hit me hard—how could I have been so careless?
Sanding Your Deck the Right Way: Protecting the Grain and Achieving a Smooth Finish
Everyone who’s tackled a deck renovation has faced the dilemma: how to sand without harming the wood’s natural grain? It’s a common challenge, and honestly, it’s one that trips up many DIY enthusiasts and even seasoned pros. The truth is, improper sanding can strip away the beauty of your wood, lead to uneven surfaces, and even cause long-term damage that might cost hundreds to fix. But don’t worry—over the years, I’ve learned a few tricks to keep the grain intact while still achieving that perfect, smooth finish.
Is Sanding Your Deck Actually Worth the Fuss?
When I first started, I believed that any abrasive would do the trick. Turns out, that’s a mistake I paid dearly for. I learned the hard way that using too coarse a grit or pressing too hard can gouge the wood and ruin its appearance. Early on, I also skipped the step of properly preparing the surface—why bother cleaning the deck dust or choosing the right sandpaper? These small oversights made my initial results lackluster.
Research from experts like the National Wood Flooring Association emphasizes that proper sanding techniques are essential for preserving the grain’s integrity and ensuring a long-lasting finish. Skipping these steps can cause the stain or sealant to penetrate unevenly, leading to a less durable deck.
So, have you ever felt frustrated because your sanding job didn’t turn out quite right? Believe me, I’ve been there, and I can tell you—there’s a better way. In the following sections, I’ll walk you through how to sand properly, step by step, so your deck looks stunning and stays protected for years to come. Ready to transform your outdoor space without destroying its natural beauty? Let’s get started.
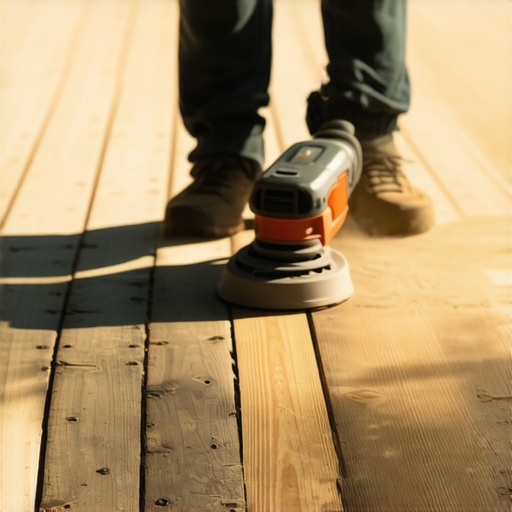
Select the Right Tools and Prepare Your Surface
Begin by choosing a medium-grit sandpaper, like 120 grit, to avoid gouging the wood. I once tried using coarse grit on a delicate cedar deck and ended up with scratches that took extra time to fix. Clear the deck of furniture and sweep away loose debris. Use a leaf blower or broom to ensure the surface is dust-free, which helps prevent grit from embedding into the wood during sanding.
Master the Proper Sanding Technique
Hold the sander firm but gentle, moving it with the grain of the wood. Think of it like petting a cat—you want to be gentle and follow its flow. During my first attempt, I pressed too hard, which caused uneven surfaces. Instead, let the sander do the work by keeping it moving steadily to avoid gouges and uneven patches. Always overlap each pass slightly to ensure uniform results.
Pay Attention to Edges and Corners
Corners and edges tend to be overlooked, leading to rough spots that catch stain or sealant. Use a hand-held sanding block or a detail sander for these areas. I learned this the hard way when I missed a corner, and it remained rough until I touched it up with a smaller tool, which improved the overall finish.
Manage Dust and Maintain Your Equipment
After each pass, vacuum or sweep the dust away to prevent it from settling into the wood. Wear a dust mask and eye protection for safety. During my last deck project, neglecting dust management led to clogging my vacuum filter and dulling my sander quickly. Regularly clean your sander’s filters and pads to keep performance optimal—staying on top of maintenance extends the tool’s lifespan.
Evaluate Your Progress and Make Adjustments
Periodically stop to inspect your work. Run your hand lightly over the deck surface; it should feel uniformly smooth and free of splinters. If you notice rough patches, focus on those areas with a finer grit sandpaper, like 180 or 220 grit, for a polished look. I once skipped this step, which resulted in uneven staining later, so patience here pays off.
Finish with a Light Sanding and Clean-Up
Before applying any finish, do a final pass with an ultra-fine grit paper to close the wood pores. This step ensures better adhesion of stain or sealant. Afterward, thoroughly sweep and wipe down the deck with a damp cloth to remove any remaining dust particles, which can ruin your finish. Proper prep keeps your deck looking professional and lasting longer. If you need guidance on maintaining your deck’s overall health, check out [7 critical deck safety checks](https://deckbuildersneedham.com/3-critical-deck-safety-checks-every-needham-homeowner-needs) to ensure everything is in top shape.Many homeowners believe that hiring a deck builder in Needham is simply about selecting someone with the lowest quote or the flashiest website. However, this common misconception overlooks the nuanced skills and knowledge that truly ensure a lasting and beautiful deck. As an expert in the field, I can confirm that what most people miss are the intricate details that differentiate a good contractor from a great one. For instance, understanding the subtleties of soil type and foundation requirements can prevent long-term issues like uneven settling or structural failure. Contrary to popular belief, not all materials are suited for the local climate; some woods or composites may warp or degrade faster if not chosen carefully, which is why I recommend thoroughly researching the environmental resilience of your options.
One critical myth is that any professional can handle complex projects flawlessly. But in reality, experienced deck builders in Needham recognize the importance of meticulous site assessments, including evaluating existing structures, soil stability, and local zoning regulations. Ignoring these can lead to costly reworks or legal complications. Furthermore, many overlook the importance of finishing details, such as proper sealing and maintenance planning, which extend the lifespan of your deck.
A common mistake I see is underestimating the importance of drainage and water management. Failure to incorporate effective flashing, proper slope, and strategic placement of water runoff channels results in water damage and rot over time. This nuance is often dismissed by DIY enthusiasts who focus only on the aesthetic aspects.
From my experience, adopting an advanced approach means understanding the subtle interaction between materials, climate, and design. For instance, integrating smart lighting with your deck not only elevates the aesthetics but also enhances safety—consider exploring innovative lighting ideas that seamlessly blend functionality and style. Check out [7 custom lighting ideas for your stairs and railings](https://deckbuildersneedham.com/7-custom-lighting-ideas-for-your-stairs-and-railings) for inspiration.
Have you ever fallen into this trap? Let me know in the comments. Remember, the difference between an ordinary deck and one built with expert nuance can significantly impact its durability, safety, and beauty.
Keeping Your Deck in Prime Condition: Essential Tools and Maintenance Tips
Owning a beautiful deck is a commitment that extends beyond initial construction. To ensure your outdoor space remains sturdy, safe, and visually appealing, investing in the right tools and adopting a regular maintenance routine is crucial. Over the years, I’ve refined my toolkit, focusing on equipment that offers reliability and precision—elements vital for professional-grade results at home.
One staple in my arsenal is a high-quality orbital sander equipped with variable speed settings. I prefer models with dust collection ports, like the Bosch ROS20VSC, which significantly reduces airborne debris and keeps the workspace cleaner. Personally, I find that using a sander with adjustable speed allows me to delicately sand finishes or more aggressive removals depending on the project stage. Regularly replacing abrasive pads ensures efficient performance and prevents scratches, especially important when preparing surfaces for sealing or staining.
When it comes to cleaning decks, power washers are indispensable. I recommend models that offer adjustable pressure settings; for example, the Sun Joe SPX3000 provides stellar control, preventing damage to delicate wood fibers. Correct pressure settings are vital—too much force can gouge or splinter the wood, undermining the very foundation of your maintenance efforts. To tackle stubborn grease or food spills, I turn to eco-friendly solutions like the ones detailed here, which effectively clean without harsh chemicals or risking harm to your plants and pets.
For ongoing monitoring, I utilize moisture meters from brands like Wagner Meters. Knowing when your deck’s moisture level is optimal before applying finish or stain can save you from costly mistakes and uneven coverage. Accurate moisture readings also help identify hidden rot or water intrusion issues early, prolonging the deck’s lifespan. Modern sensors often connect via Bluetooth to smartphone apps, giving instant feedback and record-keeping—making maintenance data accessible and manageable.
Keeping tools in top shape is equally important. Regularly inspecting power tools, replacing worn parts, and lubricating moving components extend their lifespans and ensure safety during use. I’ve found that maintaining a dedicated toolbox, with labels and organized compartments, accelerates my workflow and minimizes downtime during projects.
What’s Next for Deck Maintenance Tools?
The future points towards smarter tools integrated with IoT technology, capable of providing real-time data on wood conditions and suggesting maintenance actions proactively. Integrating such innovations could further streamline long-term upkeep, allowing homeowners in Needham to catch issues early and avoid expensive repairs.
To optimize your deck’s health, try incorporating a moisture meter into your routine or upgrading to a variable-speed sander. These investments pay off by reducing maintenance time and ensuring your deck remains a stunning outdoor retreat for years. For advanced care, consider consulting a professional for annual inspections or applying protective coatings with professional-grade sprayers—tools that, when used correctly, deeply enhance the durability of your deck surfaces. Discover more about protecting your deck by reviewing critical safety checks or exploring the latest drip-edge solutions.
The Hard Lessons That Never Made the Brochure
One of the most valuable lessons I learned about deck care is that patience and attention to detail can save you a lot of trouble down the line. I once rushed through a sanding project, thinking a quick pass would suffice. The flaw? I missed spotty areas that led to uneven staining later. That experience taught me that every inch of your deck deserves meticulous care—it’s the difference between a surface that looks good and one that lasts decades.
Another insight is realizing that not all tools are created equal. Using an inexpensive sander might seem tempting, but investing in a quality model with variable speed and effective dust collection can make your work smoother and more forgiving. Trust me, those small upgrades pay off when you’re aiming for a flawless finish.
Lastly, embracing the concept of ongoing maintenance has transformed how I approach deck projects. A deck isn’t a set-it-and-forget-it structure; it’s an evolving part of your home that benefits from regular inspections and touch-ups. Incorporating simple routines, like quick cleanings and moisture checks, helps prevent major repairs and keeps the wood in pristine condition.
Your Toolbox for Long-Lasting Decks
Over the years, I’ve curated a collection of tools that make deck maintenance efficient and effective. My go-to is a reliable orbital sander from brands like Bosch, which offers excellent dust collection and handling. I’ve found that paired with high-quality abrasive pads, it provides a consistent, gentle touch that preserves the wood’s grain. For cleaning between projects, a pressure washer with adjustable settings has been indispensable—just be sure not to use excessive pressure, especially on delicate cedar or composite decking.
Moisture meters from trusted brands help me determine the best moments to apply stains or sealants, ensuring optimal absorption and longevity. Investing in proper storage and regular inspection of tools prevents breakdowns and keeps my toolkit ready for any project. If you’re interested in some expert tips, check out the resources on [proper deck safety checks](https://deckbuildersneedham.com/3-critical-deck-safety-checks-every-needham-homeowner-needs) to keep everything in top shape.
Looking ahead, I believe the next frontier in deck maintenance involves smarter, connected tools that monitor wood health in real time. Imagine apps that gauge moisture levels and automatically recommend repair actions—technology that could become a game-changer for homeowners and professionals alike.
Step Into Your Power and Revitalize Your Outdoor Space
Your deck is more than just an extension of your home—it’s a sanctuary, a gathering spot, and a reflection of your personal style. With a bit of knowledge, the right tools, and patience, you hold the power to transform it into something truly extraordinary. Whether you’re repairing, sanding, or sealing, each step brings you closer to a deck that withstands the test of time and weather. Dive into the process, enjoy the journey, and remember—the best decks are built with care, not haste.
What part of deck maintenance do you find most challenging? Share your experiences below—I’d love to hear your stories and tips!
,