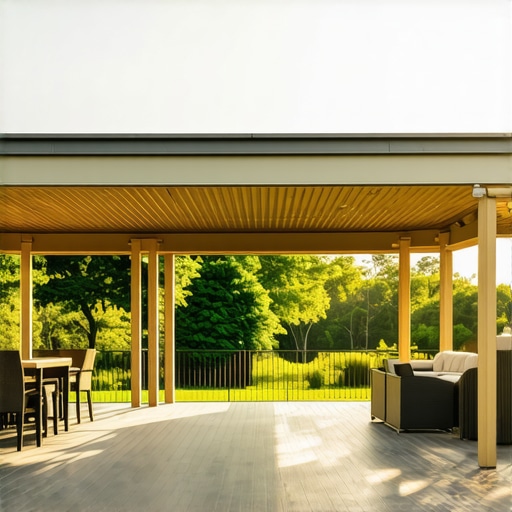
I remember the moment I first stepped onto my backyard deck after a heavy rainstorm. Instead of enjoying the fresh air and sunshine, I was met with a soggy mess beneath my feet—water dripping, wood warping, and a persistent dampness that ruined my mood. It was a lightbulb moment that made me realize: my outdoor living space was missing something crucial. That realization led me down a path of research, and what I discovered about Best Under-Deck Ceiling Systems for Dry Outdoor Living changed everything.
Why Well-Designed Under-Deck Ceilings Matter More Than You Think
If you’ve ever felt frustrated with puddles and moisture ruining your outdoor gatherings, you’re not alone. An effective under-deck ceiling acts as a shield against rain, controlling runoff and keeping your patio area dry and usable year-round. It’s more than just an aesthetic upgrade; it’s about transforming your backyard into a true extension of your home, one where you can host barbecues, enjoy family time, or simply relax without worrying about weather interference.
When I first looked into under-deck systems, I underestimated their importance. I thought a simple tarp or canopy would do. But I quickly learned that a professionally installed, quality under-deck ceiling system offers long-term durability, better water management, and a cleaner look. I also found that opting for the right system can save you a lot of maintenance and headaches down the road. Trust me, skimping here can lead to costly repairs and discouragement.
Is the Hype Around Under-Deck Ceilings Just Overblown?
Early on, I made a mistake of assuming that all under-deck ceiling options were created equal. Some DIY solutions seemed tempting, but ultimately, I ended up with leaks and an unpleasant mess. If you’re considering upgrading your outdoor space, it’s vital to choose a system tailored to your needs—like those that use hidden fasteners or advanced water drainage features. I recommend checking out some hidden clip technology and other innovations that ensure longevity and aesthetics.
According to a study published in the Journal of Building Science, proper moisture management significantly extends the lifespan of deck structures, saving homeowners money and hassle. Recognizing the signs early and installing the right system makes all the difference.
Now that I’ve shared my story, let’s explore the practical steps to choosing and installing an under-deck ceiling system that keeps your outdoor space dry, inviting, and ready for any weather. If this sounds like what your backyard needs, stay tuned—your transformation begins now.
,
Assess Your Space and Choose the Right System
Begin by evaluating your backyard deck to determine the appropriate under-deck ceiling system. Measure the area carefully and consider factors like slope for water runoff. I once mistakenly purchased an overly complex system for a small deck, which resulted in unnecessary expenses. Instead, I recommend consulting a professional or reviewing options like hidden clip technology discussed in hidden fastening systems to ensure durability and aesthetic appeal.
Prepare Your Materials and Tools
Gather all necessary materials—composite panels, drainage components, fasteners, and sealing compounds—and tools such as drills, screwdrivers, level, and measuring tape. A tip from my experience: organizing your tools beforehand speeds up the process and minimizes mistakes. Using high-quality fasteners is crucial; consider those recommended for high-salt environments if your area is coastal, as detailed in best fasteners for salt environments.
Remove Debris and Inspect the Deck
Clear any leaves, dirt, or debris from the deck surface. Examine the joists for damage or rot by checking for soft spots or sagging. For example, I once found a rotted joist hidden beneath new decking, which could have compromised the entire structure if unnoticed. Repair or replace damaged joists, following guidelines in joist repair tips. Ensuring a solid foundation is key to a successful installation.
Install Drainage and Framing Components
Start by installing a drainage system that directs water away from the deck. Use specialized brackets or hidden fasteners to attach the framing supports, creating an air gap that promotes airflow and prevents moisture buildup. Remember, proper ventilation extends the life of your deck, much like the advice in airflow benefits. During my project, I used a level constantly to keep supports perfectly aligned, avoiding uneven surfaces that could lead to water pooling.
Attach the Ceiling Panels Safely
Lay the composite panels over the framing, securing them with fasteners designed for outdoor use. Use a pattern that minimizes visible fasteners—an approach I learned from reading about hidden clip technology. Be sure to follow manufacturer instructions for spacing and sealing joints to prevent leaks. I found that pre-drilling holes helped avoid splitting the composite material and made fastening smoother, especially on a windy day.
Seal and Finish Your Installation
Apply weatherproof sealant along the edges and joints for added protection. Check all fasteners for tightness and inspect for any gaps that might allow water intrusion. My first attempt was a bit messy—over-application of sealant caused some drips—but I learned to use a caulking gun carefully and remove excess promptly. Proper sealing ensures your under-deck system remains dry and maintenance minimal.
Inspect and Maintain Regularly
Once installed, periodically check your system for signs of wear or damage. Clean gutters and drainage pathways to avoid blockages. Regular inspections—like checking for loose fasteners or damaged panels—extend the lifespan of your investment. Remember, a well-maintained under-deck ceiling transforms your outdoor space into a year-round retreat, free from the frustration of unexpected rainouts.
While many believe that selecting a deck builder is simply about comparing prices and portfolios, there’s a deeper layer of understanding that often gets ignored. Most people assume that all contractors in Needham follow the same standards, but in reality, the nuances in their methods can significantly affect the durability and safety of your outdoor space.
Why Believing All Deck Builders Are Equal Can Cost You
It’s a common myth that if a contractor is licensed, they’re automatically the best choice. But experience shows that specialization matters. For example, specialized deck builders possess nuanced skills—like precision in fastening techniques and understanding local climate impacts—that general contractors might overlook. Trusting a generalist might save initial costs but could lead to costly repairs due to overlooked details.
Are You Overlooking the Long-Term Effects of Material Choices?
Many homeowners focus on the appearance and initial cost, but the hidden impact of material selection is often underestimated. For instance, choosing standard pressure-treated wood without considering climate-specific treatments, like Kiln Dried After Treatment (KDAT wood), can result in faster rot and warping, especially in humid Massachusetts weather. An experienced Needham builder knows how to recommend materials that balance aesthetics, durability, and environmental conditions, avoiding future headaches.
Pro tip: Always inquire whether your builder uses advanced fastening systems, such as hidden clips, which not only enhance aesthetics but also improve moisture resistance and longevity (hidden clip technology).
Beware the Common Pitfalls in Maintenance and Inspection
Another misconception is that once a deck is built, it remains maintenance-free. In truth, many homeowners neglect regular inspections, leading to overlooked signs of decay, such as soft spots or loose fasteners. Expert Needham builders include comprehensive maintenance plans, emphasizing routine checks for structural integrity and moisture management. Skipping these steps can compromise safety and shorten your deck’s lifespan; it’s an advanced nuance that differentiates a decent build from a true investment.
Incorporating these subtle yet impactful considerations can save you thousands in repairs and extend the life of your outdoor structure. Remember, the right builder seamlessly integrates expert practices, from material selection to ongoing maintenance.
Have you ever fallen into this trap? Let me know in the comments. Your experience can help others make smarter choices when selecting their Needham deck contractor.
,
Tools I Recommend for Deck Maintenance and Long-Term Care
Maintaining a deck requires the right equipment and a strategic approach to ensure durability and safety over time. Personally, I’ve found that investing in quality tools not only makes the job easier but also extends the lifespan of your outdoor space. One staple in my toolkit is a high-powered cordless drill with variable speed settings, which allows precise fastening and removal of screws without damaging the material. For measuring and leveling, I rely on a laser level—specifically, the Leica UREA line—because it provides accurate, long-distance readings that are invaluable when ensuring your deck remains perfectly even, especially after weather shifts. The trend toward laser leveling technology is growing, and for good reason; precision reduces future maintenance costs.
Power washers are another essential, particularly for cleaning composite or wood surfaces. I use a Sun Joe SPX3000, which offers adjustable pressure settings—crucial for avoiding surface damage. Regular cleaning prevents mold and grime buildup that can expedite wear. For inspecting hidden issues, I recommend a moisture meter like the Triplett Moistek. Detecting areas with excessive moisture helps identify potential rot or decay before they become costly repairs. Using these tools helps keep your deck in prime condition, saving you money and stress in the long run.
Schedule Preventive Maintenance with Advanced Techniques
Long-term care involves more than just tools—it’s about a proactive mindset. I suggest creating a seasonal maintenance schedule that includes inspections of fasteners, joist condition, and sealants. For instance, replacing loose or corroded fasteners early with hidden clip systems can prevent structural issues and maintain aesthetic appeal. It’s also wise to revisit your sealant application every couple of years to ensure water remains extruded, especially in climate zones like Needham where humid summers and snow can take a toll. Want to make this process easier? Consider adopting a deck maintenance app that tracks your inspection dates, such as Decks.com’s digital planner—an excellent resource for homeowners aiming to extend deck longevity.
How do I maintain my deck over time?
Implementing a dedicated, routine inspection and cleaning plan is key. Use your moisture meter to check hidden decay, and keep fasteners tight with a cordless impact driver. Also, explore professional-grade sealants like those recommended in 2026 deck safety guides to ensure your sealant holds up against weather. Prioritize preventive measures—routine maintenance not only preserves your deck’s beauty but also prevents costly repairs down the line. Start by setting a biannual schedule that includes cleaning, fastener checks, and resealing. With consistent care and the right tools, your deck can remain a safe, inviting space for years to come. Ready to upgrade your maintenance routine? Try scheduling your next thorough inspection with a laser level and moisture meter—your future self will thank you.
Lessons From the Behind the Scenes of Deck Success
One of the most eye-opening lessons I learned was the importance of precise moisture management. Early on, I underestimated how subtle issues like tiny gaps or overlooked fasteners could lead to major problems years down the line. That realization made me prioritize expert installation techniques, especially hidden clip systems that many miss. Additionally, I discovered that choosing materials suited specifically for Massachusetts’s climate makes a huge difference in longevity, saving me endless headaches. Lastly, I learned that regular preventative inspections are not just maintenance tasks—they’re investments that protect your entire outdoor living space from costly repairs and premature aging.
My Essential Toolkit for a Resilient Deck
Over the years, I’ve come to trust a few key tools that keep my deck in prime shape. A high-quality laser level—like the Leica UREA—ensures every panel and support remains perfectly aligned, especially after weather shifts. Power washers, such as the Sun Joe SPX3000, help me clean surfaces efficiently without damage. A reliable moisture meter, like the Triplett Moistek, detects hidden decay early. Lastly, a sturdy cordless impact driver with variable speed settings makes tightening fasteners a breeze. These tools, paired with trusted resources like professional-grade sealants, form the backbone of my long-term deck care routine.
Seize The Moment to Reinvent Your Outdoor Space
Your backyard is more than just a patch of grass—it’s a canvas waiting for your personal touch. With the right under-deck ceiling system and a bit of know-how, you can transform it into a weather-proof retreat that offers year-round comfort. Don’t wait for another rainy day to wish you had done something sooner; take action now. Remember, every upgrade you make today lays the foundation for countless relaxing moments tomorrow. You have the power to create an outdoor sanctuary that’s both functional and beautiful—ready to withstand whatever Massachusetts weather throws your way. Step into that future and make your dream backyard a reality today.