It was a sunny Saturday afternoon when I finally decided to tackle that stubborn leaning post on my deck. As I grabbed my toolbox, I noticed a soft wump as I pushed on the post—something didn’t feel right. That moment was a lightbulb for me. I realized how easy it is to overlook the silent signs of decay until a minor issue becomes a major safety headache.
The Importance of Regular Deck Post Checks
Many homeowners take their decks for granted, assuming if it looks fine from the surface, everything’s okay. But beneath the paint or stain, rot can be quietly inching its way through the structural posts—crucial supports that keep your deck sturdy and safe. Ignoring these signs can lead to dangerous collapses or costly repairs. Especially in climates with high humidity or frequent rain, posts are vulnerable to moisture damage. According to the National Park Service, a deck’s safety depends heavily on early detection of issues like rotting wood. That’s why I decided to share what I learned about checking your deck posts before an emergency arises. When you frequently inspect your deck, you catch problems early, saving money and ensuring the safety of everyone enjoying your outdoor oasis.
Is Checking Your Posts Really Worth the Hassle?
Early on, I made the mistake of assuming superficial repairs would suffice—just a quick paint job, maybe some sealant. But underneath, rot had already taken hold. That oversight taught me a valuable lesson: visual inspections are vital, and ignoring subtle signs can turn into serious hazards. Have you ever faced a similar situation where a small problem escalated unexpectedly? If so, you’ll appreciate how simple, regular checks can make a world of difference. Now, let’s dive into how you can reliably identify the early signs of post deterioration and prevent costly repairs down the line. If your deck needs a refresh, I also recommend reading about fixing cracked deck boards without replacement or exploring checking stair treads for stability to keep your entire deck safe and sound.
Begin with a Visual Inspection to Catch Early Warning Signs
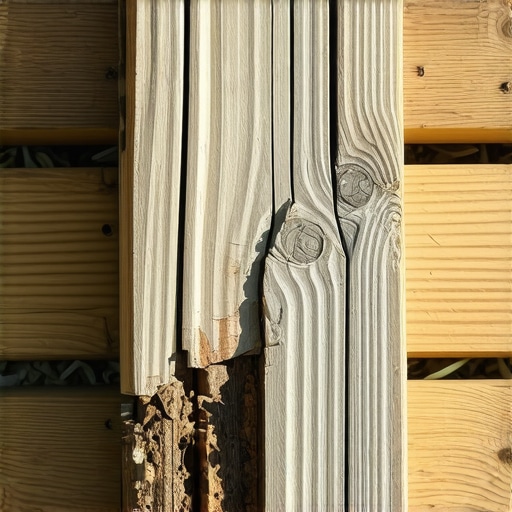
Start by examining each post closely, looking for discolored or soft wood that indicates rot. Use a flashlight to inspect the underside and hidden areas where moisture tends to accumulate. Remember, rot often begins where water collects, so pay special attention to the base of each post and the connection points with the ledger board. I once tackled this step when I noticed a slight wobble in one corner post; a quick inspection revealed soft wood at the base, saving me from a potential collapse later.
Test for Structural Integrity with a Simple Probe
Use a screwdriver or Awl to Check Wood Strength
Gently press into the wood surface with a flathead screwdriver or awl. If the tool sinks in easily or the wood crumbles, it’s a sign of advanced decay. For instance, during my inspection, I pressed into a post near the foot and felt it give way—prompting me to plan for a replacement before any failure occurred.
Assess the Post Height and Alignment
Stand back and observe the post’s alignment with neighboring posts. A leaning or uneven post can be a sign of a shifting foundation or internal rot. In my experience, even a slight tilt was enough to warrant deeper investigation into the post’s internal condition, preventing future safety hazards.
Check for Moisture and Signs of Mold
Look for signs of mold, which thrive in damp environments and accelerate rot. Use a moisture meter if available; a reading above 20% indicates a high moisture level. I once found high moisture readings in a post that appeared perfectly fine externally. Addressing this early saved me from a more costly repair later.
Address Minor Damage with Quick Fixes
If you spot small cracks or splits, consider [fixing cracked deck boards without replacement](https://deckbuildersneedham.com/how-to-fix-cracked-deck-boards-without-replacing-them). For minor rot at the surface, applying wood hardener and a sealant can extend the post’s lifespan temporarily. However, keep in mind these are short-term solutions; deep rot necessitates replacement.
Plan for Replacement of Severely Damaged Posts
When a post shows extensive rot or internal softness, plan to replace it entirely. Use a level and measuring tape to determine the correct post height, considering the existing framing. Insert temporary supports to secure the deck while removing the damaged post. Remember, proper assessment and precise measurements are critical—mistakes here can compromise deck safety.
Install the New Post Correctly
Dig a hole at least 12 inches deep for the new post, ensuring it’s below the frost line. Fill with gravel for drainage before setting the post in concrete. Use a level to ensure vertical alignment and attach it firmly to the ledger and joists. For additional durability, consider [using reclaimed wood for an eco-friendly deck](https://deckbuildersneedham.com/how-to-use-reclaimed-wood-for-an-eco-friendly-deck), which often provides valuable tips on weather resistance.
Perform a Final Safety Check
Once repairs are complete, evaluate the stability of all posts, ensuring they are firmly anchored and level. Check neighboring components like the ledger board and support beams for signs of wear. Regular, diligent inspections now can prevent emergency repairs and ensure your deck remains a safe space for years to come.
Many homeowners believe they understand deck construction thoroughly, but in reality, a few misconceptions can lead to costly mistakes. One prevalent myth is that high-quality materials alone guarantee long-lasting decks; however, even premium woods or composites require precise installation and maintenance to perform optimally. In fact, improper framing or neglecting proper flashing can cause hidden damage that isn’t immediately visible, highlighting the importance of expert assessment during project planning. Additionally, there’s a misconception thatDIY repairs, such as fixing cracked boards without professional guidance, are sufficient; but attempting to patch issues without understanding underlying structural problems often results in recurring failures. A common trap homeowners fall into is assuming that a quick repaint will solve peeling paint issues—yet without addressing underlying moisture infiltration or surface preparation, these problems will quickly return. For advanced DIY enthusiasts, understanding the intricacies of [checking your deck stair treads for stability](https://deckbuildersneedham.com/checking-your-deck-stair-treads-for-stability-and-safety) can prevent dangerous wobbles or collapses. Moreover, many overlook the importance of proper joist layout, which is crucial for load distribution and avoiding future sagging or cracking. An often-unsuspected nuance is the role environmental factors play; for example, moisture management and adequate drainage are vital to prevent rot even in well-built decks. According to a study by the *Journal of Structural Engineering*, decks exposed to frequent moisture without proper ventilation or sealing can experience accelerated deterioration regardless of material quality. So, the key is not only choosing the right materials but also implementing sound construction practices and regular inspections. Are you aware of these subtle pitfalls? Have you ever fallen into this trap? Let me know in the comments. Remember, understanding these hidden nuances makes all the difference in ensuring your deck’s longevity and safety.
Maintaining a deck that stands the test of time requires more than just visual inspections; it demands precise tools and effective methods that ensure safety and longevity. Over the years, I’ve refined my toolkit, choosing equipment that offers reliability and accuracy for every repair or assessment. One staple is my digital moisture meter—specifically, the
Another invaluable tool is a high-quality cordless impact driver, like the
For detailed inspections, I rely on an LED flashlight with a flexible neck—something like the
To handle minor surface repairs, I turn to my orbital sander equipped with a fine-grit pad—specifically, the
Looking ahead, I predict that smart, sensor-based monitoring systems will become standard for deck maintenance, offering real-time alerts for moisture levels or structural shifts. Investing now in precise tools like moisture meters and impact drivers not only facilitates immediate repairs but prepares you for upcoming technological advancements.
If you’re serious about sustaining your deck, start with a comprehensive moisture assessment using a digital meter—it’s the foundation for early problem detection. Additionally, regularly rearranging your toolbox to include a high-power impact driver and quality lighting can streamline repairs and inspections, keeping your outdoor space safe and inviting year-round. For concrete advice on early signs of structural failure, check out this detailed guide. Don’t hesitate to try out a moisture meter at your next check—it’s an advanced step that makes a tangible difference in the longevity of your deck.
Through years of hands-on experience and countless inspections, I’ve uncovered lessons that aren’t taught in manuals or DIY blogs. These insights have transformed my approach to deck maintenance, and sharing them might just save you from common pitfalls. So, here are the lesser-known truths that have made a real difference in keeping my deck safe and beautiful.
What I Wish I Knew About Deck Longevity Early On
- Not all rot shows up visually—internal moisture buildup can silently weaken your deck’s foundation, which is why trusting a moisture meter is crucial. I once dismissed a slightly darkened post, only to realize later it had internal rot causing a wobble.
- Regular probing saves big bucks—testing wood strength with simple tools like an awl helps catch hidden decay before it becomes unsafe. This small step is a game-changer I now never skip.
- Moisture management is your best friend—rather than relying solely on surface treatments, understanding how water moves and drains around your deck prevents rot from forming in hidden corners. Proper flashing and drainage are often overlooked but are vital for lifespan extension.
Tools and Resources That Changed My Deck Game
- Repairing cracked boards without full replacement taught me that many superficial issues mask deeper structural concerns—addressing the root is always better.
- Quick fixes for peeling paint reminded me that regular repainting can be futile if moisture issues remain unaddressed.
- Checking stair treads for safety revealed how critical it is to evaluate all parts of your deck—not just the visible surfaces but also the hidden supports.
Keep Your Deck Alive: Take Action Now
Remember, a well-maintained deck isn’t just about aesthetics—it’s about safety and peace of mind. Use these insider tips, invest in quality tools, and prioritize regular inspections. With these lessons in mind, you can extend your deck’s life and create a safe outdoor haven for years to come. What’s the first step you’ll take today to better care of your deck? Share your plans below—I love hearing how homeowners like you take control of their outdoor spaces!