It was a sunny Saturday when I realized I was about to spend the entire day wrestling with tangled chains, stubborn screws, and a step that didn’t quite fit. Honestly, I felt a wave of frustration wash over me. I’d underestimated the complexity of installing new steps onto my deck, and it almost turned into a full-blown project that would take days.
But then I discovered something that changed my whole approach: prefabricated deck steps. These ready-to-install units might seem too good to be true, but I’m here to tell you—they’re a total game-changer for homeowners like us who just want a quick, reliable upgrade without the fuss.
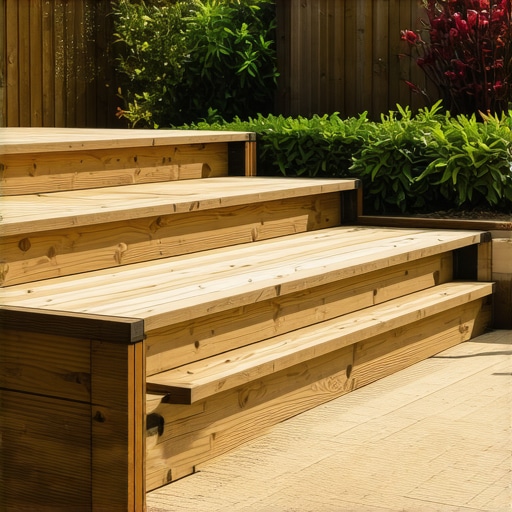
The Beauty of Prefabricated Deck Steps
Imagine this: instead of hours spent measuring, cutting, and struggling with unstable posts, you just pull a ready-made set out of the box, and within a fraction of the time, your deck’s stairs are safe, sturdy, and good-looking. Sounds almost too easy, right? That’s exactly what I thought at first.
But I found that prefabricated steps are designed with precision, ensuring proper fit and durability. Plus, they help you avoid some common pitfalls, like uneven risers or loose hardware, which I had encountered plenty of in past DIY attempts. If you’re like me and value time, safety, and a hassle-free process, this option is worth considering.
And here’s the kicker: installing prefab steps can actually improve the overall safety of your outdoor space, especially if your current stairs are worn out or unstable. A quick install means you can focus on enjoying your yard instead of fixing something that’s been bothering you for years.
Are you tired of the same old struggle every time you need to fix or replace your outdoor stairs? If so, keep reading. I’ll walk you through why these prefab units are so effective and how you can make the switch this weekend.
Could Prefab Steps Be a Waste of Money?
Early in my project, I nearly made the mistake of thinking prefab steps wouldn’t last as long as custom builds. But I learned that modern materials and manufacturing precision mean they actually outperform many traditional options. In fact, some durable composites can last well beyond a decade with minimal maintenance, making them a smart investment.
My biggest mistake? I skipped careful measurement and didn’t check whether the prefab unit would fit right away. Turns out, taking a few minutes to compare measurements carefully can save tons of frustration later, and there are great resources that can help, like this guide on [checking your deck post brackets for signs of failure](https://deckbuildersneedham.com/checking-your-deck-post-brackets-for-signs-of-failure). Don’t be like me—plan ahead.
With all these benefits in mind, it’s clear that prefab deck steps aren’t just a convenience—they’re a savvy choice for practical, safe, and quick outdoor improvements. Ready to see how simple installation can be? Let’s dive into the details and get your deck looking sharp, safe, and welcoming again.
Measure Your Space Carefully Before Buying
Start by accurately measuring the width, depth, and height of your existing stairs or the area where the steps will go. I once rushed this step and bought a prefab unit that didn’t quite fit, leading to a frustrating re-measure that cost me a day. Use a tape measure and double-check your numbers. For detailed measurement techniques, visit https://deckbuildersneedham.com/how-to-find-the-square-footage-of-your-deck-fast to avoid common mistakes.
Prepare the Site and Gather Your Tools
Clear the area around your deck, removing any debris or loose boards. Gather a level, drill, screws, and a wrench. I used a level with a long bubble in my project; it was like balancing a surfboard on a tightrope, but it helped ensure the steps were perfectly level. Having the right tools makes installation smoother. For suggestions on fasteners and tools, see https://deckbuildersneedham.com/the-best-fasteners-for-a-long-lasting-mahogany-deck.
Assemble the Prefabricated Unit
Follow the manufacturer’s instructions to assemble the prefab stair unit on the ground. I found that laying out all components first saved time during assembly, preventing misplacements. Keep screws ready and tighten all bolts snugly. This step is like building a Lego set; patience and attention to detail yield better results. Once assembled, double-check the stability of the unit before lifting it into place.
Position the Unit and Secure It
Lift the prefab steps carefully into position, aligning the bottom with your existing deck or ground level. Use a friend or a dolly for heavy units. Set it down gently and check for levelness with your bubble level tool. Once aligned, attach the steps securely using appropriate screws or hardware. Secure the top of the stairs to the deck using brackets; for advice on proper attachment methods, see https://deckbuildersneedham.com/why-every-needham-deck-needs-a-proper-drip-edge. I once missed this step, and the steps shifted over time, so don’t skip it.
Check the Fit and Finish
Ensure the steps are stable and the riser heights are even across the stairs. Use shims if needed to correct slight unevenness. Tighten all hardware and step back to view the overall look. I learned to take a few steps back, virtually and literally, to see if the stairs look safe and attractive. Proper finishing touches, like adding post caps for style and protection, can be done after installation; see https://deckbuildersneedham.com/choosing-the-right-post-caps-for-style-and-protection for more.
Final Inspection and Safety Checks
Walk up and down the stairs a few times, testing stability and comfort. Look for wobbling or loose bolts. Confirm the stairs adhere to safety standards, especially if children or elderly neighbors will use them. If you notice any issues, tighten hardware immediately. Regularly checking the brackets and post support brackets can prevent accidents; visit https://deckbuildersneedham.com/checking-your-deck-post-brackets-for-signs-of-failure for tips to keep your stairs secure.
When discussing deck construction or renovation, many homeowners focus solely on materials and aesthetics, overlooking a critical aspect that can make or break your project: proper planning and understanding of local nuances. In my experience working with homeowners in Needham, I’ve noticed a common myth: that choosing high-end materials automatically guarantees a durable and flawless deck. While quality materials are essential, neglecting the nuances of local climate, soil conditions, and proper framing can lead to costly mistakes. For example, many believe that pressure-treated pine is sufficient for all situations, but in Needham’s humid seasons, advanced framing techniques and specific fasteners (like those discussed in https://deckbuildersneedham.com/the-best-fasteners-for-a-long-lasting-mahogany-deck) are necessary to prevent warping and rot.
Another widespread misconception is that a flawless-looking deck doesn’t require a professional layout plan. As emphasized in https://deckbuildersneedham.com/why-your-new-deck-needs-a-professional-layout-plan, a well-designed plan accounts for drainage, wind exposure, and future modifications, saving you money and headaches later. Skipping this step often results in uneven surfaces or water pooling, issues that are exacerbated by local weather patterns similar to those described in https://deckbuildersneedham.com/winterizing-your-deck-a-complete-checklist-for-needham.
Let’s talk about the hidden traps homeowners fall into during installation. One of the most common errors is neglecting to check the structural integrity of existing framing before installing new components. Many assume their current posts and brackets are sound, but as outlined in https://deckbuildersneedham.com/checking-your-deck-post-brackets-for-signs-of-failure, inspecting and reinforcing these foundational elements is crucial. Overlooking this can lead to safety hazards down the line.
So, what’s the real nuance that most tend to overlook?
Make Your Deck Last Longer, Think Beyond Material Choices
Beyond selecting premium products, understanding the local environment’s impact on your deck is vital. Using appropriate fasteners, framing methods, and protective coatings tailored for Needham’s climate—like those covered in https://deckbuildersneedham.com/why-2026-composite-boards-are-more-fade-resistant—can extend your deck’s lifespan significantly. It’s about marrying quality materials with informed installation practices.
Are you aware of how subtle factors like soil drainage or seasonal weather variations influence your deck’s durability? Many homeowners forget these elements, risking structural issues over time. For example, a poorly drained foundation can cause wood rot or shifting post supports, which is why regular inspections are paramount. For tips on maintaining stability, consider reviewing https://deckbuildersneedham.com/why-every-needham-deck-needs-a-proper-drip-edge.
Making this nuance your secret weapon involves ongoing education and strategic planning. Don’t assume that once your deck is built, the job is done. Routine checks, appropriate maintenance, and adjustments based on seasonal changes can prevent many avoidable problems.
Ever fallen into the trap of thinking that higher-end materials alone will ensure your deck’s longevity? Share your experience in the comments, and remember: mastering this hidden aspect can elevate your project from average to enduring elegance.
Investing in Quality Maintenance Tools
As a seasoned deck builder, I rely on a selection of specific tools that make maintenance tasks more efficient and reliable. For instance, I swear by a high-precision digital moisture meter, which helps me detect early signs of rot or warping in wood components, especially in Needham’s humid climate. This proactive approach allows for targeted repairs before problems escalate, saving both time and money.
Another essential tool is a cordless angle grinder fitted with a wire brush attachment. This is perfect for removing rust or old paint from metal hardware, ensuring a clean surface before applying a fresh coat of protective sealant. Personally, I prefer models with brushless motors for longer battery life and durability. Paired with a quality set of safety goggles, it’s a dependable combo for periodic hardware refurbishment.
Software for Planning and Documentation
Keeping detailed records of your deck’s maintenance schedule is critical for longevity. I advocate for using a project management app like Trello or Notion to track inspections, repairs, and replacement dates. These platforms enable me to set recurring reminders aligned with seasonal needs—crucial in areas like Needham, where weather patterns accelerate wear and tear. Also, they facilitate sharing progress with clients or family members who may assist with upkeep.
Long-Term Results through Routine Checks
Implementing a regular maintenance routine involves more than just tools; it’s about consistency. I recommend setting a bi-annual review calendar, ideally in spring and late fall, to check brackets, post supports, and sealing conditions. For example, frequent inspection of post brackets, as discussed in this guide, can prevent collapses and costly repairs later.
How do I maintain my deck over time?
Continuously monitoring the structural integrity, applying protective sealants, and replacing worn hardware are key. Using specialized tools like a power sander with a fine-grit pad helps refresh surfaces, improving appearance and durability. Staying ahead of issues by scheduling annual inspections and utilizing quality fasteners—such as those recommended in this article—ensures your deck remains a safe, attractive outdoor living space year after year. Investing in these specific tools and routines pays off by extending your deck’s lifespan and preserving its value. Don’t hesitate to try out a high-powered moisture meter or establish a digital maintenance log today; the benefits will become clear with time.
The Hard-Won Truths That Nearly Slip By
One of the most valuable lessons I learned was that even the best tools can’t compensate for skipping the foundational steps. I once rushed through measuring, only to realize afterward that the prefab steps didn’t align properly—proof that attention to detail upfront saves headaches later. Embracing thorough planning and patience transformed my projects from frustrating to fulfilling.
Tools and Resources That Made a Difference
Over time, I’ve curated a selection of tools and references that elevate your deck-building game. For example, investing in a reliable digital moisture meter (https://deckbuildersneedham.com/checking-your-deck-post-brackets-for-signs-of-failure) helped me predict and prevent rot, extending the life of my decks. Additionally, books like Build the Perfect Deck deepened my understanding of advanced framing techniques, proving that continuous learning fosters long-term success.
Embracing the Emotional Side of Deck Building
Beyond the technical, I found that patience and persistence nourish the confidence needed to undertake these projects. Every time I faced unexpected challenges—like adjusting to seasonal weather changes or unexpected soil conditions—I reminded myself that mastery comes with perseverance. That mindset turned daunting tasks into opportunities for growth—and I believe you can, too.