I’ll never forget the moment I painted my first deck. I was eager, excited, and surprisingly naive. In my haste, I skipped a crucial step—masking the edges. The result? Streaks, drips, and hours of frustration. It was a lightbulb moment that taught me how essential proper prep is before staining a deck. If you’ve ever faced the nightmare of uneven stain lines or stubborn paint leaks, you know exactly what I mean.
Why Masking Your Deck Matters More Than You Think
Deck staining isn’t just about choosing the right color or brand. It’s about ensuring that your finish looks professional and lasts longer. Proper masking creates crisp lines, prevents stain or paint from bleeding into unwanted areas, and saves you countless hours of cleaning up afterward. Plus, when done right, it helps seal the deck’s edges against moisture infiltration—an often overlooked cause of wood rot and decay.
Is Masking Really Worth All the Fuss?
Some folks dismiss masking as unnecessary or too time-consuming. I used to think the same—until I had my hands full cleaning stain off the rails and siding because I rushed the prep. That mistake taught me that investing a bit more time upfront can make all the difference in the final result. And if you’re unsure about how to tackle this, don’t worry—I’ll walk you through the practical steps later. If you’re curious about other ways to upgrade your outdoor space, check out some modern bench designs that complement your freshly stained deck.
So, have you ever faced the challenge of staining around delicate trim or avoiding messy overflows? If so, keep reading—that’s exactly what we’ll solve today. Over the years, I’ve learned a few tricks—like using quality painter’s tape and precise tools—that turn a daunting task into a manageable, even enjoyable, project. Ready to transform your deck with a sleek, professional look? Let’s dive into how you can do it right, the first time.
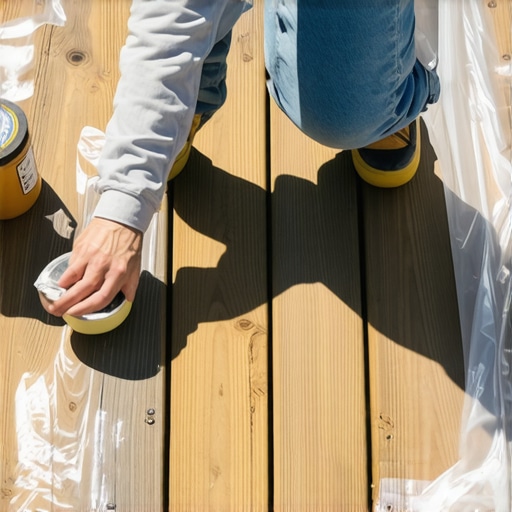
Prepare Your Materials and Work Area
Before you start masking, gather all necessary materials: painter’s tape, plastic sheeting or paper, a putty knife, and a utility knife. Clear your deck of furniture, plants, and debris. A tidy space allows for precise masking and prevents overlooked spots. I remember once rushing to mask a corner, only to realize I forgot to move a chair, leading to a frustrating re-mask later.
Choose the Right Masking Tape and Tools
Opt for high-quality painter’s tape designed for outdoor use to withstand weather conditions. Use a putty knife to press down the tape firmly along the edges, ensuring good adhesion. For intricate areas, a utility knife helps trim the tape neatly. I learned that cheap tape often peels during rain, causing stains and rework. Investing in durable tape saves time and ensures sharp lines.
Start with Clean, Dry Surfaces
Clean the edges thoroughly with a stiff brush or a damp cloth to remove dirt and loose debris. Allow surfaces to dry completely before applying tape. Moisture trapped under the tape can lead to bleed-through or peeling. During a project, I neglected this step once, and it resulted in fuzzy paint lines, which I had to sand and redo. Patience here pays off with a cleaner finish.
Apply Masking Tape Precisely
Lay the tape along the edges you want to protect, pressing down as you go. Use a putty knife to smooth the tape, eliminating air bubbles and gaps. For corners or curves, cut the tape into strips and conform them to the shape. I vividly recall spending extra time carefully pressing tape around railings, which prevented stain bleed and saved hours during cleanup.
Cover Unwanted Areas Effectively
Use plastic sheeting to cover larger sections like floors or adjacent walls. Attach with painter’s tape at the edges to secure it in place. Overlap sheets to prevent gaps. Once, I used a large trash bag plastic sheet, but it was cumbersome—upgrading to heavy-duty painter’s plastic made the difference in a cleaner project.
Inspect and Touch Up Before Painting
Check your masked edges for gaps or loose tape. Re-press or add strips as needed. Pay special attention to corners and joints. I remember rushing at this stage and later noticing stain seepage along a loose edge, which required touch-up. Double-checking now prevents such issues.
Remove Masking Carefully Post-Project
Once staining is complete and paint is dry, remove the tape slowly at a sharp angle to avoid lifting the stain or paint. Pulling the tape too quickly or at incorrect angles can cause jagged edges. When I properly removed the tape after my first project, I achieved crisp lines that looked professionally done. For detail-oriented tasks, patience here is essential.
Mastering these masking steps transforms a daunting deck stain project into a manageable task with professional results. It’s an investment that pays off by delivering crisp lines and saving cleanup time, ultimately enhancing your outdoor space’s appeal and longevity.
 Many homeowners assume that hiring a deck builder is a straightforward process—choose the lowest bid, and you get a quality result. However, this misconception can lead to significant problems down the line. In my experience, one of the most overlooked nuances is the importance of meticulous **project planning** and understanding the builder’s expertise beyond basic credentials. For example, some contractors may excel at traditional wood decks but lack experience with modern composite materials, leading to issues like improper installation or premature wear. It’s crucial to ask about their experience with different materials to ensure durability and safety.
Can an inexperienced builder hide hidden issues during installation?
Absolutely. A common trap is assuming that all deck builders follow the same standards, but the reality is that some may overlook critical aspects like proper flashing, joist spacing, or ventilation—which can cause wood rot or structural failure over time. According to a study by the American Society of Home Inspectors, poorly installed decks are one of the top sources of home defects, often due to inadequate expertise. So, it’s vital to verify their certification, ask for references, and review previous work.
Another misconception is that cost is the only factor—many clients choose the cheapest option without considering quality. While affordability matters, sacrificing craftsmanship can result in costly repairs or replacements sooner than expected. For instance, improper nail placement or inadequate sealing can cause swelling, warping, or mold growth, compromising safety. I recommend reviewing the contractor’s warranty and guarantees, which reflect their confidence in the quality of work performed.
Be cautious of the common myth that all modern deck designs require minimal maintenance. Many homeowners overlook that certain materials, like composite decking, demand specific installation techniques to prevent warping or fading—something not all builders are familiar with. For example, when upgrading your deck, consider exploring options like modern benches or integrated lighting; but ensure your contractor understands the nuances of these features. Check out some modern bench designs that can elevate your outdoor space.
To truly master the art of hiring a deck builder in Needham, it’s essential to look beyond surface credentials and evaluate their depth of experience, attention to detail, and familiarity with current materials and design trends. Remember, a well-constructed deck is an investment that adds value and safety to your home—not just an aesthetic addition. Have you ever fallen into this trap? Let me know in the comments.
Keep Your Decks Moving with the Right Tools
Maintaining a deck over time requires precision, durability, and sometimes a bit of creativity. Personally, I rely on a set of specialized tools that make routine upkeep efficient and effective. For example, I always recommend investing in a high-quality cordless impact driver, like the right drill bits for composite decks. It ensures secure fastening of loose boards or rails without stripping screws, which is crucial for safety and longevity.
Another essential is a good inspection mirror. It allows me to peer into tight spaces beneath the deck where moisture, mold, or rot might develop unnoticed. Regular inspections are vital — I suggest a quarterly check to catch issues early before they escalate. For example, measuring the guardrail height compliance is important for safety, and having the right tools simplifies this process.
Leverage Software for Better Planning and Budgeting
Beyond physical tools, digital solutions can streamline maintenance planning. I personally use project management apps like Trello or Asana to track when each part of my deck needs treatment or repair. For budgeting, online estimation calculators help predict costs for replacements or upgrades, which can be lifesavers when considering a full redo. For instance, when considering replacing worn-out boards, an estimate can help decide whether a repair or full replacement is more economical — check out this cost estimation guide.
Future Trends in Deck Maintenance Tools
The future points toward smart technology integration. Imagine sensors embedded in your deck that monitor moisture levels or structural stress and send alerts directly to your phone. Although still emerging, companies are exploring IoT (Internet of Things) solutions tailored for outdoor structures. Based on current trends, I predict a surge in smart maintenance kits that combine sensors, data analytics, and user-friendly apps, simplifying long-term care. According to industry experts at Builder Magazine, smart home integrations are rapidly expanding into outdoor structures, and staying ahead now gives homeowners peace of mind.
How do I maintain my deck systems to last decades?
The key is consistent, targeted maintenance—regular inspections, timely repairs, and using the right tools for each job. For example, if you notice wobbly railings, consult this quick safety check to troubleshoot and fix the problem yourself, extending the life of your structure. I challenge you to try one of these advanced tools or techniques today—perhaps upgrading to a digital moisture sensor or a premium impact driver—and watch your deck’s performance improve dramatically over time.
Lessons That Changed My Decking Journey
One of the most surprising lessons I uncovered was how crucial proper masking really is—it’s not just about looking neat but about preventing costly mistakes that could ruin hours of work. I also learned that patience during the tape application and removal stages makes an enormous difference in achieving crisp lines. The biggest lightbulb moment? Realizing that investing in quality tools and materials upfront saves a ton of headache later—and that even the smallest steps, like clearing debris before staining, can have outsized impacts on durability and appearance.
Tools and Resources That Made a Difference
My go-to toolkit includes high-quality painter’s tape, a durable impact driver, and a reliable moisture meter, which I trust because they deliver consistent results and extend the life of my decks. For guidance, I always refer to detailed guides on estimating costs and proper maintenance routines, such as the comprehensive cost estimation resource. Additionally, staying connected to the latest trends through reputable blogs and industry updates keeps me ahead, especially when exploring innovations in composite materials or smart maintenance solutions.
Fuel Your Passion for Perfect Decks
Don’t let hesitation hold you back from creating your own stunning outdoor space. Each deck you craft or restore is an investment in your home’s beauty and your own satisfaction. With patience, the right know-how, and a bit of courage to try new techniques or tools, you can achieve professional-quality results that last for decades. Now’s the perfect time to start—your dream deck is within reach, and your best project yet awaits!