Ever looked out at your cramped backyard and thought, “There must be a better way to enjoy this space”? I’ve been there. Frustrated by a tiny yard that barely fit a grill and a chair, I realized I needed a solution that was both functional and inviting. The lightbulb moment? A multi-level deck. Not just any deck, but one designed to carve out separate zones—dining, lounging, even a little garden—without needing more land.
So, today, I promise to show you how a carefully planned multi-level deck can turn a small, underused yard into a personal retreat. We’ll cover the basics of designing levels that work with your space, and I’ll share my real-world tips from my own experience trying to make every inch count.
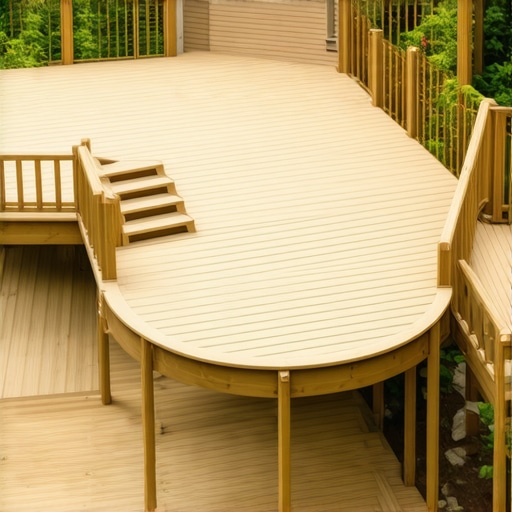
Turning the Small Yard Challenge into an Opportunity
Building a deck in a tiny backyard might seem like a challenge, but it’s also an opportunity. Instead of fighting the constraints of limited space, you can use clever design tricks to create the illusion of more room and add versatility to your outdoor area. Multi-level decks, for example, can define different zones—perhaps a casual fire pit on the lower level and a dining area above—without crowding the yard.
From personal experience, one of the most overlooked aspects is the importance of proper planning. Early on, I made the mistake of trying to squeeze everything into a flat, single surface, which left the space feeling cramped and cluttered. I learned that incorporating levels not only makes the yard feel more expansive but also adds visual interest. Plus, it allows for better drainage and less wear in high-traffic areas.
Creating this layered effect isn’t as complex as it sounds. Using sturdy, weather-resistant materials is key. I recommend exploring options like [best deck fasteners for coastal-like weather in Massachusetts](https://deckbuildersneedham.com/best-deck-fasteners-for-coastal-like-weather-in-massachusetts), especially if your yard experiences harsh winters or salty air. Proper fasteners can extend your deck’s lifespan and keep it safe for years to come.
Now, imagine having distinct spots for relaxing, dining, and even gardening—all within a compact footprint. It’s achievable with some smart planning and a little bit of DIY spirit. Stay tuned, because next, I’ll guide you through designing your multi-level masterpiece, avoiding common pitfalls, and making the most out of every inch of your backyard oasis.
Plan the Foundation and Frame
Start by measuring your yard accurately and sketching your deck layout, including the different levels. I recommend using stakes and string to outline the perimeter. For my project, I marked the lower zone for a fire pit and the upper for dining, ensuring proper elevation changes. Dig sturdy footings below frost line—consult local code or a professional to get exact depths—and use treated lumber for the frame. Think of this as laying the backbone of your deck: if it’s solid, the rest will follow smoothly.
Build the Sleeping Tiers
Focus on constructing each level separately but ensuring they integrate seamlessly. Use ledger boards attached to your home’s structure—securely fastened with the right fasteners, such as those recommended in best deck fasteners for coastal-like weather. For intermediate supports, install posts and beams level with each other; use a level frequently to check. In my own build, I initially misaligned a lower beam, causing subsequent issues, but corrected it with shims and rechecked before proceeding.
Arrange and Secure Deck Boards
Lay decking boards starting from the outer edge, ensuring a consistent gap for drainage. For composite decks, consider using hidden fasteners; they create a clean look and minimize trip hazards—see hidden fasteners benefits. For wood, screws penetrate better when pre-drilled; stainless steel screws are a wise choice for longevity. During my project, I realized that predrilling saved me from splitting boards and made aligning the fasteners easier.
Include Transition Elements for Safety and Style
Install stair stringers properly—using guides from how to install a stair stringer—and add railings that match your aesthetic. I added a simple, sleek railing, which I secured using the right hardware, ensuring safety without compromising style. When working on your deck, don’t overlook the importance of proper anchoring; it will prevent shifting and structural issues over time.
Finish with Details and Inspection
Seal or stain your deck with a quality product like those reviewed in choosing a stain, or consider a non-toxic option to keep your family safe. Once assembled, double-check all fasteners and supports, and clarify drainage paths to avoid water pooling—crucial for a small yard to prevent rot, as highlighted in spring prep tips. During my build, I also made sure to walk around the deck, inspecting for loose screws and uneven boards, reducing tripping hazards and ensuring a safe environment.
Many homeowners assume that selecting a local deck builder in Needham is simply about price and availability, but the real nuances often go unnoticed. One prevalent myth is that all contractors are equally skilled, which isn’t true; craftsmanship quality varies significantly. Relying solely on price can lead to choosing someone who cuts corners, resulting in structural issues or short-lived decks. For example, some underestimate the importance of proper fasteners, especially in coastal-like weather conditions, which can cause premature deterioration. Instead, opting for professionals familiar with the local climate and building codes—like those recommended in best deck fasteners for coastal weather—ensures durability. Another misconception is that deck maintenance is unnecessary if the initial build is perfect; however, neglecting routine inspections and upkeep, such as winterizing properly, can compromise safety and longevity. An advanced mistake many overlook involves ignoring hidden structural flaws that aren’t immediately visible but can be detected through thorough inspections and experience—like assessing joist health or footing stability winterizing your deck. Becoming aware of these tricky nuances helps you avoid costly repairs down the line. Do you believe in the myth that all local builders are interchangeable? Share your thoughts! Let’s dig deeper by understanding that quality craftsmanship and extensive local knowledge make a difference. Misjudging this can lead to safety hazards, especially in challenging weather, and can diminish your deck’s aesthetics and function over time. Remember, investing in experienced professionals doesn’t just mean a safe, beautiful deck but also peace of mind for years to come.A well-maintained deck not only looks great but also provides safe outdoor enjoyment for years to come. To keep your deck in top shape, investing in the right tools and following a consistent maintenance routine is crucial. I personally swear by a high-quality orbital sander for smoothing out surface imperfections and preparing boards for staining. Its versatility allows me to tackle both large flat surfaces and intricate edges efficiently, saving time and ensuring an even finish. Additionally, a cordless power drill with a variety of screwdriver bits is indispensable for tightening loose fasteners and replacing worn hardware without hassle.
For cleaning, I rely on a deck-specific cleaner like the ones reviewed in our guide on the best deck cleaning products for 2026. Using a product tailored for decks helps remove dirt, algae, and stains without damaging the surface. A stiff-bristled brush is also necessary for scrubbing textured areas and stubborn grime, but make sure to choose one with synthetic bristles to prevent scratching.
Regular inspections are vital. I recommend setting a seasonal schedule to check for loose boards, cracked fasteners, or signs of rot. An inspection mirror can help you see underneath the deck’s surface where issues often hide. For areas prone to moisture, installing joist tape, as discussed in our guide on preventing water damage, provides an extra layer of protection.
Power washing is excellent for deep cleaning, but it must be done carefully. I use a pressure washer with a wide-angle nozzle set to a low PSI to prevent etching the wood. Always keep the wand at a consistent distance from the deck surface—roughly 12-18 inches—and test on a small hidden area first.
Predicting future trends, I believe the integration of smart technologies like moisture sensors and automated cleaning systems could revolutionize deck maintenance in the next few years. These innovations will enable homeowners to detect problems early and maintain their decks with minimal effort.
How do I maintain my deck’s weather-resistant finish over time? One effective method is applying a high-quality stain, preferably non-toxic and UV-resistant, following the guidelines we’ve outlined. Regular reapplication—every 2-3 years depending on exposure—keeps the wood protected and vibrant. For example, our recommended deck stain for 2026 offers superior durability and peel-resistance, ensuring your deck looks great season after season.
To ensure your deck remains safe and inviting, I suggest setting up a routine maintenance plan that includes cleaning, inspection, and re-sealing. Try using an orbital sander to refresh your surface before staining—it’s a game-changer for a smooth, professional look. Remember, a little effort now saves money and hassle later, especially when dealing with coastal-like weather conditions in Massachusetts where salt and moisture accelerate wear. For guidance on more advanced repair techniques and durable hardware, visiting our detailed articles can make a significant difference in your DIY maintenance journey.
Through my journey of transforming a tiny backyard into a multi-level retreat, I uncovered more than just construction tips — I learned the value of patience, attention to detail, and trusting local expertise. Remember, building a deck isn’t just about layout and materials but about creating a space that sparks joy and safety for years to come. Embrace the process as a chance to personalize your outdoor oasis, and don’t hesitate to lean on resources and professionals who deeply understand Massachusetts’ unique climate. With careful planning and a dash of creativity, your small yard can become your favorite escape. Take the leap, and soon you’ll enjoy every sunset from your custom-built haven, knowing you crafted something truly special. If you’re ready to start your own backyard transformation, consider how each lesson applies to your space and vision. Your outdoor sanctuary awaits—happy building!