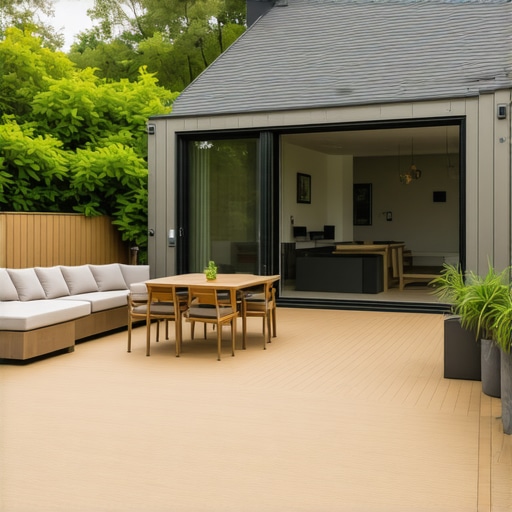
It was a warm Saturday afternoon when I stepped onto my tired, uneven deck and realized something needed to change. The space, though promising, felt more like an afterthought than a welcoming retreat. As I sipped my iced tea, I knew I wasn’t alone in this struggle—many homeowners want a deck that isn’t just pretty but truly functional. That’s when I had my lightbulb moment: an L-shaped deck could be the game-changer, provided I mastered the design principles.
Why an L-Shaped Deck Could Be Your Backyard’s Best Friend
Backyards are the heart of our homes, places where memories are made with friends and family. Yet, many decks end up being underutilized or cluttered because of poor design. Crafting an L-shaped deck offers an elegant solution—creating distinct zones for dining, lounging, and even gardening, all within a single space. This layout optimizes your backyard’s potential and adds architectural interest.
But here’s the thing—there are common pitfalls. Early in my project, I made the mistake of choosing a one-size-fits-all approach without considering how my family uses the space. I ended up with a deck that looked good but was impractical for my needs. Trust me, it’s a mistake to overlook how flow and function intertwine. For example, did you know that improper planning can lead to uneven weight distribution, which might compromise your deck’s longevity? According to the National Association of Home Builders, 60% of deck failures are due to poor design or improper load considerations.
Thinking about design, I also worried about making my deck stand out. A contrasting picture frame border, for instance, can add a chic touch—learn more about this idea [here](https://deckbuildersneedham.com/choosing-a-contrasting-picture-frame-border-for-your-deck). And if leveling uneven ground feels intimidating, don’t worry—there are straightforward methods to level a sloping deck yourself, which I’ve detailed in this guide.
Are you grappling with similar questions? Do you worry that your ideas might not translate into a sturdy, beautiful deck? If so, you’re in the right place. We’re about to turn your backyard into a functional paradise, starting with the fundamentals of designing that perfect L-shape tailored to *your* needs. Ready to dive into the details?
Frame the Foundation with Precision
Start by marking the exact layout of your L-shaped deck using stakes and a measuring tape, ensuring the angles are square. When I built my own, I used a carpenter’s square to double-check all corners—precision here prevents future headaches. Next, install the ledger board securely, anchoring it to your house with proper flashing to prevent water intrusion. For the support beams, select rot-resistant pressure-treated lumber, framing the perimeter first and then working inward. Remember, a solid frame supports everything else; skimp on it, and you’ll regret it later. For detailed techniques on leveling uneven ground, visit this guide for tips on achieving a perfectly flat surface.
Lay a Sturdy Substructure
After framing, focus on the deck joists. Space them according to your chosen decking material’s span requirements—using wider spans without proper support can lead to warped boards and safety hazards. A useful test, detailed here, helps determine if your joists are spaced correctly. Install blocking between joists for additional stability, especially in high-traffic areas. This substructure acts as the skeleton; get it right, and everything else follows smoothly.
Choose and Install Decking Carefully
Select high-quality decking material suited to your climate—composite, cedar, or redwood, for example. I opted for composite for its low maintenance, but I paid close attention to the installation details to prevent squeaking. Use the right drill bits, as explained here, for secure fastening. Space the planks evenly, leaving gaps for drainage. To add an aesthetic touch, consider installing a contrasting picture frame border—more info here. Properly fastened and spaced boards will last longer and look more professional.
Balance Safety and Style with Railings
Railings should be sturdy, 36-42 inches high, and meet local building codes—so double-check these requirements. For visual appeal, add modern lighting fixtures or decorative brackets. During the build, I made sure all guardrails were secure by wiggling them—safety first! Incorporating lighting not only enhances evening ambiance but also improves safety. For ideas, see this collection.
Finish with a Protective Seal and Final Touches
Once construction completes, treat your deck with a high-quality sealer to protect against moisture and UV damage—more details available here. Sanding the surface first ensures better adhesion and smoother finish. Add personal style elements, like planters or cozy furniture, to transform your deck into an inviting oasis. Remember, regular maintenance will keep your investment looking great for years—cleaning and sealing annually is a good rule of thumb.
When homeowners consider working with a deck builder in Needham, many believe that choosing the lowest bid guarantees the best value. However, in my experience, focusing solely on price often leads to subpar results and costly repairs down the line. A common myth is that all deck builders are equally skilled; in reality, craftsmanship, experience, and attention to detail vary widely. Overlooking these factors can result in uneven joist spacing or improper support, which compromises safety and longevity. For advanced DIY enthusiasts, understanding the importance of a precise joist layout is crucial—improper spacing can cause boards to warp or squeak, as discussed in this post. Many clients overlook the nuance that not all materials perform well under different climates; for instance, certain composite decks might not be suitable without proper sealing, which I cover in this article. One hidden trap is neglecting water management—failure to include proper flashing tape or gutters can lead to rot and structural damage over time. In my experience, qualified Needham contractors prioritize these details, ensuring your deck remains sturdy and attractive. For those planning to level uneven ground, remember that DIY leveling is feasible but requires careful consideration to avoid future instability—see this guide. The advanced mistake many overlook is underestimating the importance of a well-designed support structure, especially when adding features like built-in seating or lighting. Investing in a detailed plan and consulting professional insights can save you from costly mishaps. Have you ever fallen into this trap? Let me know in the comments.Maintaining a beautiful, durable deck requires more than just initial construction; it demands the right tools and consistent care to ensure it stays functional and stylish over the years. One essential piece of equipment I rely on is a high-quality electric sander. I prefer using a random orbital sander because it provides a smooth finish without gouging the wood, which is vital for preparing surfaces before sealing or staining. For more persistent grime, I turn to a deck-specific pressure washer, but I always use a wide fan tip to avoid damaging the surface—this approach, explained in detail here, ensures efficient cleaning without risking structural harm.
Regular inspection tools also play a crucial role. I keep a sturdy flashlight on hand to detect water damage or rot that might be hidden in shadowed areas, especially in joints and beneath the railings. Spotting issues early can prevent costly repairs down the line. My go-to is a moisture meter, which helps determine if wood has absorbed more water than it should—prompting me to address leaks or sealant failures promptly. These tools are invaluable, especially as the trend in deck maintenance shifts toward proactive care in protecting structural integrity over time.
For ongoing upkeep, I recommend investing in a high-quality sealant applicator. A pump sprayer with adjustable nozzles provides uniform coverage, reducing application time and waste. Applying a sealant like the ones discussed here is most effective when the surface is clean, dry, and free of old paint or stain—sanding or a thorough cleaning first can make a significant difference.
Looking ahead, I see a growing shift toward smart maintenance solutions, such as app-controlled sprayers or moisture sensors connected to home systems, making deck care even more effortless. Embracing these innovations could save you time and money while extending your deck’s lifespan.
How do I maintain my deck over time? The key is a disciplined routine: regular inspections, timely cleaning, and professional-grade tools. Don’t wait until you see warping or splitting; early detection allows for simple repairs that keep your space safe and inviting. For example, I often use the leveling techniques learned earlier to adjust uneven areas during routine maintenance, preventing future problems. If you’re ready to step up your deck care, I highly recommend trying a combined approach—use a moisture meter regularly and clean with the right gear to stay ahead of potential issues. With the right tools and habits, your deck can continue to be the centerpiece of outdoor enjoyment for years to come.
The Hardest Lesson I Learned About Deck Builders Needham
One of the biggest surprises I encountered was how overlooked details during the planning phase can lead to costly mistakes down the line. I learned that paying close attention to water management and structural support from the start ensures your deck remains safe and beautiful for years.
3 Myths About Deck Builders Needham That Held Me Back
I believed that choosing the lowest bid guaranteed quality, but I soon realized that experience and craftsmanship are more important than price alone. Also, I thought all composite decking was maintenance-free, but proper sealing and care are essential to ensure longevity—something I discovered after some early frustrations.
What Experts Won’t Tell You About Deck Builders Needham
Many professionals focus on aesthetics, but the true expertise lies in understanding the local climate and materials suitable for Needham’s weather. A contractor who emphasizes water-shedding features and proper flashing can save you from rot and structural issues later on. Learning about these nuances has been a game-changer for me, and I recommend asking your builder about their approach to moisture protection and material selection.
Where to Go from Here
If you’re ready to elevate your backyard, start with a solid foundation by reviewing your current deck’s support system. Consider investing in quality tools like moisture meters and sealant applicators to maintain your deck proactively. For those planning a new build, exploring resources like color trends and lighting ideas can help transform your space into a personalized outdoor sanctuary. Remember, a well-designed deck is more than just a structure—it’s an extension of your home and lifestyle, waiting for your personal touch.