I remember the moment vividly. I was sitting on my backyard deck, mug in hand, when I realized something was missing—privacy. My neighbors’ curious eyes and backyard noise turned an outdoor oasis into a constant show-and-tell. Frustrated, I knew I had to find a solution that was both effective and straightforward. That lightbulb moment led me down a path of trial, error, and ultimately success, in adding a privacy fence to my deck frame.
The Power of a Privacy Fence and Why It Matters Now
In today’s busy world, having your own private outdoor space is more than a luxury—it’s a necessity. Whether you’re lounging with family, entertaining friends, or enjoying a quiet evening with a good book, privacy enhances the experience immensely. But while installing a new deck can be exciting, making it private without dismantling your entire structure or shelling out a fortune can seem daunting.
Trust me, I’ve been there. My early attempts were plagued with mistakes—like attaching fencing directly to the deck boards instead of the frame, which led to instability and an unsightly appearance. Early on, I learned that the key isn’t just in choosing the right materials but also in understanding the best way to incorporate a privacy fence into your existing deck frame seamlessly.
Don’t settle for fences that look out of place or compromise your deck’s integrity. With the right approach, you can add privacy fencing that enhances your outdoor space’s look, feel, and functionality. If you’re tired of feeling exposed or simply want a cozy retreat, this guide will walk you through the proven steps based on personal experience and expert advice.
In fact, according to the National Association of Home Builders, privacy fences can increase your property’s value and curb appeal—think of it as an investment in your outdoor living space. But the trick is doing it right, avoiding common pitfalls that can turn your project into a costly headache.
Are you ready to turn your deck into a private sanctuary? Let’s dive into the practical steps to get this done efficiently and beautifully.
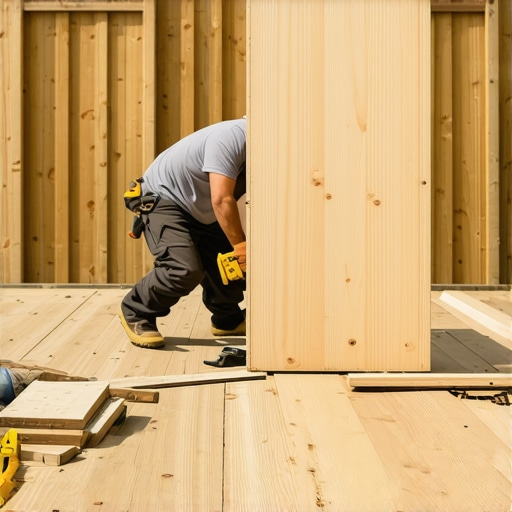
Preparing Your Deck Frame for Privacy Fencing
Start by assessing your current deck structure. Use a level to check that all beams and joists are even; uneven surfaces can cause fencing to look crooked or become unstable. I vividly recall my first attempt—an uneven deck resulted in wobbly posts and frustration, but I fixed this by carefully shimming the uneven joists before proceeding. Gather the materials needed: pressure-treated lumber, stainless steel screws, concrete mix, post anchors, and fencing panels.
Measure the perimeter of your deck to determine how much fencing material you’ll need. Consider the height of privacy you desire; most fences range from 6 to 8 feet. Mark the exact points where you’ll install the posts, ensuring they are spaced evenly—typically 6 to 8 feet apart—to support stable fencing. It’s crucial to ensure each post is plumb and securely anchored in concrete. I recommend pouring concrete into post sleeves instead of directly setting posts; this simplifies adjustments and future removal if needed.
Installing the Fence Posts Securely
Lay out the positions for your fence posts based on your measurements. Use string lines to keep the posts aligned horizontally and vertically. When setting each post, dig holes at least 12 inches deep, wider at the top to accommodate anchors. Pour a layer of gravel for drainage, then set the post with concrete. I learned this hard way—skipping proper drainage led to rot and wobbling posts within a year. Allow the concrete to cure for at least 24 hours before attaching fencing panels.
Tip: For a cleaner look, consider using post sleeves that bolt onto the deck frame, especially if you want to avoid penetrating the deck surface itself. This method also simplifies future modifications. Check for level and plumb after pouring concrete to ensure the posts are perfectly upright. Remember, a crooked fence looks unprofessional and can compromise stability.
Attaching Fencing Panels for Privacy and Style
Once all posts are securely in place, start attaching your fencing panels from one end, working your way around the deck. Use stainless steel screws to prevent rust and ensure longevity. Secure panels firmly to the posts, following manufacturer instructions. For extra stability, consider adding horizontal support beams between posts—this is especially useful in windy areas. When joining panels, ensure gaps are minimal to maintain privacy; if panels are too wide, consider adding decorative features or overlapping slats.
During my project, I faced a challenge where the last panel didn’t quite fit due to slight measurement errors. I fixed this by trimming the panel with a circular saw and adjusting the neighboring panels. It’s better to measure twice and cut once to avoid time-consuming fixes later. If you’re considering energy efficiency, check out solar-powered fans to improve ventilation behind the fence.
Final Touches and Maintenance
Finish your installation by sealing or staining the fence if using wood, which protects against weather damage. Regular maintenance, like cleaning greasy food spills (learn more here), and inspecting for rotting or loose panels, will extend the life of your privacy fence. Keep an eye on the posts, especially after harsh winters, to prevent leaning or collapse.
When it comes to hiring a deck builder in Needham, many homeowners believe they just need to choose the lowest bid or pick the most colorful portfolio. But real expertise goes beyond surface-level assumptions. One common myth is that all deck builders are equally skilled at handling complex designs or code requirements. In my experience, overlooking the nuance of local building codes and permit processes can lead to delays and costly rework—something I learned the hard way. For instance, some think that off-the-shelf materials suffice, but in Needham’s climate, the choice of wood or composite decking can significantly impact longevity, especially when considering winter damage and moisture. Most people don’t realize that a seasoned deck builder integrates structural engineering principles—like proper joist sizing—early in planning, which prevents sagging or failure over time. When selecting a contractor, homeowners often focus solely on price, but the hidden truth is that quality installation and adherence to safety standards have a direct impact on your deck’s lifespan and safety. For advanced homeowners wondering about ensuring your deck’s stability, understanding the importance of correct joist spacing and support system can’t be overstated. For example, choosing the right joist size is crucial for supporting heavy loads and preventing creaking or collapse. Furthermore, a common mistake is neglecting ventilation; inadequate airflow underneath the deck can accelerate rot, especially in humid seasons. According to expert studies, proper airflow reduces moisture buildup, extending your deck’s lifespan—check out spring prep tips for more insights. Let’s also question whether your current deck design maximizes sunlight and natural warmth, which are essential for year-round enjoyment—consider design strategies here.
Are you aware of how small details, like using stainless steel screws instead of basic ones, can save you money and hassle over time? For instance, smart fastener choices ensure your deck resists rust and corrosion effectively. Let’s not forget the importance of planning for future upgrades—adding solar-powered fans (a topic I’ll cover at some point) can keep your space cool during summer.
Have you ever fallen into this trap? Let me know in the comments. Ultimately, understanding these hidden nuances and avoiding complacency ensures your deck not only looks great but stands the test of time—making your investment worthwhile and your outdoor space truly enjoyable.Maintaining a beautiful, functional deck requires more than just initial craftsmanship; it demands the right tools and ongoing upkeep. Over the years, I’ve discovered that investing in specialized equipment not only streamlines the process but also extends your deck’s lifespan. One of my go-to tools is a high-quality cordless oscillating multi-tool. Its versatility allows me to easily sand, scrape, and cut materials right on site, making tasks like removing old stain or trimming new decking pieces much faster and more precise. Pairing this with a durable electric pressure washer ensures your deck remains clean without risking damage—especially crucial when dealing with stubborn grime or algae buildup during the humid months.
For intricate tasks, like sealing tight corners or reaching under railings, a flexible-detail spray gun has proven invaluable. I personally prefer models with adjustable pressure settings, which help prevent surface damage and achieve an even coat of stain or sealant. Regarding maintenance software, I rely on project management apps like Trello or Asana to schedule periodic inspections, cleanings, and repairs—keeping everything organized, especially when juggling multiple projects or coordinating with contractors. This proactive approach saves time and prevents small issues from snowballing into costly repairs.
Predicting future trends, I believe that integrating smart technology will become more commonplace. Automated deck monitoring systems powered by IoT devices can alert homeowners to structural weaknesses or moisture problems before visible signs appear. Imagine receiving a smartphone notification that your joist spacing is compromised or that moisture levels beneath the deck exceed safe thresholds—making preventive maintenance more accessible than ever.
How do I maintain my deck tools and ensure long-term performance?
Cleaning your power tools after each use is essential. For instance, rinsing and drying your pressure washer prevents corrosion, especially in a climate like Needham’s. Lubricating moving parts annually keeps everything running smoothly. Storing tools in a climate-controlled garage or shed also shields them from extreme temperatures and moisture. Additionally, replacing blades, brushes, and filters at recommended intervals sustains performance and safety—consult specific manufacturer guidelines for best practices. Using high-quality accessories not only enhances efficiency but also reduces the risk of tool failure.
In terms of software, updating your project management app periodically ensures compatibility with new features that aid scheduling and reminders. As technology advances, I foresee a rise in DIY-friendly smart diagnostics, perhaps via apps connected to sensors embedded in your deck’s structure—making maintenance more proactive and less reactive.
If you’re looking to take your deck care to the next level, I recommend trying a high-end cordless oscillating multi-tool for small repairs and detailed work. Its precision can significantly improve the quality of your repairs and refinishing projects, saving you time and money in the long run. Remember, diligent maintenance combined with the right tools safeguards your investment and ensures your outdoor oasis remains inviting year after year. For more tips on protecting your deck, check out the comprehensive guides on [spring deck prep to prevent summer rot](https://deckbuildersneedham.com/essential-spring-deck-prep-to-prevent-summer-rot) and [how to use decking scrap for small yard projects](https://deckbuildersneedham.com/how-to-use-decking-scrap-for-small-yard-projects).
What I Wish Someone Told Me About Creating a Perfect Privacy Fence
One of the most valuable lessons I learned was that patience pays off. Rushing through measurements or skipping the planning phase often led to skewed panels or an uneven look. Taking the time to double-check measurements, especially when dealing with uneven terrain or existing structures, saved me from costly adjustments later. I also realized that choosing quality materials and proper fasteners like stainless steel screws significantly boosts the durability of your privacy fence, especially in climates like Needham’s.
Another insight was the importance of integrating the privacy fence thoughtfully into the existing deck frame. Instead of attaching fencing directly to deck boards—which can cause instability—I learned to support the fence using dedicated posts anchored securely in concrete or using post sleeves. This approach prevents wobbly panels and preserves the integrity of your deck for years to come.
Lastly, I discovered that adding smart features, like integrated lighting or even solar-powered fans, can turn your privacy fence into a multifunctional enhancement. For example, solar fans can improve ventilation and keep your outdoor space comfortable during hot summer days, making your privacy investment even more worthwhile.
Tools That Changed My Approach to Deck Privacy and Maintenance
Over the years, I’ve come to rely on a handful of tools that make maintaining and enhancing my deck easier. A high-quality cordless oscillating multi-tool, for instance, has been invaluable for precise repairs, trimming, and sanding tight corners—saving me both time and frustration. When it comes to cleaning, a durable electric pressure washer with adjustable settings effortlessly removes grime without damaging wooden surfaces. These tools, combined with specialized cleaning solutions like safe cleaning products, ensure my deck remains inviting and well-preserved.
To keep track of regular maintenance tasks, I use project management apps such as Trello, which help schedule inspections, cleanings, and upgrades—especially when juggling multiple projects around the house. I also foresee the integration of smart sensors in decks that could warn about moisture buildup or structural issues before they become visible, transforming maintenance from reactive to proactive.
Investing in these tools has paid dividends. For example, replacing standard fasteners with stainless steel fasteners prevents rust and corrosion, extending the life of my privacy fence and deck structure. If you’re serious about safeguarding your outdoor haven, I highly recommend trying a versatile multi-tool for those tricky repairs and refinishing projects.